Google is finally rolling out the Android 15 update, and it includes one of the greatest features ever added to stock Android. A major complaint people have about Android or rather Pixel UI is the lack of app cloning, locking, or hiding features, and Private Space addresses that. Here’s everything you need to know about Private Space and how to use this new feature on Android 15.
What Is Private Space in Android 15?
Private Space in Android 15 allows you to lock sensitive apps to protect them and their contents from others. This feature keeps the apps on a separate user profile so that the apps in Private Space pause when it’s locked. As a result, it doesn’t show notifications from apps that are in Private Space. These apps are also hidden from recent apps and settings.
Similarly, the files downloaded using Private apps are stored in that separate user profile. But the photo picker can give access to content in two separate spaces when Private Space is unlocked.
How to Set up Private Space on Android
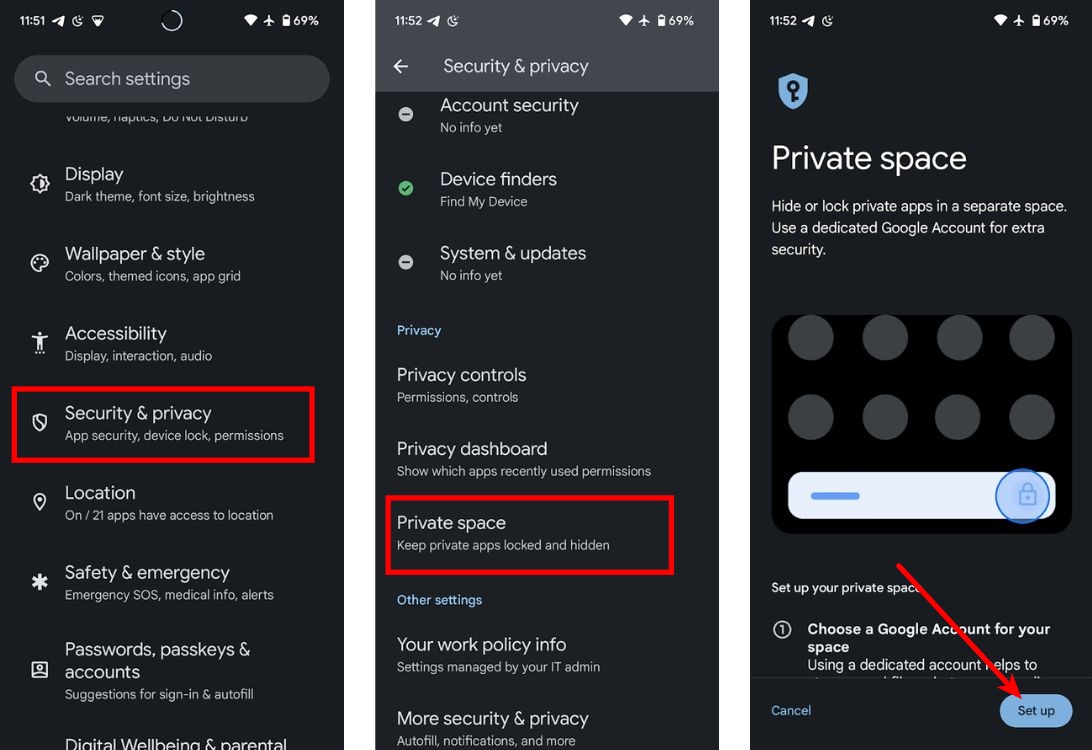
To use Private Space on your Android phone, you first need to enable it from Settings. Here are the steps to do that:
- Launch the Settings app.
- Go to Security & privacy > Private Space.
- Use your fingerprint or PIN code to access Private Space.
- On the Private Space screen, tap on Set up.
- Private Space will ask you to create a Google Account. Select Skip to add it later.
- You will then be asked to choose between a new lock or an existing screen lock. Pick whichever option you’re comfortable with.
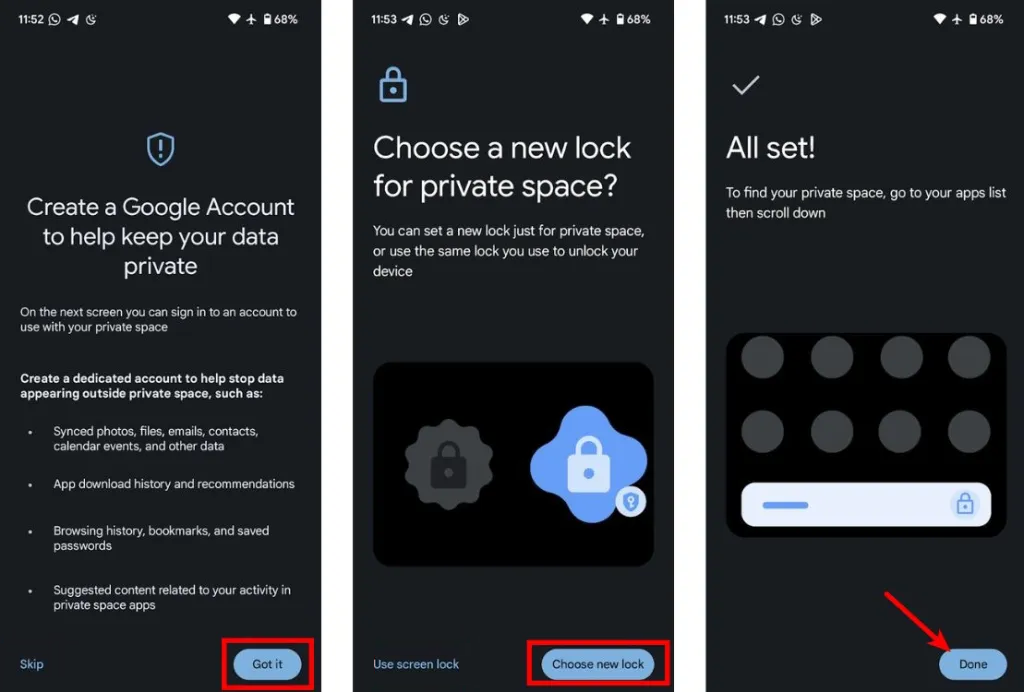
Private Space should now be ready and accessible via the App drawer on your Android phone. So, let’s learn how you can use the feature.
How to Add Apps to Private Space & Access Them
To get started, swipe up to open the app menu on your Android phone. Then, long press on any app to open the context menu. Then, select the “Install in private” app option to move the app you wish to hide from everyone. It will then be installed in the Private Space.
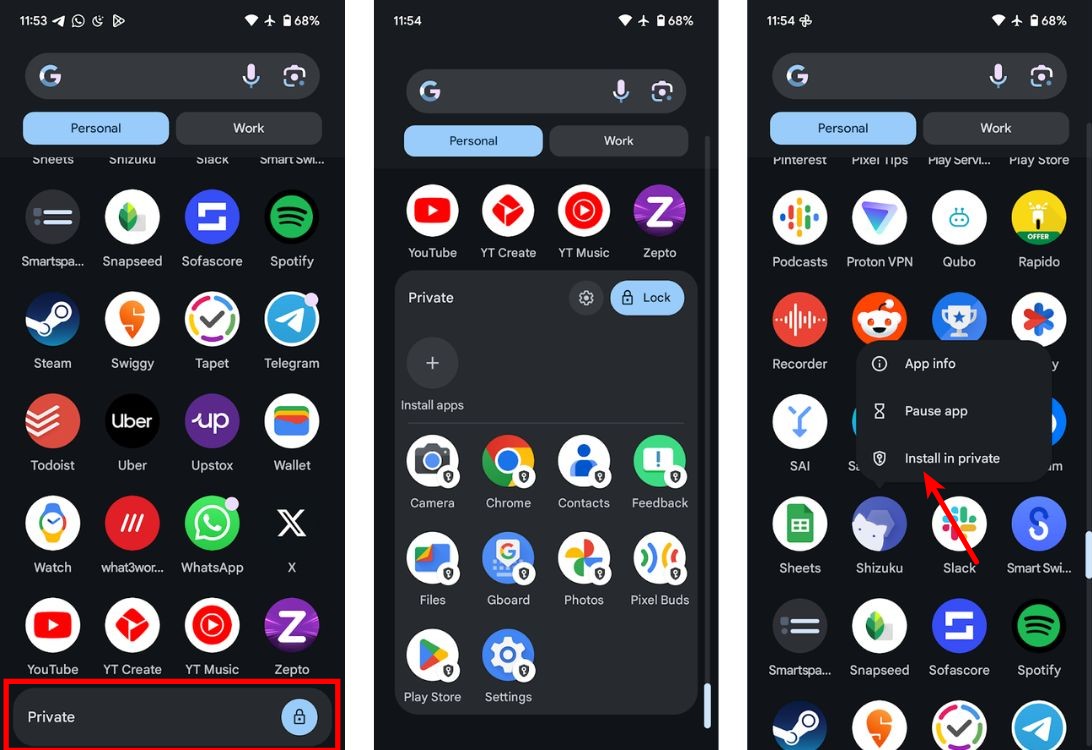
Once an app has been installed and moved to the Private Space, here are the steps to access it:
- Scroll to the end of the App drawer to find the Private space and tap on it.
- Enter the passcode or fingerprint you used when setting up Private Space.
- If the password or fingerprint is correct, Private Space will be unlocked.
How to Change Private Space Settings
If you want to hide the Private Space, change the lock timeout, or change the PIN, you can do so quite easily. Here’s how:
- Scroll down to the bottom of the App drawer in the Pixel launcher.
- Then, use your biometrics or PIN code to unlock Private Space.
- Once unlocked, tap the cogwheel icon to open Private Space settings.
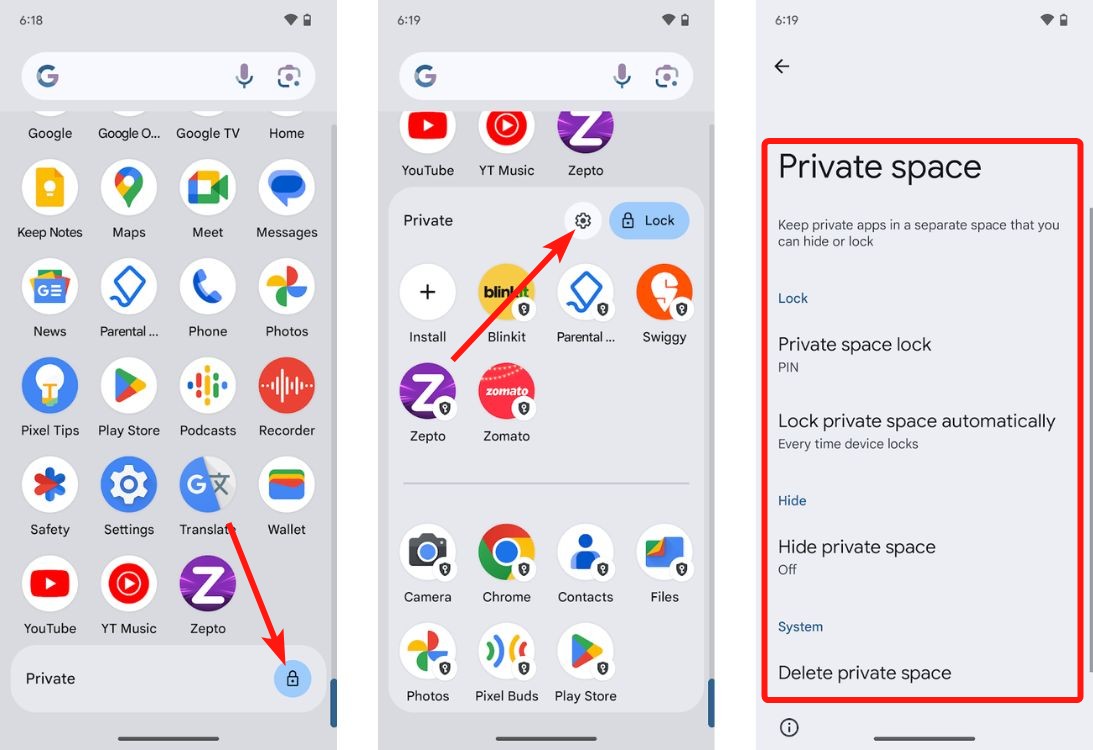
Hide Private Space
The option to hide Private Space ensures no one can see the section in the Pixel launcher. Here’s how to do so:
- Open Private Space settings.
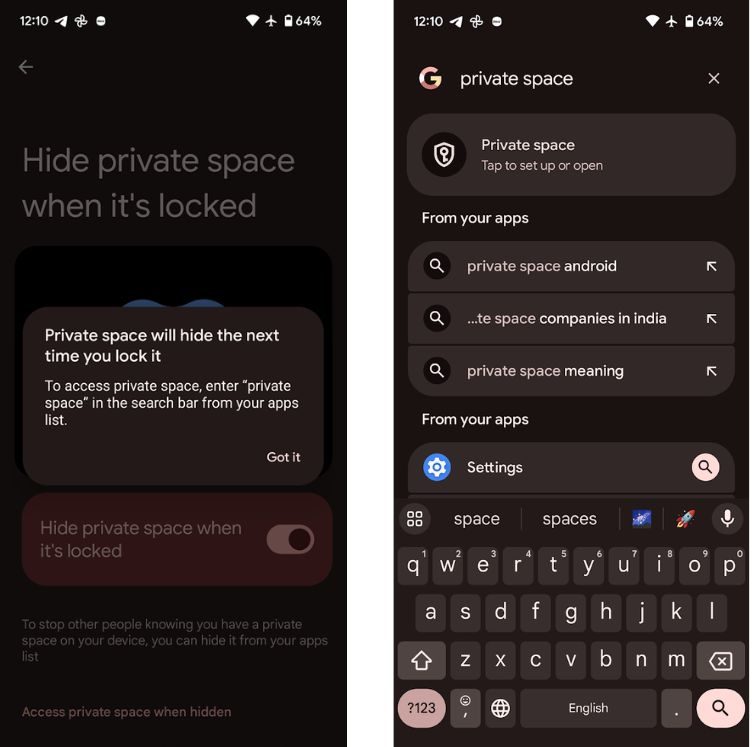
- Tap the Hide private space option.
- Turn on the Hide private space when it’s locked toggle.
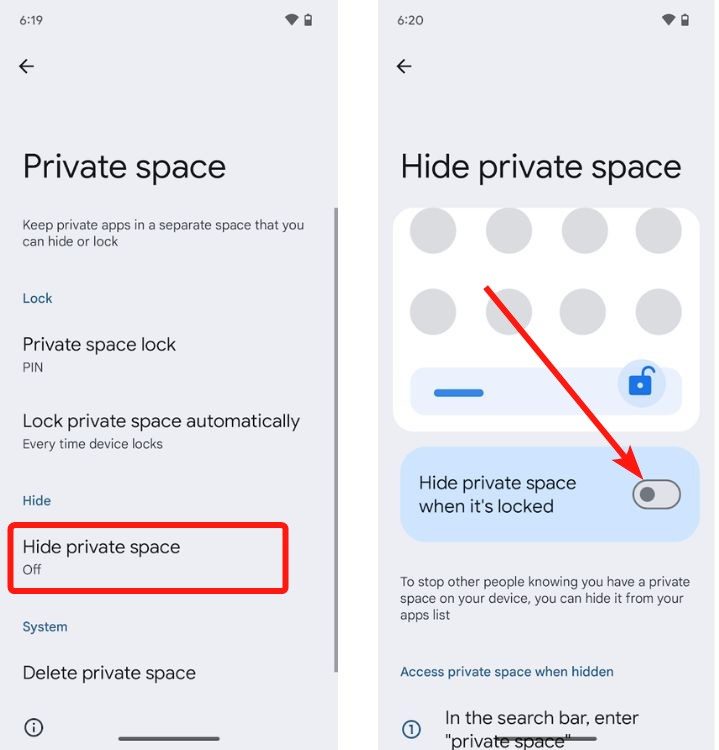
So, now, you’ve hidden the Private Space. How do you access it now? Well, once enabled, you can simply type and search for “Private Space” in the App drawer search bar to access it.
Lock Private Space Automatically
Private Space will be automatically locked as soon as your device is locked. However, you may want to change that if you want the feature to take a bit longer to lock. Fortunately, Private Space settings let you do that.
- Open Private Space settings.
- Tap the Lock Private Space automatically option.
- Select the 5 minutes after screen timeout or Only after device restarts option.
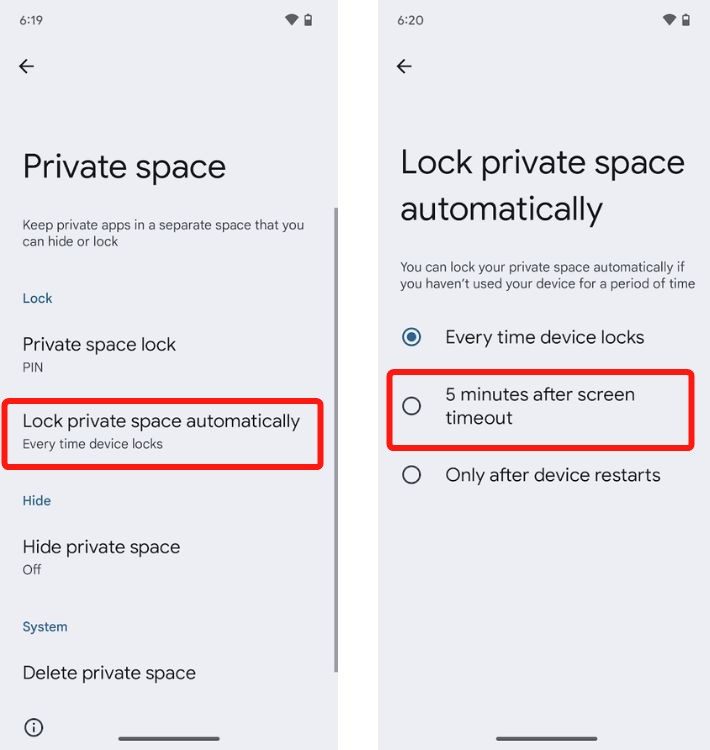
If you select the former, the Private Space will be automatically locked five minutes after screen timeout. You could also select the Only after device restarts option but we wouldn’t recommend doing that as your apps wouldn’t be as private as you think.
Change Private Space Lock
If you want to change the existing PIN or fingerprint, you can do so quite effortlessly. Here’s how you can do that:
Open Private Space settings > Private space lock. You can either turn on the use device screen lock option, which will set your phone lock as the default Private space lock.
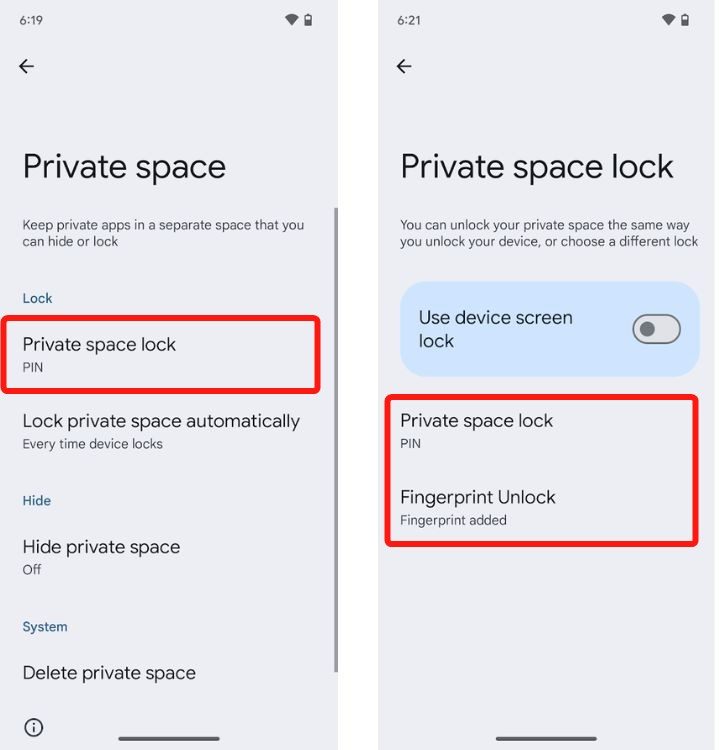
Or, you can tap Private space lock > enter your current PIN > and then enter a new PIN. Moreover, you can also tap on Fingerprint Unlock to register a new fingerprint for Private Space.
How to Share and Access Files from Private Space
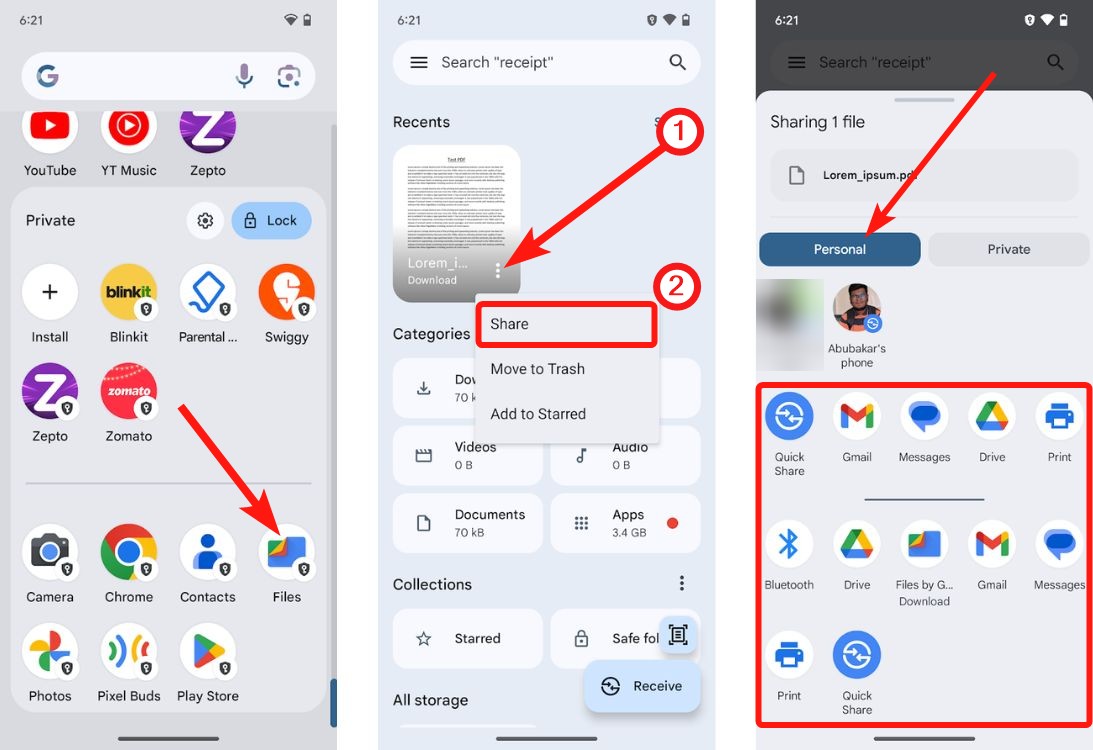
You can access files and folders in Private Space and share them with apps in both Private Space and Personal Space. Files by Google is one of the apps that’s preloaded in Private Space. Users can use the same to access and share files. Here’s how:
- Go to Private Space and tap the Files app icon.
- You should now see all your downloaded files.
- Tap a file you want to share and tap the Share icon.
- In the tray that opens, tap Personal and select the app you want to send the file to.
How to Remove Apps From Private Space
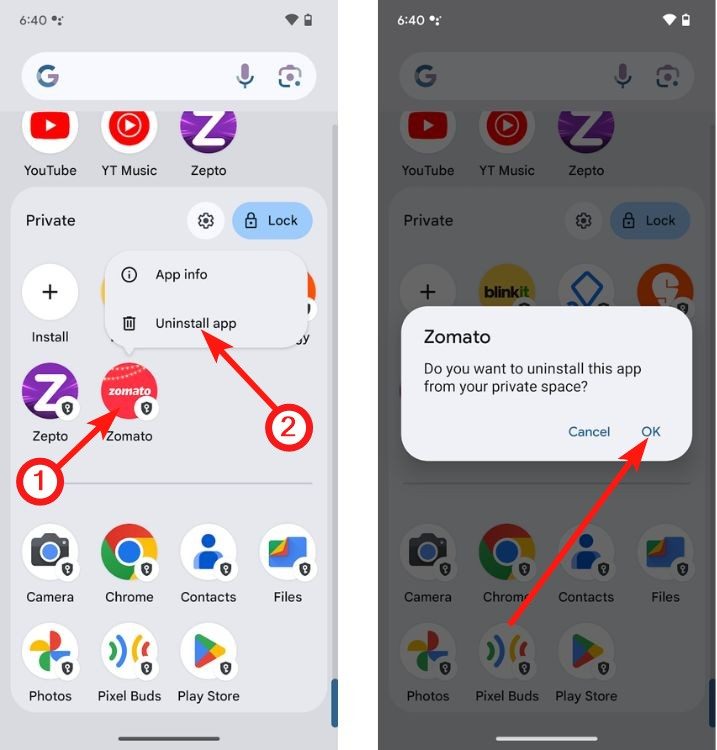
Apps in Private Space are divided into two sections — Installed and Preinstalled apps. The apps you install from the Play Store appear at the top while the preinstalled apps appear at the bottom, right after a dividing line. To remove the installed apps:
- Unlock Private Space.
- Long press an app in the top section to bring up more options.
- Then, tap on the Uninstall app.
- Tap OK in the confirmation pop-up that appears.
How to Delete Private Space on Android
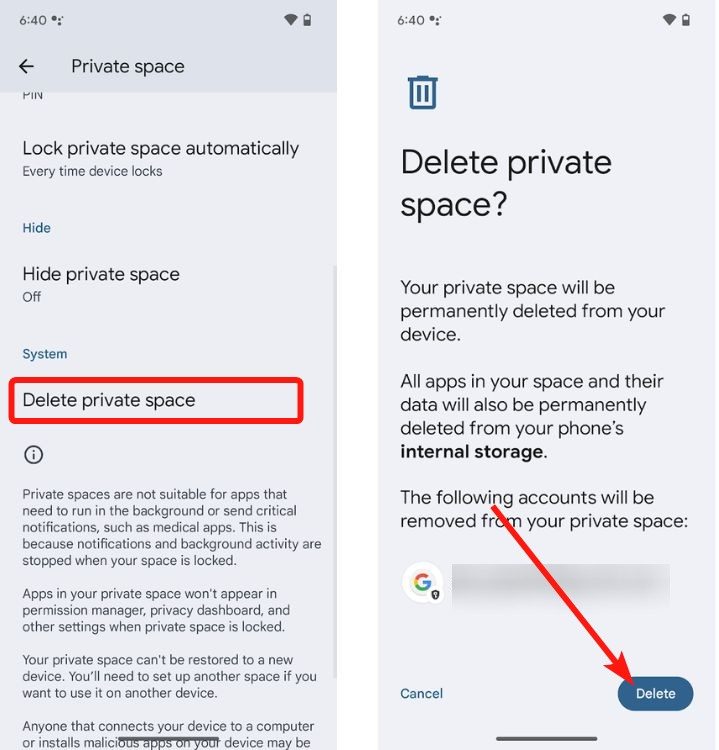
If you no longer require the Private Space, you can easily delete it. Just make sure you’ve backed up all your important files in the apps in Private Space before you proceed.
- Go to Private Space settings.
- Scroll down and tap on Delete Private Space.
- Tap Delete on the next screen once again.
- Enter your Private Space PIN to delete it.
Things to Remember While Using Private Space
Here are a couple of the things about the Private Space feature on Android that are worth noting:
- You can add the same Google account as the main account in your regular user profile.
- When in Private Space, you’ll see a key enclosed in a shield logo in the notification bar. This will make it easier if you don’t know which space you’re currently in.
What are your thoughts about Private Space on Android? Is it exactly what you expected it to be? Which Android 15 feature are you most excited about? Let us know in the comments below.