Tag: Computers

  • How to Sign in to your Apple Account using Passkeys in iOS 17

    Apple introduced Passkeys in iOS 16 with an aim to deliver a secure password-less sign-in experience. Since then, you could easily create and use Passkeys on your iPhone and Mac. With iOS 17 and macOS Sonoma, Apple automatically generates a passkey for your Apple ID that you can use to log in to iCloud and Apple websites. It means you can easily sign in to your Apple account without a password. All you need is a device with iOS 17 or macOS Sonoma, and Apple will take care of the rest. In this quick hands-on guide, we’ll tell you how to use Passkeys on iOS 17 to sign in to your Apple account on any device. Without any ado, we should get started.

    How to Sign in with a Passkey on iOS 17

    As long as you’re using a device with iOS 17 or macOS Sonoma, Apple will automatically assign a Passkey for your Apple ID. You can then use your Face ID or Touch ID to authenticate your login on Apple websites like apple.com, iCloud.com,or appleid.apple.com. It means you won’t have to enter the password every time you wish to log in to your accounts. It’s particularly helpful in situations when you’ve forgotten your Apple ID password. Here’s how to do it:

    Before you proceed, make sure that you have created passkey on iPhone and saved it in iCloud Keychain. Check out our article to learn how to create passkey on iPhone.

    Note: Before you begin, make sure your iPhone and the other device are connected to the internet and have Bluetooth turned ON.

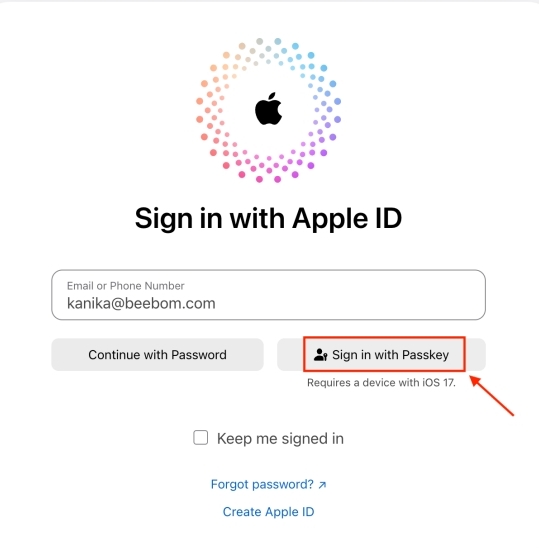
    • On your Mac, PC, or Android device, open appleid.apple.com, iCloud.com, or any other Apple website where you want to sign in.
    • Tap on the Sign In button and enter your Apple ID.
    • Then, tap on ‘Sign in with Passkey‘.
    Sign in with Passkey
    • This will bring up a QR code on the screen. Scan the QR code using your iPhone.
    Scan the QR Code to use Passkey on iOS 17
    • When you do this, you’ll see a pop-up on your iPhone asking if you want to “Use Face ID to sign in. Tap on Continue.
    • Once the Face ID authenticates, you’ll be signed into your account without having to enter your Apple ID password.

    Frequently Asked Questions

    1. What are Passkeys on an iPhone?

    A passkey is a replacement for a password that is faster, easier to use, and more secure. Contrary to passwords, passkeys rely on Face ID or Touch ID to identify you on a supported website or app. It’s a cryptographic entity that’s always strong, resistant to phishing, and not visible to you. Just like a password, a passkey is also end-to-end encrypted so that no one, not even Apple can read it.

    2. Is Passkey support available on iOS 17?

    Yes, iOS 17 supports Passkeys on an iPhone. In fact, iOS 17 and macOS Sonoma can automatically generate your Apple ID passkeys so you don’t have to enter passwords to sign in to Apple websites. Instead, you can use an iOS 17 device to use a Face ID or Touch ID to authenticate your login.

    So you see, it’s that easy to sign in to your Apple account without entering a password. Since FIDO Alliance and W3 standards govern the Passkeys, Apple claims that they profoundly improve security. With this newly added passkey support, it seems that passkeys will keep up with their promise to replace passwords for good.

    Kanika Gogia

    73 Posts

    Kanika has been a loyal iPhone user since 2014 and loves everything Apple. With a Master’s in Computer Applications, passion for technology, and over five years of experience in writing, she landed at Beebom as an Apple Ecosystem Writer. She specializes in writing How To’s, troubleshooting guides, App features, and roundups for Apple users to help them make the best use of their gadgets. When not writing, she loves to try out new recipes and enjoy some family time.

    Source

  • Take Control of Your Privacy: How to Disable Instagram Web Activity Tracking

    It goes without saying that most social media apps and websites offer little to no privacy for your data. Yes, there are some apps and websites that let you browse privately. But in the case of most apps and websites, you give your data for accessing them without any money. The good news is now Meta allows you to block Instagram web activity tracking.

    And it’s not just Instagram; Meta is now offering a few extra controls in the Accounts Center section of Messenger and Facebook too. These additional controls could give you more control over your data, offering you a little more privacy. Some of these settings, however, aren’t really about privacy.

    But one setting in particular lets you “manage how information other businesses send to us is connected to your Facebook and Instagram accounts.” Here, you can check which businesses are sharing data with Meta. Alongside that, you can clear the previous data and prevent future web activity tracking from taking place.

    How to Block Web Activity Tracking on Instagram

    Most Instagram users don’t really know that the app is tracking the web activity in some way. But there were some clear signs. For example, the social platform would serve you ads for a product that you have recently searched for. The good news is that Meta is allowing you to block web tracking on Instagram with the new setting. Here’s how you can activate it:

    1.      Get into Your Instagram profile

    Open your Instagram app and press your profile picture from the bottom right corner of the app. This will get you in your Instagram profile.

    Settings and Privacy on Instagram and Facebook

    2.      Navigate to the Settings and Privacy Settings

    After getting into the Instagram profile, press the three horizontal lines that appear in the top right corner. Tap on “Settings and privacy” from the options that are presented afterward.

    3.      Go to the Accounts Center

    Tap on Accounts Center, which will be the first option when you go to the “Settings and privacy” screen.

    Accounts Center on Meta

    4.      Get in the Activity Options

    Press on “Your information and permissions” after getting into the account center screen. Then, press on “Your activity off Meta technologies.”

    Gizchina News of the week


    Activities off Meta on Instagram

    5.      Select What Privacy Action You Want to Take

    You will see a couple of options here. To see which of the apps have been sending information to Meta, press “Recent activity.” If you want to prevent particular apps from sending data to Meta, tap on “Disconnect specific activity.”

    Downloading Information from Instagram

    Press the “Clear previous activity” to wipe all the previous data sent to Instagram. And lastly, press “Manage future activity” to prevent businesses from sending data in the future.

    If you press the “Disconnect future activity” after selecting “Manage future activity,” you can clear the previous activity data from Instagram as well. After pressing this, you should get a confirmation. It says that Meta will disconnect information from organizations and businesses that send Meta information about your interactions with them.

    Why Does Instagram Track Your Web Activity

    As hinted earlier, Instagram uses your web activity to offer you personalized ads. This data is often sold to Meta from the platforms you interact with. Now, personalized ads are better than seeing random ads. At least, that’s what most people think. But it’s better to have control over your data.

    Accounts Center

    So, it’s better to cut the line between your Instagram profile and the organizations that track your personal data. And this option to disable Instagram web activity tracking is already available on Facebook. The steps are the same, which means you can do the same for your Facebook and Messenger app if you want to.


    Source

  • Big changes coming to Granblue Fantasy Versus Rising, see patch notes here


    Arc System Works is preparing to release Granblue Fantasy Versus Rising in late November, and after some initial backlash from fans concerning simple vs. technical inputs, developers are aiming to return to audiences’ good graces.


    A good many updates have been detailed on 4gamer, including some to the aforementioned technical inputs. We’ve rounded them all up for you to view so you can see what kinds of changes are en route.


    The issue fans were initially pushing back against came from the fact that developers had decided that Rising would offer the exact same results regardless of if players were using simplified or technical inputs.


    Many modern fighting games are offering a simplified approach to traditionally complex controls, but almost always with some kind of handicap since simplified inputs can be done more quickly.


    Cries seem to have been heard loud and clear, as these latest patch notes detail how using technical inputs will result in 10% more damage than their simplified counterparts.


    “Considering the physical difference in speed when activating a skill using technical inputs compared to simple inputs,” say devs, “we’ve added an advantage to technical inputs instead of a disadvantage to simple inputs.”


    There are also alterations to Ultimate skills, dash attacks, throws, bravery points, raging strikes, brave counters, skybound arts, and raging chains. All of these can be read via the graphics below, and we’d love to hear what you think of them as we grow closer to GBFVR’s November 30 release date.


    Granblue Versus Rising Patch Notes image #1

    Granblue Versus Rising Patch Notes image #2

    Granblue Versus Rising Patch Notes image #3

    Granblue Versus Rising Patch Notes image #4

    Granblue Versus Rising Patch Notes image #5

    Granblue Versus Rising Patch Notes image #6

    Granblue Versus Rising Patch Notes image #7

    Granblue Versus Rising Patch Notes image #8

    Granblue Versus Rising Patch Notes image #9

    Granblue Versus Rising Patch Notes image #10

    Click images for larger versions


    Source

  • How to Unlock and Use Fast Travel in Spider-Man 2

    Besides its remarkable story and gripping combat, which we talked about in our Spider-Man 2 review, the game is garnering attention for how seamless its fast travel system is. Unlike the previous 2018 title, fast travel in Spider-Man 2 is locked and must be unlocked, but mind you, it’s just so much better this time around. While the process itself is not so difficult, we decided to whip up a quick guide for you all to show you how to unlock and use fast travel in Spider-Man 2. So, without further ado, let’s swing to it.

    Unlock Fast Travel in Spider-Man 2

    If you have started playing Spider-Man 2, you will have already seen Insomniac put a lot of emphasis on mastering Web Wings. They are a cool addition, but there might be times when you don’t want to swing around but fast travel to the next mission.

    Fast Travel in Spider-Man 2 is divided among various districts and locked in what the game is calling District Progress. Each section of NYC has its own District Progress Bar with three different tiers to complete. All of these tiers give some form of reward. To unlock this feature, players need to get to the second tier, after which they can fast travel to and from there.

    Unlock Fast Travel Spider-Man 2

    In order to fill the District Progress bar and unlock fast travel, Spider-Man 2 has various activities spread throughout each section of the map. Once you finish enough activities, the bar automatically moves, and once at the second tier, you get fast travel.

    However, as we mentioned, you must separately unlock fast travel for each district, thereby making this process a bit tedious. While we can’t unlock them for you, we suggest focusing on prominent areas like Midtown, Astoria, Downtown Brooklyn, Upper East Side, and the Financial District. These are spread through NYC and will make your life a lot easier.

    Use Fast Travel in Spider-Man 2

    Once you have unlocked fast travel in Spider-Man 2, it’s actually quite effortless to use it. Follow our steps below to do so:

    • In the main game, press the touchpad on your DualSense controller to open up the map.
    • Hover over any district where you’ve unlocked Fast Travel and keep holding the “Triangle” button on any area. You will see the fast travel bar fill up.
    fast travel bar spider-man 2
    • And almost immediately, you will see Spider-Man swinging onto your selected district. As unbelievable as that sounds, fast travel in Spider-Man 2 is as easy and quick (see GIF below).
    Spider-Man fast travel

    The fact that the entire process happens in less than two seconds is completely mindblowing and a testament to how hard Insomniac has worked on the game. A Spider-Man 2 has even confirmed the travel bar doesn’t hide a load. You can follow the above steps in any area once you’ve unlocked fast travel everywhere in Spider-Man 2.

    And that’s how you unlock and use fast travel in Spider-Man 2. Make sure to select the exact point, as your Spidey will use it to spawn you there. Once you have grown accustomed to it, play the game right by knowing some handy Spider-Man 2 tips and tricks. Already finished the game? Need help understanding the Spider-Man 2 ending and post-credit scene? We have detailed all that we know, along with some speculations about what’s to come next. Finally, do you have any questions about fast travel? Drop them in the comments below!

    Upanishad Sharma

    239 Posts

    Combining his love for Literature and Tech, Upanishad dived into the world of technology journalism with fire. Now he writes about anything and everything while keeping a keen eye on his first love of gaming. Often found chronically walking around the office.

    Source

  • USB-C CT Scan Reveals the True Difference Between a Cheap vs Expensive USB-C Cable

    As I’ve said before, all electronic devices should come with USB-C ports. Micro-USB makes no sense anymore, as the new standard brings better performance and many convenient features. But we often skimp on these cables, choosing cheap ones over expensive ones. A USB-C CT scan has just shown why you shouldn’t make such choices.

    Folks at Lumafield have put various USB-C cables under the X-ray CT scanner. Their goal was to find out why the $5 cables cost so little and what marvels the $129 cables hold. The results are fascinating, and the 3D scans that the team shared get the point across beautifully.

    What Did the USB-C CT Scan Show?

    Lumafield first scanned a $5.59 USB-C cable that’s from NiceTQ. In this scan, the team saw a bare minimum cable. More importantly, the pins and connector shells of the cheap USB-C are floating independently in over-molded plastic. Yes, the cable had zero shielding.

    Cheap USB-C Cable CT Scan

    Out of the eight pins present in the cheap USB-C cable, only four of them were connected. And the worst part is that they were soldered directly to the cable’s wire. You can check out the CT scan of this specific USB-C cable in the image attached below.

    Cheap USB C Cable Connector

    Interestingly, the product listing of the cheap USB-C cable promises transfer speeds of up to 10Gbps. That’s basically USB 3.2 Gen 2×1 territory. But as the USB-C CT scan shows, the cable can’t physically offer such performance. It will mas out at 480Mpbs, which is basically a fraction of the promise that the brand is making.

    There are also no redundancy pins on the cheap USB-C cable. That means the cable is dead if one of the four active pins shown in the CT scan stops.

    What About the Expensive USB-C Cable?

    The other USB-C cable that the team has put through a CT scan is Apple’s Thunderbolt 4 cable. This cable costs $129, much higher than the $5 cheap cable. While many might think this is absurd pricing for a USB-C cable, Apple has some good reasons for asking that much amount of money.

    Gizchina News of the week


    Before talking about the USB-C CT scan of this cable, let’s talk about what the cable promises. This Apple Thunderbolt 4 cable promises to deliver a transfer speed of up to 40Gbps over USB 4 and Thunderbolt 4. And up to 10Gbps over USB 3. Also, it offers a charging speed of up to 100 watts. You can also use it to daisy chain up to 6 Thunderbolt 3 devices.

    Apple USB-C CT Scan

    To offer all of these features, Apple has built an incredibly complex cable. And most importantly, the cable features connectors with their own complex PCB assemblies. You can check out the CT scan of this Apple cable in the picture attached below.

    In addition, the CT scan image shows that the Apple cable has 20 separate wires. There are 10 that are co-axially shielded. Also, they are all separately soldered to the PCB. A stain-relief fitting protects all of these intricate components, which is cramped in from 8 directions.

    Thunderbolt shielding

    Lumafield also has two other cables. Among them, there’s the Amazon Basics cable. But this comparison with the cheap cable and Apple cable is truly eye-opening. It shows how intricate USB-C cables can be. Also, the test showcased how difficult it can be for consumers to determine if a cable can truly deliver its promises.

    But the main takeaway is that it is important to purchase USB-C cables from reputed brands only. Without that, you can’t really expect class-leading performance and longevity. Our guide (found here) can help in this regard.


    Source

  • Boruto’s New Rasengan Uzuhiko Explained

    Boruto: Two Blue Vortex is undoubtedly one of the best ongoing manga series right now. It kicked off in the coolest way possible, and the story continues to top our expectations with every chapter. As this Boruto series picks up after a three-year time skip, we get to see major character design changes. But more importantly, we are now witnessing the unreal upgraded powers of our protagonist, Boruto. And the first overpowered jutsu we get to see in Boruto Two Blue Vortex is the all-new Rasengan Uzuhiko. It’s a pretty complicated jutsu that can leave you puzzled, but don’t worry, as we have you covered. Keep reading to learn more about this new Rasengan and its power.

    What is Rasengan Uzuhiko in Boruto Two Blue Vortex?

    Boruto unleashes Rasengan Uzuhiko.
    Image Courtesy: Boruto Two Blue Vortex Chapter 3 by Ukyō Kodachi, Masashi Kishimoto, and Mikio Ikemoto (Viz, Shonen Jump)

    Rasengan: Uzuhiko is the newest type of Rasengan we are witnessing in Boruto: Two Blue Vortex. So, let’s take a look at how unique it is from the other Rasengan and especially how powerful it is. The term Uzuhiko literally translates to Spiralling Sphere “Vortex Boy.”

    It should be noted that the term Uzuhiko is derived from the God of Wind, Shinatsuhiko, in Japanese Mythology. Thus, you can now easily understand this Rasengan. Vortex is heavily associated with wind as Boruto was also seen enveloped in swirls of wind when he performed this jutsu for the first time.

    Uzuhiko may seem a bit perplexing at first but not too impossible to understand. As mentioned earlier, it is heavily associated with wind and planetary motion, making it one of the strongest jutsus we’ve ever seen. So, let’s understand how this Rasengan works in detail in the section below.

    How Does Rasengan Uzuhiko Work?

    Boruto unleashes Rasengan Uzuhiko against code.
    Image Courtesy: Boruto Two Blue Vortex Chapter 3 by Ukyō Kodachi, Masashi Kishimoto, and Mikio Ikemoto (Viz, Shonen Jump)

    Before we head to its explanation, it is necessary to know how Boruto prepared the attack, which will greatly help us understand how this jutsu works. So, instead of concentrating the chakra in the middle of the hand (as is the case in a majority of Rasengans), Boruto switched this up a tad bit by gathering senjutsu chakra all over his body. That’s the first and biggest difference between Uzuhiko and the other Rasengan techniques. Once the preparations are done, a swirl of wind surrounds Boruto and it’s time to unleash its full power.

    Boruto’s new Rasengan Uzuhiko derives its powers from planetary motion and its chakra as well. Once it’s prepared, Boruto can hit any enemy once they are in close proximity to him. It doesn’t deliver an instant impact like all other types, but this is a special case where the attack leaves the enemy totally disoriented.

    As this Rasengan technique uses the planet’s spin and chakra, the intended target is hit with the rotational movement of a whole planet. This leaves them shaken and unable to maintain their balance, as Code is seen struggling to stand up on being hit by this jutsu. That’s how this new form of Rasengan works basically.

    How Powerful is Boruto’s Rasengan Uzuhiko?

    Boruto unleashes Rasengan Uzuhiko against code.
    Image Courtesy: Boruto Two Blue Vortex Chapter 3 by Ukyō Kodachi, Masashi Kishimoto, and Mikio Ikemoto (Viz, Shonen Jump)

    The brand new Uzuhiko is one of the most OP Rasengan techniques to exist. Code trembling and losing his ground after receiving a blow by this jutsu is a testament to how powerful it really is. Although Boruto said that damage done is semi-permanent, one should know that the effects don’t stop unless the planet stops spinning or Boruto puts an end to the technique.

    The first attack may look like it lacks sheer force, but that is the perfect cover to hide this overpowered version of Rasengan. This can catch enemies off guard, just like Boruto’s Vanishing Rasengan move.

    Boruto keeps surprising us with world-class level upgraded versions of Rasengans. He is shaping up to be one of the biggest shinobis we have ever seen and is more like a mix of Sasuke and Naruto, isn’t he? The first instance of Uzuhiko has us hyped, and we can’t wait to see more of this exciting new jutsu in the upcoming chapters. Until then, let us know your thoughts about this new Rasengan in the comments section.

    Ajith Kumar

    132 Posts

    An entertainment writer with a passion for analyzing and sharing insights on movies, shows, and anime.

    Source

  • MediaTek Dimensity 9300 Takes on Snapdragon 8 Gen 3 and Exynos 2400 in Benchmark

    The MediaTek Dimensity 9300 is expected to be official later next week. And right before SoCs land on a commercial device, it’s customary for the manufacturers to test the performance in benchmarking tools. Well, the pre-release Oppo Find X7 model with the chipset has appeared on the browser of Geekbench 6.

    This Geekebench listing reveals some impressive hardware specifications of the MediaTek Dimensity 9300. More importantly, the chipset performed very well in the benchmarking tool. This confirms that the SoC is a strong competitor against the Snapdragon 8 Gen 3. The same thing applies to the recently released Samsung Exynos 2400.

    Closer Look at the Benchmark Results of MediaTek Dimensity 9300

    As shown in the benchmark result picture attached below, the Dimensity 9300 has a robust CPU configuration. It packs one high-performance Cortex-X core at 3.25GHz. Alongside that, there are three Cortex-X4 cores at 2.85GHz and four Cortex-A720 at 2.0GHz. As for the GPU, the SoC features the Immortalis G720 MC12.

    Dimensity 9300 Geekbench 6 Results

    Gizchina News of the week


    About the performance, the MediaTek Dimensity 9300 scores 2139 in the single-core test. And on multi-core, the chipset achieved a score of 7110. To compare, the Snapdragon 8 Gen 3 got 2234 on single-core and 6807 on multi-core. As for the Samsung’s Exynos 2400, it got 2067 in single-core and 6520 in multi-core.

    MediaTek Dimensity 9300 vs Apple A17 Pro

    In short, the MediaTek Dimensity 9300 is a better performer against the Snapdragon 8 Gen 3 and Exynos 2400 per current benchmarks. And things could be better for the MediaTek chipset before it lands on commercial devices.

    But the Dimensity 9300 still has some catch-up to do against the Apple A17 Pro. This Apple flagship chipset has a 36.3% lead in the single-core and 1.7% lead in the multi-core against the MediaTek chipset. In other words, Apple is still in the lead when it comes to powerful mobile processors.


    Source

  • Early Season 3 tier list for Guilty Gear Strive released by Supernoon including Johnny


    Guilty Gear Strive is now almost two months into its third season of competition and content with the game having changed quite a bit from where it was in Season 2.


    Longtime pro competitor Supernoon recently released his early strength ratings tier list for GGSST Season 3.


    Starting out, Supernoon believes there’s a pretty clear top five in the game right now beginning with Sol Badguy, Ramlethal and Happy Chaos though admits that Sin Kiske also almost took that fifth spot after his buffs.


    Interestingly, it seems he thinks most characters in Strive are adequately equipped to compete with most characters in S or A tier and the lowest being the three down in B including Bedman? — whose buffs were apparently not enough.


    Although he started out not too hot, Supernoon thinks Johnny is actually pretty strong and puts the newest character in A tier with the caveat that he’s not fully sure how strong the pirate leader is.


    As for his own character, Supernoon has Bridget up there looking good in S tier along with the other DLC addition Asuka.


    You can check out Supernoon’s full tier list below where only the top five are ordered. A more in-depth breakdown on his picks can be found in his Twitch archive.


    Supernoon Guilty Gear Season 3 tier list image #1

    Click images for larger versions


    Source

  • How to Delete Photos from iCloud (2023 Guide)

    Apple’s iCloud is a powerful tool that automatically backs up important data on your device. When enabled, iCloud will back up each and every photo and video that you have on your iPhone, iPad, and Mac. While it ensures that your important data remains safe, it won’t filter which photos to back up and which ones not to. This can quickly eat up your precious 5GB of free iCloud storage, making it unavailable for your data that’s actually important to you. In this article, we’ll show you how to delete photos from iCloud to get rid of older photos and free up your storage. Also, if you want to delete photos from iCloud but not an iPhone, you shouldn’t worry as we’ve mentioned steps for that as well. No more waiting, let’s get started right away!

    How to delete photos from iCloud

    Note: This method will delete photos from your iCloud storage as well as your Apple device. The steps remain the same for iPhone, iPad, and Mac.

    If you wish to remove photos that are synced on iCloud as well from your iPhone, you can easily do that via the Photos app. The process is simple and doesn’t require you to mess around with any other settings on your iPhone. However, make sure to back up your important photos beforehand. When you delete photos and videos from the Photos app, they will be deleted from your iPhone and all the other devices where you’ve signed in using the same Apple ID. Here’s how to delete iCloud photos:

    • Open the Photos app on your iPhone.
    • Go to the Library tab from the bottom-left corner.
    • Then, tap on All Photos.
    • Next, tap on Select from the top-right of the screen and choose the photos and videos you wish to delete from your iCloud account.
    • Once selected, tap on the trash icon from the bottom and hit the Delete button.
    • If prompted, confirm your decision.
    Delete photos from iCloud and iPhone

    Once deleted, the photos and videos remain on your device for up to 30 days. If you wish to permanently delete photos from iCloud and iPhone, go to the Recently Deleted folder in the Photos app. Then, choose the Select option, tap on the three horizontal dots, and choose Delete All. This will permanently remove photos from iCloud and all connected Apple devices.

    Permanently delete from recenetly Folder

    How to delete photos from iCloud but not iPhone

    If you want to remove photos from iCloud without removing them from your iPhone, you need to check your iPhone’s syncing status. If you’ve enabled the iCloud Photos sync option, you can’t delete iCloud Photos without deleting them from your iPhone. This is because when everything stays in sync, deletion will also be in sync. If you wish to delete pictures from iCloud storage but not on your iPhone or iPad, you first need to disable the iCloud Photos option on your device.

    Step 1: Turn Off iCloud Photos

    • Open the Settings app on your iPhone.
    • Scroll down and tap on Photos.
    • Turn off the toggle for iCloud Photos.
    • In the pop-up that appears on the screen, tap on Remove from iPhone if you want to delete low-res copies from your iPhone. If you wish to restore original photos on your iPhone from iCloud before deleting them, tap on Download Photos and Videos.
    Disable iCloud Photos on iPhone
    • Repeat the above steps for any other device that’s linked to your Apple ID. When the iCloud Photos toggle is turned off, the photos on each device will be managed individually.

    Step 2: Delete iCloud Photos

    Once you’ve disabled iCloud Photos, follow the below steps:

    • Open iCloud.com on a web browser.
    • Click on the Sign In button and enter your Apple ID credentials. If you’ve forgotten your password, here’s how to reset your Apple ID password.
    • Then, go on the Photos app and click on Library from the left-pane.
    • Next up, select the photos and videos you wish to remove from your iCloud account.
    • To select multiple photos, press and hold the Command button on Mac or the Control Key on a Windows PC while selecting the items.
    • To select all photos at once, press Command + A on your Mac or Control + A on a Windows PC.
    • Click on the trash icon from the right corner.
    Open iCloud.com and delete photos
    • Finally, hit the Delete button to confirm your decision.
    Delete photos from iCloud

    Again, the deleted items will be moved to the Recently Deleted folder where they are available for the next 30 days. If you want to permanently delete your iCloud Photos, click on the Recently Deleted folder from the left pane, then click on the Delete All option, and confirm your decision.

    Delete iCloud photos from Recently Deleted Folder

    Those were the two ways to delete photos from iCloud. Hopefully, this article helped you free up storage space and get rid of older photos and videos that you no longer need. In case you have any doubts, feel free to reach out to us in the comments below.

    Kanika Gogia

    71 Posts

    Kanika has been a loyal iPhone user since 2014 and loves everything Apple. With a Master’s in Computer Applications, passion for technology, and over five years of experience in writing, she landed at Beebom as an Apple Ecosystem Writer. She specializes in writing How To’s, troubleshooting guides, App features, and roundups for Apple users to help them make the best use of their gadgets. When not writing, she loves to try out new recipes and enjoy some family time.

    Source

  • Microsoft releases a fix for Outlook slow start

    Microsoft announced that it has fixed the problem of Outlook in Microsoft 365, starting slowly. The company said that this update also takes care of Outlook freezes. So, whether it is the slow start or freezing, the new update takes care of it. Back in June, the company acknowledged Outlook slow start/freeze and started working on a fix. Microsoft stated that this bug was caused by the synchronization of the entire offline data file (.ost) during the startup process.

    Microsoft Outlook

    There are currently two temporary solutions:

    First solution:

    1. Open the registry
    2. Access  the HKEY_CURRENT_USER\Software\Policies\Microsoft\Office\16.0\Outlook\Options\Calendar  path
    3. Select RestUpdatesForCalendar and assign it a value of 1
    4. Restart the computer.

    Another workaround:

    Another solution is to display the specified REST status in Outlook account settings. This is done by toggling Shared Calendar Improvements off and on:

    Gizchina News of the week


    • File/Account Settings/Account Settings
    • Double click to save
    • More settings
    • advanced
    • Note that “Enable Shared Calendar Improvements” is turned on.
    • Turn it off and then turn it back on immediately.
    • Click OK.
    • Outlook may warn that it needs to be restarted, and users can restart as needed.
    • Click the “X” to close the Exchange Account Settings dialog box.
    • Click Close

    Outlook slow start

    Troubleshooting Performance Issues in Outlook

    To determine whether the performance problem is caused by add-ins, run Outlook in Safe mode. To do this, press and hold Ctrl when you start Outlook. When prompted to start in Safe mode, click Yes. If the problem does not occur in Safe mode, this indicates that the issue is caused by an add-in. You can then disable the add-ins one by one to determine which one is causing the problem.

    The performance issues may be caused by one or more of the following conditions:

    • Insufficient computer specifications
    • Absence of the latest service pack and updates for Outlook
    • Large Personal Folders files (.pst) or Offline Folder files (.ost)
    • Third-party add-ins
    • Your AppData folder is redirected to a network location
    • Microsoft Skype for Business integration
    • Antivirus software interaction

    To troubleshoot these issues, you can use the Microsoft Support and Recovery Assistant for Office 365. This tool can diagnose and fix many common issues with Outlook, including slow performance. To use the tool, download and install it on your computer, then follow the prompts to diagnose and fix the problem.

    Conclusion

    Outlook slow starts can be a frustrating issue for users, but there are steps you can take to troubleshoot and fix the problem. By running Outlook in Safe mode, using the Microsoft Support and Recovery Assistant for Office 365, and applying the latest updates, you can improve the performance of Outlook. This can also reduce the time it takes to start up.


    Source