In a world where adventure knows no bounds, the new rugged Cubot KINGKONG 8 will try to redefine how you explore, conquer, and stay connected. The upcoming arrival of this rugged powerhouse is almost upon us and it is designed to fuel your quest for the extraordinary. So let’s take a closer look at this phone.
Light Up Your Adventures
At the heart of KINGKONG 8 is a blazing flashlight, ready to illuminate the darkest paths. Whether you’re camping in the wilderness, hiking through dense forests, or exploring uncharted territories, this powerful flashlight will be your guiding light.
Power Your Journey
Adventure is demanding and the KINGKONG 8 is certainly prepared for all of it. With a massive 10.600 mAh battery, the smartphone ensures you stay connected even in the most remote locations. Say goodbye to the anxiety of running out of power in the middle of your adventure.
Designed for Explorers
The KINGKONG 8 is ready to withstand the harshest conditions. It will be your dependable companion with IP68&IP69K certifications for water and dust resistance, so you can fearlessly push your boundaries.
Gizchina News of the week
Capture the Moments
Equipped with an exceptional camera system, the KINGKONG 8 enables you to seize every memorable moment. From breathtaking landscapes to close-up details, the smartphone will make adventures forever etched in stunning imagery.
Adventure-Ready Features
But this rugged beast isn’t just about powering your adventures. It’s packing more features for a modern explorer, from NFC support for contactless payments to a side-mounted fingerprint sensor for quick and secure unlocking. And much more
The KINGKONG 8 is more than a smartphon, it’s your passport to the uncharted. It’s the device that empowers you to conquer the unknown and capture every thrilling moment. This is where durability meets excellence and it’s coming to transform your adventures. As your Adventure Passport. Discover the future of exploration with the Cubot brand on November 11th. Get ready to embrace the extraordinary. Participate in the Giveaway event to WIN three KINGKONG 8 pieces for free as well !
Released in 2000, X-Men is the movie that could easily be deemed the torchbearer of the golden age of superhero movies. More precisely, the concept of a team of superheroes was brought to popularity by the first X-Men movie. This was the first time we ever witnessed the X-Men in action outside the pages of comic books, and trust me when I say it, the cast and characters for this project made it even better.
From the righteous and charismatic Professor X to the sinister and dark aura of Magneto, the acting done in this film was as perfect as the October sun. So, in this article, let’s dive into our nostalgia and give our due remembrance to the cast of X-Men!
1. Patrick Stewart as Professor X (Charles Xavier)
Source: IMDb
The leader of the X-Men and the man behind the brains of the team is none other than Charles Xavier (aka Professor X). If you have seen the later X-Men movies, especially X-Men: First Class where James McAvoy played the role of Professor X, you would agree with me that the older version of him, played by Patrick Stewart, is the perfect cast for him. Or I would rather say James was a perfect younger cast for the world’s most popular telepath.
As soon as this movie was released, Stewart became a sensation as well as an instant hit among X-Men fans for his exceptional charm and charisma, which was as if Professor X himself walked out of the comic books to our screens.
2. Hugh Jackman as Logan (Wolverine)
Source: IMDb
The best decision ever made in the history of casting decisions has to be choosing Hugh Jackman as Wolverine in X-Men. Before this film, Hugh Jackman was almost unknown, but after this, he became an overnight superstar and the face of Wolverine for all time.
In this movie, we are introduced to Wolverine after the experiment that gave him his Adamantium bones as well as his signature claws. After the major success of X-Men and the explosive fanbase of Jackman as Wolverine, an X-Men: Origins movie project was initiated with the first movie being X-Men Origins: Wolverine. Even though the movie has some flaws, it became a massive fan favorite and is one of the best X-Men movies to date.
3. Ian McKellen as Erik Magnus Lehnsherr (Magneto)
Source: IMDb
If we talk about the antagonist of 2000’s X-Men, I don’t think anyone can argue with the fact that anyone else except Ian McKellen could have brought to screen a better adaptation of the charismatic yet dark persona of Magneto. Magneto can be best defined as the frenemy of Professor X. They both wish to protect the interests of Mutants but there’s a striking difference of morality between both of them.
In this movie, we get to see this difference crystal clear when Magneto is trying to turn the world leaders into Mutants using some extreme methods, but Professor X stops him believing humans and Mutants can co-exist without being enemies.
3. James Marsden as Scott Summers (Cyclops)
Source: IMDb
If we are talking about comic accuracy, along with Wolverine, another Mutant who was cast with utmost perfection was Cyclops, played by James Marsden. I don’t know about you but to me, not just the way he carried the character, but also the way he looks is strikingly similar to how we saw Cyclops in the comics.
Marsden played the character of Cyclops in three X-Men movies where he is an important member of the team and possibly one of the core members of the original X-Men team. The chemistry between Wolverine and Cyclops was the best ever seen in a comic book movie, which adds a sense of comic relief to the usually serious tone of the movie.
4. Famke Janssen as Jean Grey
Source: IMDb
The first X-Men movie itself introduced us to one of the most powerful mutants in the X-Men comic series. Jean Grey evolves into the Dark Phoenix in comics who initially is a threat to the X-Men and everyone since Jean is totally under the control of the Phoenix Force. Eventually, she takes control of the Phoenix Force and becomes the strongest member of the team.
In the X-Men movie trilogy, Jean is killed by Wolverine to protect everyone around him. In the first X-Men, she is a physician, a telepath, and can perform Telekinesis but her powers are not that enhanced in this movie.
5. Anna Paquin as Anna Marie (Rogue)
Source: IMDb
Rogue was basically the central character of this movie. She is a young mutant who has the ability to absorb life energy from anyone she touches. So if she touches a mutant, she gets a fraction of the powers of that mutant for some time. Her powers are more like a curse to her as she does not have a switch for her powers. Hence, making her more like a threat to anyone she makes physical touch with.
In the X-Men film, Magneto abducts her to transfer his powers to her and use her as collateral damage while attempting to turn the world leaders into Mutants.
6. Halle Berry as Ororo Munroe (Storm)
Source: IMDb
Storm is officially one of the most powerful mutants in the universe of X-Men simply because of her quite exceptional powers. Halle Berry has been cast as Storm from the first X-Men movie to the last X-Men movie, except in X-Men Origins: Wolverine and X-Men: First Class.
She has the power to control the weather and bend it to her will. If you have seen later projects in the X-Men universe, you already know that she has been an important part of the X-Men universe whether it be the timeline where “Days of Future Past” takes place or the one where we see the events of X-Men: Apocalypse and Dark Phoenix.
7. Rebecca Romijn as Raven Darkholme (Mystique)
Source: IMDb
Mystique is the most famous shapeshifter in the X-Men universe and was seen for the first time in this movie. She is the right-hand person of Magneto. In the comic run, she is often called one of the most powerful mutants because of her unique ability to not only shape-shift but also replicate the powers of any other person or mutant.
Throughout the X-Men universe, Rebecca Romijn is the one who reprised the role of Mystique in most X-Men movies. In the later projects ofX-Men, we get to see a complete arc of how Raven went from being Charles Xavier’s sister to Magneto’s right-hand person.
8. Ray Parker as Mortimer Tonybee (Toad)
Source: IMDb
Ray Parker is a professional martial artist, who is best known for playing the role of Darth Maul in Star Wars: Episode I – The Phantom Menace and Solo: A Star Wars Story. He played the role of a B-Grade X-Men villain called Toad who has the abilities of a..well…toad? He can jump to great heights, spit a slime-like substance, and has a tongue that extends up to 13 feet for him to catch his prey. Well, his appearance was a one-time thing, but he made a brief appearance in X-Men: Days of Future Past as well.
With Toad, our list of popular characters in the X: Men (2000) movie comes to an end. Now you may ask, ” Where’s Sabertooth?” Well, I intentionally chose to not mention him in this list because later on, in the X-Men universe, the story of Sabertooth was twisted and Logan’s half-brother and fellow soldier was turned into Sabertooth. According to me, the decision to recast and change the origin of the character in itself was cruel to the X-Men universe. However, keeping aside the flaws of this universe, we all have to agree with the fact that this movie ushered us into a new age of superhero movies and made our childhood a lot better.
In this digital age, browsing the internet has become an integral part of our daily lives. However, the online world is not without its annoyances, and one of the most common frustrations encountered by users is the invasive and disruptive ads that seem to plague the web. While ad blockers are readily available as a solution, not all browsing experiences are created equal. In this article, we explore the persistent issue of annoying ads, especially for those using Google Chrome on Android devices, and the surprisingly simple solution Google has provided to tackle this nuisance.
The Annoying Ad Plague
The experience of surfing the internet and being bombarded by intrusive ads is all too familiar for most users. These ads disrupt the flow of your browsing, slow down page loading times, and can even lead to privacy concerns. They pop up at the most inconvenient times, making for a less enjoyable online experience. While ad blockers offer a way to deal with these nuisances, some users encounter obstacles when trying to implement them, especially on mobile devices.
The Google Chrome Conundrum
Among the myriad browsers available for Android devices, Google Chrome is a popular choice due to its seamless integration with the Google ecosystem and cross-device functionality. However, when it comes to blocking ads on Chrome for Android, the process is not as straightforward as on the desktop version. Google has integrated a built-in ad blocker, but it’s not enabled by default.
Google’s Unconventional Approach
Google’s approach to dealing with annoying ads may surprise many users. To prevent users from blocking all ads entirely, a practice that ad-blocker extensions such as AdBlock and uBlock effectively enable, Google has introduced a unique feature. Chrome for Android comes equipped with an ad blocker, which, intriguingly, must be activated manually. Fortunately, enabling this feature is simpler than it might seem.
Activating the Built-In Ad Blocker
To activate the ad blocker within Chrome for Android, follow these easy steps:
Open Chrome: Launch the Google Chrome browser on your Android mobile device.
Access Settings: Tap the three small dots located in the upper right corner of the screen to open the browser’s menu.
Navigate to Settings: In the menu, select “Settings.”
Advanced Settings: Scroll down to the “Advanced settings” section within Chrome’s settings menu.
Site Settings: Under “Advanced settings,” locate the “Site settings” section.
Block Intrusive Ads: Find and select “Intrusive Ads” (sometimes displayed as “Invasive Ads”).
Enable the Feature: Finally, turn on the feature that blocks intrusive ads.
Once you’ve completed these steps, Chrome will automatically block intrusive ads and notify you with a small message when it does so. The beauty of this feature is that it allows you to view the blocked advertisements without the need to disable the ad blocker, ensuring a hassle-free and ad-light browsing experience.
Mobile-Exclusive Feature
It’s worth noting that this ad-blocking feature is currently exclusive to the mobile version of Chrome for Android devices. Unfortunately, it is not available on the PC version, where users must resort to downloading and installing third-party ad blockers.
The Future of Ad Blocking
In a world where online advertising is essential for many businesses and websites to survive, the balance between ad revenue and user experience remains a delicate one. Google’s unique approach to ad blocking on Chrome for Android is a testament to the effort to strike that balance. Users can enjoy a more pleasant browsing experience while websites can still generate revenue from non-intrusive ads.
In conclusion, the digital landscape is constantly evolving, and so are the methods used to enhance user experience and minimize disruptions. Chrome for Android’s manual ad-blocking feature offers an accessible solution for those looking to escape the clutches of intrusive ads, and it’s a promising development for the future of online advertising. As technology continues to advance, we can anticipate even more innovative approaches to delivering a seamless browsing experience for all.
How to block intrusive ads on Android
What are intrusive ads?
Intrusive ads on Android can be a major nuisance. They can pop up unexpectedly, cover up the content you’re trying to view, and even slow down your device. But there are a number of things you can do to block these ads and improve your Android experience.
Intrusive ads are any type of ad that is designed to get your attention, often at the expense of your user experience. Some common examples include:
Pop-up ads: These ads appear in a new window, often blocking the content you’re trying to view.
Video ads: These ads play automatically when you visit a website or open an app.
Fullscreen ads: These ads take up the entire screen of your device, blocking everything else.
Auto-playing ads with sound: These ads start playing automatically, often with loud sound effects.
Ads that mimic system notifications: These ads look like they’re coming from your device’s operating system, but they’re actually trying to trick you into clicking on them.
Why do I see intrusive ads on my Android device?
There are a number of reasons why you might see intrusive ads on your Android device. One reason is that some websites and apps rely on advertising revenue to stay afloat. In order to maximize their profits, these websites and apps may use intrusive ads that are difficult to ignore or avoid.
Another reason for intrusive ads is that some apps are actually malware. Malware is malicious software that can be installed on your device without your knowledge or consent. Once installed, malware can display intrusive ads, steal your personal information, or even damage your device.
How to block intrusive ads on Android
There are a number of ways to block intrusive ads on Android. One of the most effective ways is to install an ad blocker app. Ad blocker apps work by filtering out ads from websites and apps. There are a number of different ad blocker apps available, both free and paid.
Gizchina News of the week
To install an ad blocker app, simply visit the Google Play Store and search for “ad blocker.” Once you’ve found an ad blocker app that you want to use, tap the “Install” button.
Once the ad blocker app is installed, you’ll need to enable it. To do this, open the app and follow the on-screen instructions. Most ad blocker apps will ask you to give them permission to access your internet traffic. This is necessary in order for the app to block ads.
Once you’ve enabled the ad blocker app, it will start blocking ads from websites and apps. You may need to restart your device in order for the changes to take effect.
Other ways to block intrusive ads on Android
In addition to using an ad blocker app, there are a number of other things you can do to block intrusive ads on Android:
Use a privacy-focused browser: Some browsers, such as Brave Browser, have built-in ad blockers. This means that you can block ads without having to install a separate app.
Keep your device up to date: Software updates often include security patches that can help to protect your device from malware.
Be careful what apps you install: Only install apps from trusted sources, such as the Google Play Store. Read reviews of apps before installing them and be wary of apps that ask for too many permissions.
Be careful what links you click on: Avoid clicking on links in emails or text messages from unknown senders. Also be careful about clicking on links on websites that you don’t trust.
Troubleshooting
If you’re still seeing intrusive ads on your Android device after following the tips above, there are a few things you can try:
Check your ad blocker app settings: Make sure that the ad blocker app is enabled and that it has all of the necessary permissions.
Try a different ad blocker app: There are a number of different ad blocker apps available, so it’s worth trying a different one if you’re still having problems.
Reboot your device: Rebooting your device can sometimes fix minor software glitches that may be causing intrusive ads to appear.
Scan your device for malware: Use a reputable antivirus app to scan your device for malware. If malware is found, the antivirus app can remove it.
Reset your device to factory settings: If you’ve tried all of the above and you’re still seeing intrusive ads, you may need to reset your device to factory settings. This will erase all of the data on your device, so be sure to back up your data before doing this.
Additional tips
Here are a few additional tips for blocking intrusive ads on Android:
Use a VPN: A VPN encrypts your internet traffic and routes it through a server in another location. This can help to block intrusive ads that are targeted to your specific location.
Use a DNS service: A DNS service translates website addresses into IP addresses. You can use a DNS service that blocks known ad servers.
Be careful what permissions you grant to apps: When you install an app, it will ask for permission to access certain features of your device. Only grant permission to apps that need it.
Be aware of phishing scams: Phishing scams are attempts to trick you into revealing personal information, such as your passwords or credit card numbers. Phishing scams can often take the form of ads. Be careful about clicking on links in ads, and never enter personal information into a website that you don’t trust.
More tips on how to block intrusive ads on Android
Use a web browser with built-in ad blocking. Some web browsers, such as Brave Browser and Firefox, have built-in ad blockers. This means that you can block ads without having to install a separate app.
Use extensions to block ads in specific apps. If you’re only seeing intrusive ads in a specific app, you can try using an extension to block them. Extensions are small programs that you can add to your web browser to add new features or modify its behavior. There are a number of different ad-blocking extensions available for both Brave Browser and Firefox.
Use a Pi-hole. A Pi-hole is a network-wide ad blocker. It works by blocking ad domains at the router level, so it blocks ads on all of the devices on your network. To set up a Pi-hole, you’ll need a Raspberry Pi or another small computer. Once you’ve set up the Pi-hole, you’ll need to change your router’s DNS settings to point to the Pi-hole.
Use a custom ROM. A custom ROM is a modified version of Android that is not created by Google. Some custom ROMs, such as LineageOS and GrapheneOS, have built-in ad blocking features.
Use a de-Googled ROM. A de-Googled ROM is a custom ROM that has all of Google’s apps and services removed. This can help to block intrusive ads that are served by Google.
Root your device. Rooting your device gives you full control over your Android device. This allows you to install apps that require root access, such as AdAway. AdAway is a powerful ad blocker app that can block ads at the system level.
How to deal with intrusive ads that bypass ad blockers
Some intrusive ads are designed to bypass ad blockers. These ads may use new techniques or exploit vulnerabilities in ad blockers. If you’re seeing intrusive ads that are bypassing your ad blocker, there are a few things you can do:
Update your ad blocker app. Ad blocker apps are constantly being updated to block new types of ads. Make sure that you’re using the latest version of your ad blocker app.
Try a different ad blocker app. There are a number of different ad blocker apps available, so it’s worth trying a different one if you’re still seeing ads.
Report the ads to the ad blocker app developer. If you’re seeing ads that are bypassing your ad blocker, you can report them to the ad blocker app developer. This will help them to improve their app and block more types of ads.
Contact the app developer. If you’re seeing intrusive ads in a specific app, you can contact the app developer and ask them to remove the ads.
Use a different app. If the app developer is unwilling to remove the ads, you can try using a different app. There are many different apps available for most tasks, so you should be able to find an alternative app that does not have intrusive ads.
Report the app to Google Play. If you see an app with intrusive ads on the Google Play Store, you can report the app to Google. Google may remove the app from the Play Store if it violates their policies.
By following these tips, you can help to protect yourself from intrusive ads and improve your overall Android experience.
Conclusion
Intrusive ads on Android can be a major nuisance, but there are a number of things you can do to block them. By using an ad blocker app, following the tips above, and troubleshooting any problems you encounter, you can significantly reduce the number of intrusive ads you see on your Android device. This will improve your overall user experience and make your device more secure.
Damage output is often a tad over-tuned in the initial releases of fighting games, and that seems to increasingly be the case for Street Fighter 6 as Wolfgang, one of the most prominent American Blanka players, recently revealed a sequence showing how the character can KO in just two touches.
The first question that usually comes to mind when processing touch of death or other extremely high damage scenarios is, “is this practical enough to happen in a real match?” We’re somewhat scared to report that while there are a few requirements to be met, this two touch of death mix up is extremely practical.
Blanka has to have a full three Super bars stocked, a full Drive Gauge, and needs to corner his opponent in order to pull this off. He also has to have two of his three Blanka-chan dolls available, as of course this beat down has a Blanka-chan doll corner mix up baked in.
The attack begins with a standing heavy punch cancelled into Blanka’s Super 2, which leads into a fairly routine mix up after just five hits. The good news is that the doll is not electrified at this point, so it’s not part of the mix up, but a wake up throw tech will spell the end for the defender here:
This means Blanka joins the likes of Marisa, JP, and technically A.K.I. (though hers is not all that practical) in the two-touch SF6 club. Things get a little interesting here as damage output obviously factors into a characters’ overall strength and tier placement, but many would argue that they’d want their Street Fighter 6 rounds to be determined by more than just two interactions… especially if one follows the other in a disadvantageous oki situation.
We actually addressed this directly on a recent episode of Talk and Block. In it we dig into general player expectations for how Street Fighter rounds should be determined, and how Capcom might change things around in such a way that a character like Marisa, whose advantage is directly embedded in her relatively higher damage output, could still hit harder than everyone else without watering down the overall experience.
Do you think Blanka (or anyone) should be able to KO in two hits, or should general damage be reduced so that players have to outplay each other just a little more in order to win a round? Sound off in the comments below.
With iOS 17, Apple Music gets a much-needed redesign and interesting features. You can now Crossfade between the tracks and view song credits in the Apple Music app. In addition, the first Beta of iOS 17.2 brings a long-requested feature- Collaborative playlists to the Apple Music app. You can now make playlists in Apple Music where you and your friends can add, reorder, and remove the songs. Perfect for a house party or road trip where everyone can listen to their favorite tracks without constantly switching between multiple playlists. This way, you can make the most out of your Apple Music subscription. In this quick hands-on guide, we’ll tell you how to create collaborative playlists on Apple Music where multiple people can add music together.
Make a Playlist on Apple Music on iPhone
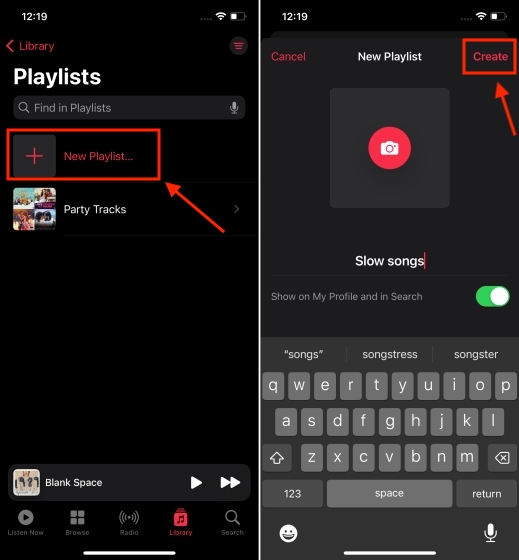
Before we get to know how to collaborate on a playlist, let’s take a moment and learn how to make a playlist on Apple Music. While the process is pretty straightforward, beginners may find it overwhelming. Here’s how to create a playlist in Apple Music:
Open the Apple Music app on your iPhone.
Go to the Library tab from the bottom of the screen.
Here, tap on Playlists and choose the New Playlist option.
Give your playlist a name and tap on the Create option.
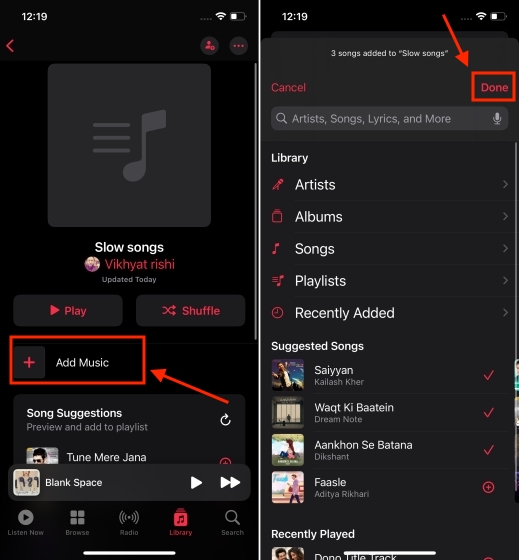
Now, tap on Add Music and choose the tracks you wish to add.
Once you’ve added music, tap on Done. And that’s it!
Make Collaborative Playlists on Apple Music on iPhone
Note: Currently, Collaborative Playlists are only available in iOS 17.2 Beta 1.
Now that you know how to create a playlist, let’s learn how to create collaborative playlists on Apple Music so you and your friends can add to the same playlists. The process is simple, though not easily traceable. Here are the steps to do it:
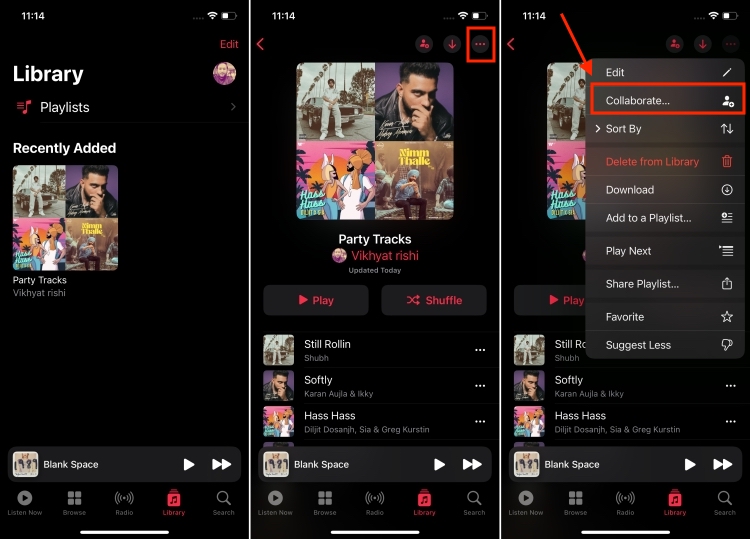
Open the Apple Music app on your iPhone and tap on Library from the bottom of the screen.
Go to the playlist that you want to invite your friends to.
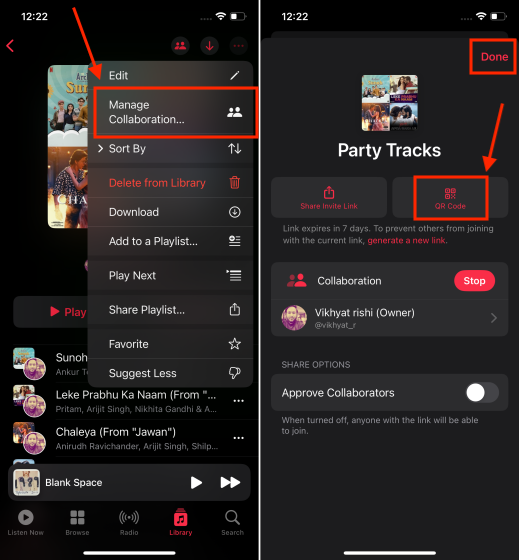
From here, tap on the three dots (on the top-right of the screen) and tap on Collaborate.
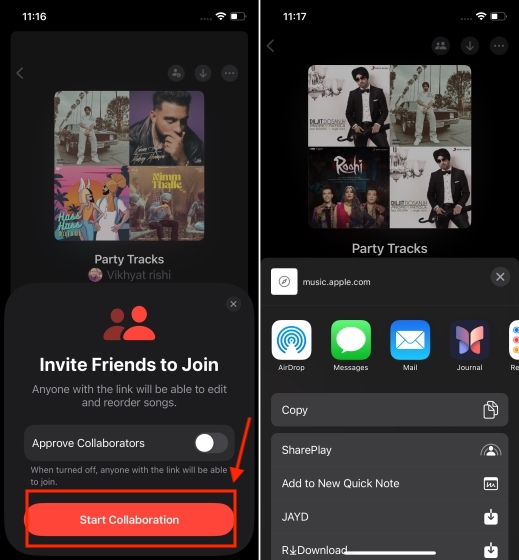
Hit the Start Collaboration button.
A link to the playlist will be created and your friends/family who have the link can add music. You can share this link via AirDrop, Messages, SharePlay, and other options.
You can also choose to invite people to this collaborative playlist on Apple Music via a QR code. For this, tap on the three dots on the top-right and choose Manage Collaboration.From here, you can choose the QR Code option and then tap on Done.
You can share the QR code with your friends to invite them to collaborate to your Apple Music playlist.
Frequently Asked Questions
1. Can you do collaborative playlists on Apple Music?
Yes, you can finally do collaborative playlists on Apple Music. It’s worth mentioning that right now, this feature is only available in the First Beta of iOS 17.2. No other iOS versions support this feature at the moment.
2. Can multiple people edit Apple Music playlists on iPhone?
On iPhones running iOS 17.1 Beta 1, multiple people can edit Apple Music playlists.
3. How do I make my playlist collaborative?
To make your Apple Music Playlists collaborative, open the playlist, tap on the three dots, choose Collaborate, and then tap on Start Collaboration.
That was all from our side on how to create collaborative playlists on Apple Music. It’s good to see Apple finally offering a long-requested feature to its music lovers. While this feature is currently available in the first beta version of iOS 17.2, collaborative Apple Music playlists will soon find a permanent spot in the stable version of iOS 17.
It has been a while since Google provided us with an update on the distribution of Android versions, but we finally have new data to analyze. The last time we got a glimpse of how Android versions were faring was back in May, and the results were less than ideal. Fast forward five months, and the landscape has evolved, with Android 13 now reigning supreme, closely followed by Android 12. However, the mention of Android 14 is still premature, and we’ll delve deeper into these developments shortly.
The Latest Trends in Android Version Distribution
Once upon a time, Google used to update Android version distribution data every month, allowing us to track how updates spread among users. However, this practice was abandoned a few years ago, leaving us with the anticipation of two yearly updates within Android Studio. The latest update, as of October 1, 2023, is here, and it provides valuable insights into the current state of Android versions.
The Android Version Landscape
Android 13 has been in the picture for over a year now, and it’s no longer the most recent Android version following the relatively recent launch of Android 14. Keep in mind that the latest Android version distribution data dates back to October 1, just a few days before the official release alongside the Pixel 8, making it highly unlikely for Android 14 to appear in the data.
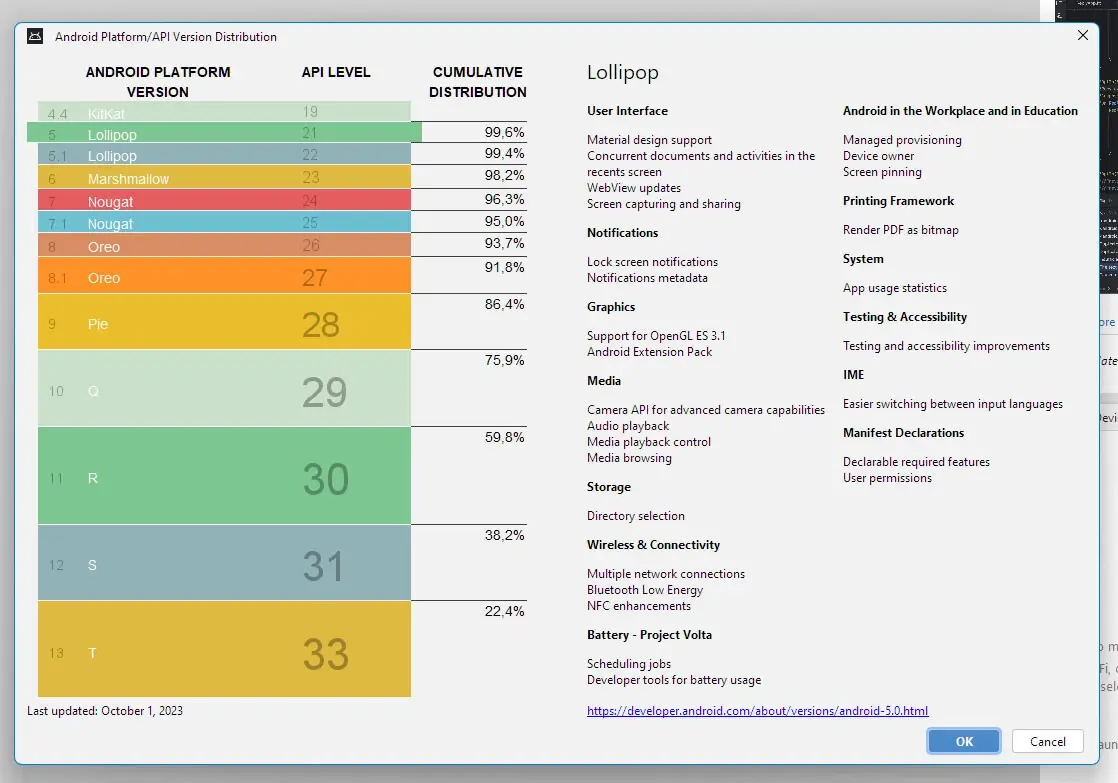
As for Android 13, it has seen significant growth in the five months since the last data update, with a 7.4% increase in market share. This jump propelled it three places up the ranks to become the most used Android version. At the time of Google’s measurement, Android 13 was present on a staggering 22.4% of active Android devices.
What’s particularly intriguing is that Android 12, the successor to Android 11, didn’t secure the second spot. Android 11 takes that position, residing on 21.6% of active devices, surpassing the 15.8% share held by Android 12. Surprisingly, Android 10 has also surpassed Android 12, capturing 16.1% of active devices.
Moving further down the list, Android Pie still holds a significant share at 10.5% of the market, and from that point onwards, the older versions quickly deflate. Android Oreo is on 7.3% of devices, while the previous versions, including Nougat, Marshmallow, and Lollipop, hover around 2%.
The fact that, a year after its launch, the most recent Android version (excluding Android 14) is present on less than a quarter of active devices may not be great news. However, a quick glance into the archives of Android distribution reveals that things were even worse in the past. For instance, a year after its launch, Oreo was only on 14% of mobile devices.
Android Versions Sorted by Market Share
Let’s take a closer look at the different Android versions, arranged by their market share:
Android 13 (22.4%): Android 13 now holds the top position with a substantial market share of 22.4%.
Android 11 (21.6%): Surprisingly, Android 11 claims the second spot, slightly edging out Android 12.
Android 10 (16.1%): Android 10 has maintained its presence on a significant portion of active devices.
Android 12 (15.8%): Android 12 has been overtaken by Android 11 and Android 10 in terms of market share.
Android Pie (10.5%): Android Pie, an older version, still manages to secure a double-digit market share.
Android Oreo (7.3%): Android Oreo lingers at 7.3% of active devices.
Android Nougat (2.6%): Older versions like Nougat continue to hang on to a small share.
Android Lollipop (1.4%): Lollipop is among the less commonly used versions.
When we consider the latest Android versions, Android 10, 11, 12, and 13 collectively account for 75.9% of the total distribution. This reflects a 3.7% increase from the data collected five months ago, indicating that while it’s not a massive shift, there is some progress in the adoption of newer Android versions.
The Android Evolution: A Closer Look at the Data
Now that we’ve examined the current Android version distribution, let’s delve into the implications and trends behind these numbers.
Android 13’s Rise to the Top
Android 13’s ascent to the top spot in the Android version distribution is a significant development. This version has been available for over a year, and its popularity continues to grow. It is a testament to Google’s commitment to delivering regular updates and improvements to its operating system.
The close proximity of Android 14’s release further highlights the importance of keeping Android devices up to date. Users are eager to experience the latest features and improvements, and this demand contributes to the rapid adoption of newer versions.
The Unexpected Triumph of Android 11
Android 11’s surprise leap to the second position is worth noting. While newer versions like Android 12 and Android 10 were expected to dominate, Android 11 has maintained a strong foothold. This could be attributed to the stability and reliability of Android 11, making it a preferred choice for many users.
Android 12’s Challenge
Android 12, despite its innovative features and user interface enhancements, has fallen behind Android 11 and Android 10 in terms of market share. This outcome serves as a reminder that enticing users to upgrade to a new version can be a challenging task. It requires convincing users that the benefits of the upgrade outweigh any potential inconveniences or learning curves.
A Notable Presence of Older Versions
The fact that older versions like Android Pie, Oreo, Nougat, Marshmallow, and Lollipop still command a considerable share of the market demonstrates the diversity and fragmentation in the Android ecosystem. While the latest versions offer the best in terms of features and security, many users continue to rely on these older iterations.
Progress in Adoption
Although the increase of 3.7% in the combined market share of the latest Android versions may seem modest, it signifies a positive trend in the industry. More users are gradually transitioning to newer Android versions, benefitting from enhanced security, performance, and features. This progress highlights the importance of Android manufacturers and carriers in facilitating timely updates and supporting a broader range of devices.
The Road Ahead
The distribution of Android versions is an ever-evolving landscape. With each new release, users eagerly anticipate what enhancements and innovations Google will bring to their devices. The ongoing challenge for Google and the Android ecosystem as a whole is to ensure that as many users as possible can access and benefit from the latest Android versions. This not only empowers users with better experiences but also strengthens the overall security and compatibility of the Android platform.
Gizchina News of the week
As we await the next data update, we can only anticipate more shifts in Android version distribution. Android 14’s presence will certainly make a splash, and it will be interesting to see how it impacts the dynamics of the Android ecosystem. One thing is for sure: the Android landscape will continue to evolve, driven by the desire to provide users with the best possible mobile experience.
The problem of Android version distribution and how it affects the user experience
Android is the world’s most popular mobile operating system, with over 3 billion active devices. However, one of the biggest problems with Android is the fragmentation of its version distribution. This means that there is a wide variety of Android versions in use, with some devices running very old versions of the operating system. This fragmentation can have a negative impact on the user experience, as it can lead to security vulnerabilities, compatibility issues, and performance problems.
Why is Android version distribution so fragmented?
There are a number of reasons why Android version distribution is so fragmented. One reason is that Google does not release Android updates directly to users. Instead, it releases updates to device manufacturers, who are then responsible for releasing the updates to their devices. This process can take months or even years, depending on the manufacturer.
Another reason for Android fragmentation is the sheer number of Android devices on the market. There are over 100,000 different Android devices in use, and each device has its own unique hardware configuration. This makes it difficult for manufacturers to test and release updates for all of their devices.
Finally, some users are simply reluctant to update their devices to the latest version of Android. This may be due to concerns about battery life, performance, or compatibility with their favorite apps.
How does Android version fragmentation affect the user experience?
Android version fragmentation can have a negative impact on the user experience in a number of ways.
Security vulnerabilities
Older versions of Android often have security vulnerabilities that have been patched in newer versions. This means that users who are running older versions of Android are more vulnerable to malware attacks and other security threats.
Compatibility issues
New apps and games are often developed for the latest version of Android. This means that users who are running older versions of Android may not be able to use the latest apps and games. Additionally, some apps and games may not work properly on older versions of Android.
Performance problems
Older versions of Android may not be able to take advantage of the latest hardware features. This can lead to performance problems, such as lag and slow app loading times.
What can be done to address the problem of Android version fragmentation?
There are a number of things that can be done to address the problem of Android version fragmentation.
Google can do more to pressure manufacturers to release updates quickly
Google could put more pressure on manufacturers to release updates to their devices quickly. This could be done by requiring manufacturers to sign an agreement that commits them to releasing updates for a certain period of time. Additionally, Google could provide financial incentives to manufacturers who release updates quickly.
Google can make it easier for manufacturers to test and release updates
Google could make it easier for manufacturers to test and release updates by providing them with more resources and tools. For example, Google could provide manufacturers with a cloud-based testing platform that would allow them to test updates on a variety of devices without having to purchase physical hardware.
Google can make it more attractive for users to update their devices
Google could make it more attractive for users to update their devices by developing tools that make the update process easier and safer. For example, Google could develop a tool that would automatically back up a user’s data before installing an update. Additionally, Google could educate users about the benefits of updating their devices.
How can users protect themselves from the negative effects of Android version fragmentation?
There are a number of things that users can do to protect themselves from the negative effects of Android version fragmentation.
Keep your device up to date
The most important thing that users can do is to keep their devices up to date with the latest version of Android. This can be done by checking for updates regularly and installing them as soon as they are available.
Be careful about which apps you install
Users should be careful about which apps they install on their devices. They should only install apps from trusted sources, such as the Google Play Store. Additionally, users should read the reviews of apps before installing them.
Use a security app
Users should use a security app to protect their devices from malware and other security threats. Security apps can scan apps for malware and block malicious apps from being installed.
Conclusion
Android version fragmentation is a serious problem that can have a negative impact on the user experience. Google, manufacturers, and users all have a role to play in addressing this problem. Google can do more to pressure manufacturers to release updates quickly and make it easier for them to test and release updates. Manufacturers can release updates more quickly and make it easier for users to update their devices. And users can keep their devices up to date, be careful about which apps they install, and use a security app.
Out of all the talented fan artists we have across the fighting game community, there’s a select few we continue to be impressed by.
Japan’s Click Burgundy is at or near the top of that short list, and their most recent portraits certainly don’t disappoint.
Over the past month or so, the top tier artist has put together a couple of more casual (or at least out of their battle garb) designs for Guilty Gear Strive’s Ramlethal and Jack-O as well as some more lovely pieces for Bridget and A.B.A.
It’s also really nice to see Click Burgundy sketching up custom portaits for big tournament winners lately too including RB|Gachikun’s Rashid victory at the Singapore Capcom Pro Tour Premier plus BST|Fuudo’s most recent World Warrior win in Japan with Dee Jay in Street Fighter 6.
They also put together what looks to be a group piece celebrating the top 4 at Kagaribi #11 for Super Smash Bros. Ultimate from earlier this month including FN|Miya’s Mr. Game & Watch, Zeta|Acola’s Steve, Revo|Yoshidora’s Yoshi and Zeta|Tea’s Mr. Game & Watch.
Plus, there’s also some love for the recent announcements of Hinako in The King of Fighters 15 and kid Goku’s return in Dragon Ball Daima.
You can check out a collection of Click Burgundy’s recent fighting game works below, and there’s plenty more to be found on their Twitter page.
Today, an iPhone has become an inevitable part of every user’s life. Right from recording your favorite moments to saving important documents, an iPhone can be your ultimate companion. To keep things going and stay away from iPhone storage full alert, you would sometimes want to get more iPhone storage, isn’t it? After all, you need space for everything like apps, high-quality photos, files, and more. Many users have a common question- how do I buy more storage for my iPhone? If you also have this question in your mind, you’ve landed at the right place. In this article, we’ll discuss how to buy more storage on an iPhone. No more waiting, let’s get started right away!
Can I Expand my iPhone Storage?
You cannot expand your iPhone’s internal storage. Wondering why? This is because iPhones do not have any SD card slot that can be found on some Android smartphones. Every iPhone has a built-in high-speed physical storage capacity, which cannot be modified once the unit has shipped. Therefore, if you’ve bought a 128 GB iPhone model, you cannot increase this storage to 256 GB in any situation. This is why you must carefully consider storage options while buying a new iPhone. The low storage options may tempt you with comparatively affordable price tags, you may have to make additional purchases later on to compensate for that low capacity.
While you cannot expand your iPhone’s physical storage, you can buy more iCloud storage to keep all your important data at your fingertips. This way you can free up space on your iPhone without losing any of your important data. We’ve discussed this below in detail.
How to Buy More Storage on iPhone with iCloud+
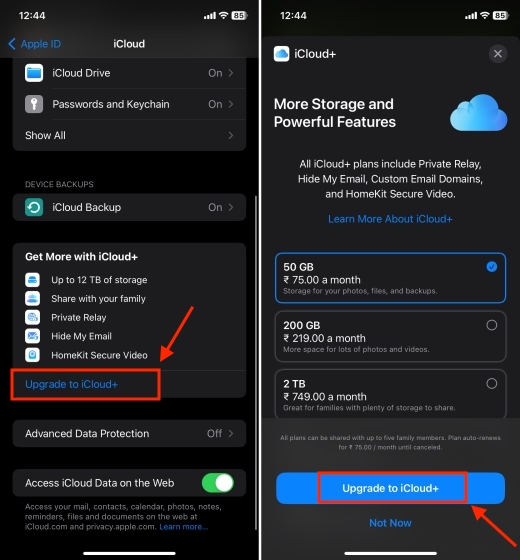
You can buy more storage on an iPhone with an iCloud+ subscription. When you create an Apple ID, you get 5GB of free iCloud storage space to store photos, videos, app data, and more. You can access your iCloud data on any Apple device where you’ve signed in with your Apple ID. Although this helps keep some of your data safe, a mere 5GB of storage space isn’t enough for your photos, videos, documents, and other data. To escape such issues, you can choose a monthly iCloud+ storage plan. You get to choose from 50GB, 200GB, 2TB, 6TB, or 12 TB of storage options. Here’s how to upgrade your Apple iCloud account on an iPhone:
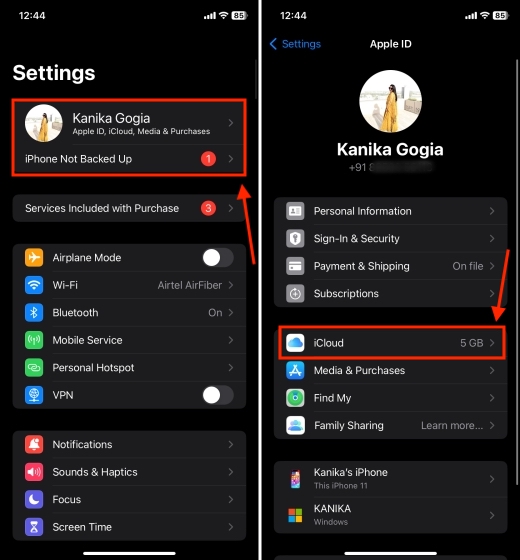
Open the Settings app on your iPhone and tap on [Your name] at the top of the screen.
On your Apple ID page, tap on iCloud.
From here, scroll down and tap on Upgrade to iCloud+.
If you haven’t subscribed to iCloud storage yet, choose an Apple iCloud storage plan and tap on Upgrade to iCloud+.
If you already have an iCloud subscription, tap on Manage Account Storage and then tap on Change Storage plan.
Then, follow the on-screen instructions and verify your Face ID or enter your Apple ID password to confirm the subscription.
While iCloud+ is Apple’s proprietary cloud service, you can opt for third-party cloud storage options like OneDrive, Google Drive, DropBox, and more. Compare the prices and storage options, and then go for the one that suits your requirements.
Other Ways to Get More Storage on an iPhone
1. Free up space on your iPhone
If you don’t want to pay for an iCloud+ subscription and want to get more iPhone storage for free, here are a few things that you can do.
You should erase data that you don’t need or delete apps that you don’t use. So, browse through the photos, videos, apps, documents, and other data on your iOS device and delete unwanted stuff.
If you have a lot of important data and don’t want to delete it, you should back up your iPhone data. Fortunately, there are many ways to keep your data safe. You can use your Mac, Windows PC, or free cloud storage services.
Another way to get more iPhone storage for free is to ensure you’re making the most of the free iCloud space. For example, you can delete photos from iCloud to get rid of older photos and ensure that you always have space for data that’s actually important to you.
2. Get a portable storage device
If you can’t purchase more storage on your iPhone and still want the liberty to have all your important data at your disposal, you can get yourself a portable storage disk. It’s worth knowing that modern iPhones support external devices that have HFS+, FAT32, AFPS, or exFAT file systems. You can easily find flash storage drives which you can connect to your iPhone and keep your important content safe. This way you can always have additional backup storage to free up internal memory on your iPhone.
3. Trade in your iPhone and get a model with more storage
In case you’re holding onto an older iPhone with low internal storage space, maybe it’s time to get rid of your existing phone and get yourself a new one. As you know, Apple lets you trade in an older device to buy a new iPhone. If you’re satisfied with the exchange value that Apple is offering you, great. If not, you can sell it on a third-party platform or a nearby store that offers a great deal. This time, make sure you get an iPhone with sufficient storage space.
Frequently Asked Questions
1. What is the difference between device storage and cloud storage?
Device storage (also known as physical or internal storage) is a finite amount of storage your device comes with. You can view the saved data on that device only. The iPhones come with internal storage options of 64 GB (iPhone 12 or older only), 128 GB, 256 GB, 512 GB, or 1TB. Once this storage space gets full, you can’t add more photos, videos, or files on your device. You can either remove older data or upgrade to an iCloud subscription.
On the other hand, cloud storage means the data is saved on the company’s cloud servers and typically requires you to go for a subscription. You can upload data to cloud storage using your phone and then access that data on any device using your account. Some popular cloud storage services include iCloud, OneDrive, Google Drive, DropBox, and more.
2. Why can’t I buy more storage on iPhone?
You cannot buy more storage on an iPhone because there is no SD card slot to expand your iPhone’s internal storage. So, your iPhone will always have the amount of storage space that it initially came with. The only way to get more internal storage space on the iPhone is to delete messages, documents, photos, and other older data. Before you do it, make sure to back up your important data so you can restore the iPhone data on purpose.
3. Can I buy more storage on my iPhone with Google One?
Yes, you can expand your iPhone storage using Google Drive. You can browse through Google One plans and pricing, and then choose the one that best suits your requirements. Besides, you can go for other cloud storage services like DropBox or OneDrive subscription.
4. How to buy iPhone storage for free?
You can back up your iPhone and delete older data to get more iPhone storage for free.
That was all from our side on how to buy more storage on an iPhone. Hopefully, this article helped to understand all the basics so you can easily manage and get more iPhone storage. In case you have any doubts, you can always reach out to us in the comments below. Also, how are you planning to get more phone storage on your iPhone? We’d love to hear your thoughts!
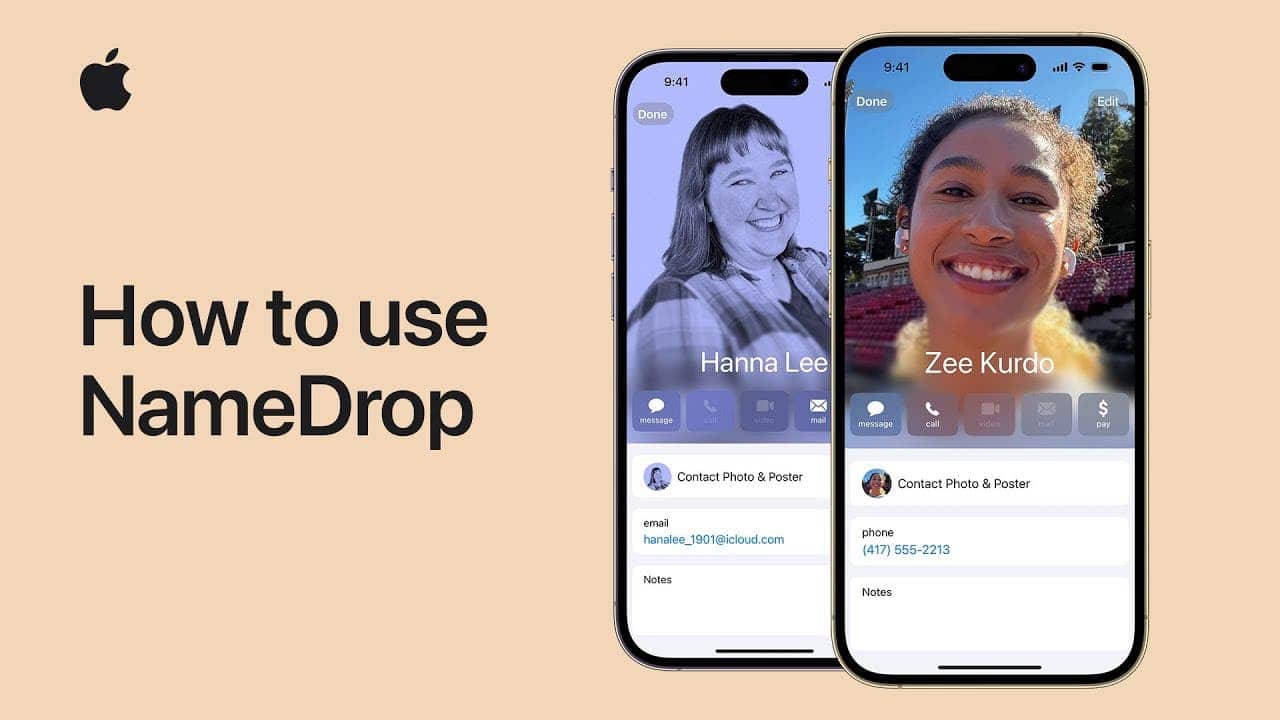
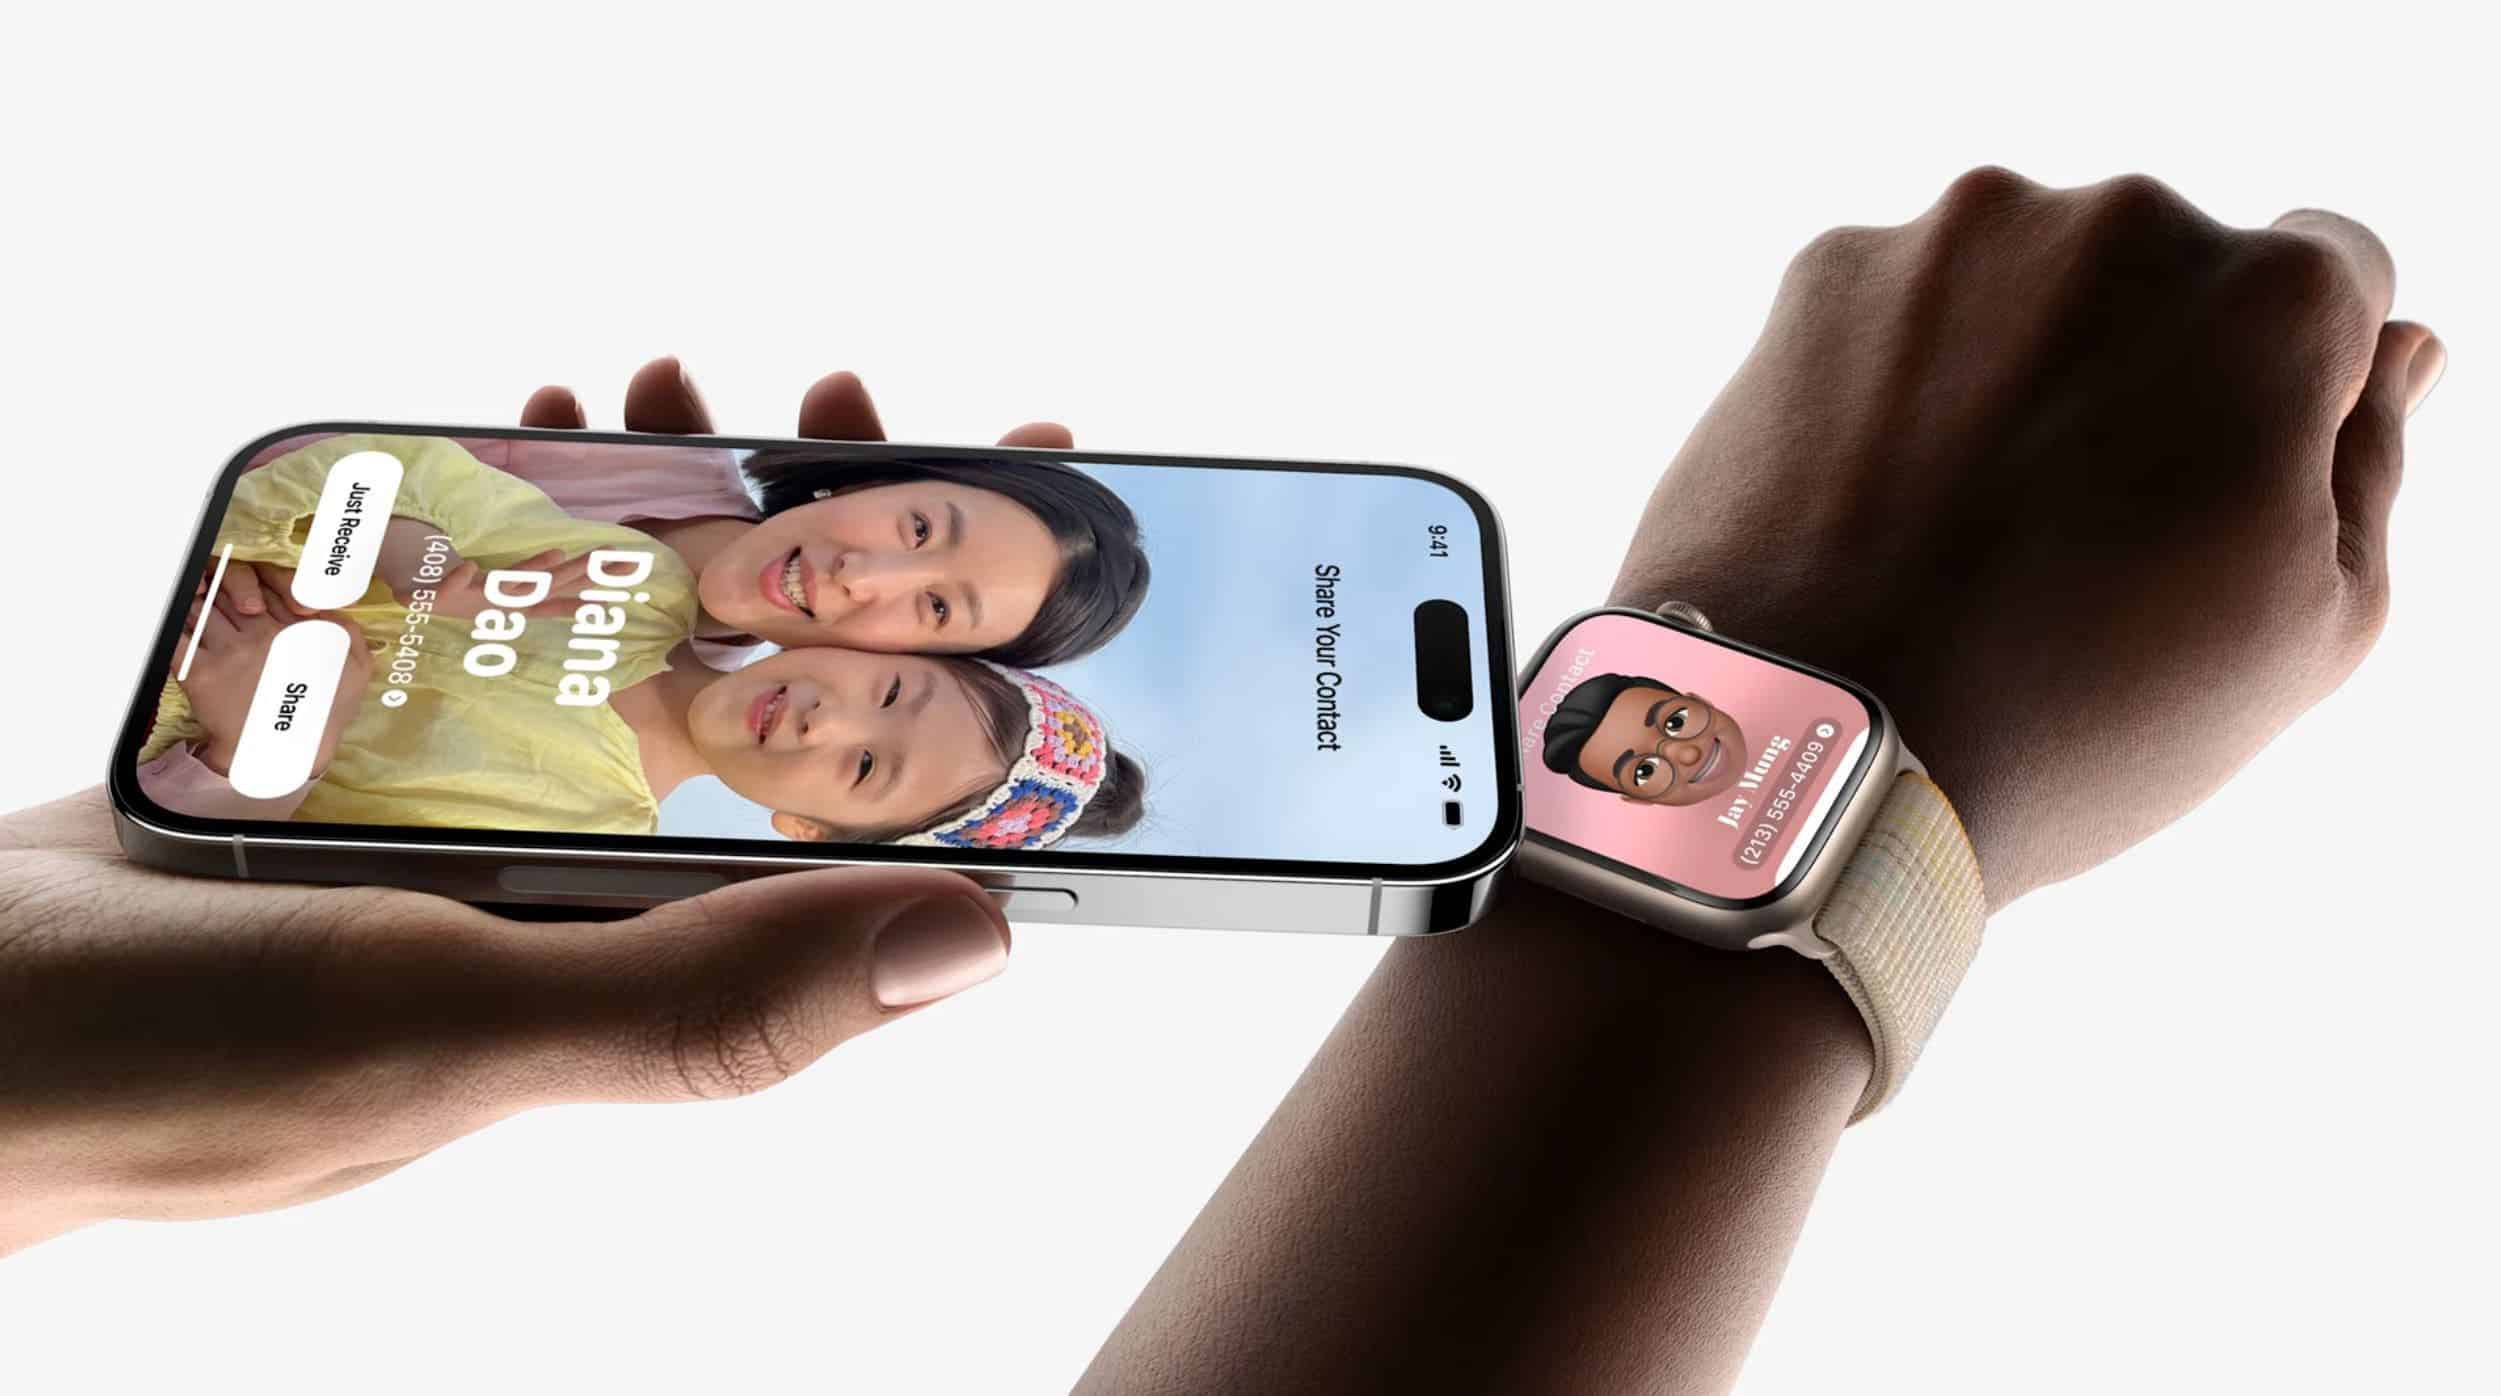
In the ever-evolving realm of Apple’s iOS, the introduction of iOS 17 brought a multitude of exciting features and enhancements. Among the standout innovations lies NameDrop, a feature that adds a whole new dimension to contact sharing for iPhone users. NameDrop streamlines the process of transferring your contact card to another user, and what’s even more remarkable is that this can be achieved with just a simple gesture – bringing two iPhones in close proximity. This ingenious feature is made possible through AirDrop, the renowned file-sharing system for Apple devices, which now extends its reach to the digital realm through the Internet. In this article, we’ll delve into the intricacies of NameDrop, exploring what it is, how to use it, and how it seamlessly integrates into the Apple ecosystem.
Understanding NameDrop: A Gateway to Seamless Contact Sharing
Before we dive into the practical aspects of using NameDrop, it’s essential to grasp the concept behind this groundbreaking feature. NameDrop is essentially a transfer system that empowers users to effortlessly share their contact card, which, in turn, encompasses all the contact information they have meticulously curated in the Contacts app. However, there’s a caveat: you need to have your own contact card created to use NameDrop effectively. This requirement underscores another noteworthy feature of iOS 17 – the ability to craft your unique contact card. With this card in hand, NameDrop becomes a powerful tool for sharing your contact information with others. At its core, NameDrop is an extension of the robust AirDrop framework, integrating seamlessly into the iOS 17 ecosystem.
Step-by-Step Guide to Using NameDrop on iPhone
Utilizing NameDrop on your iPhone is remarkably straightforward, making it accessible for users of all technical backgrounds. To initiate a contact card transfer, follow these simple steps:
Proximity Matters: First and foremost, ensure that AirDrop is enabled on both iPhones involved in the transfer. Once this is confirmed, all you need to do is bring the two iPhones close together. Within moments, an engaging animation will captivate your attention, and voilà! Both contact cards will materialize on the respective devices.
But the ease of sharing contact information through NameDrop doesn’t stop there. Apple has thoughtfully provided an alternate method for users who prefer a more hands-on approach. Here’s how you can do it:
Access the Contacts App: Open the Contacts app on your iPhone. This is your portal to the treasure trove of contact information you’ve accumulated.
Select the Contact: Navigate to the contact you wish to share. Tap on the selected contact to access their details.
Share Contact: Once you’re viewing the contact’s details, tap on the “Share Contact” option. This will open up a menu of sharing choices.
Customize the Share: You have the flexibility to choose what specific data you want to share from the contact card. Tailor it to the recipient’s needs.
Ready to Go: After selecting the data to share, tap “Listo” (Ready) to proceed. This step finalizes your choices.
Choose Your Sharing Method: Lastly, select the mode of sharing you prefer, and the data will be on its way to the recipient.
NameDrop, in essence, is one of the distinctive features exclusive to Apple devices. It enhances the user experience by simplifying the process of sharing contact information. The beauty of this function lies in its seamless integration with Apple’s continuity functions, which, in turn, allow users to perform a myriad of actions with remarkable ease. Beyond sharing contacts through NameDrop, Apple’s ecosystem also permits the sharing of passwords, the use of Handoff to transition seamlessly between devices, and the universal iCloud clipboard, which enables effortless copying and pasting between different Apple devices.
The Wider Apple Ecosystem and NameDrop: A Synergistic Symphony
As we’ve explored the magic of NameDrop, it’s essential to recognize the broader context in which it operates – the ever-expansive Apple ecosystem. Apple has masterfully woven a tapestry of features and functions, each designed to seamlessly enhance user experiences. The continuity functions within this ecosystem open up a world of possibilities, making the sharing of contact cards through NameDrop just the tip of the iceberg.
One of the standout elements of this ecosystem is AirDrop, which transcends its traditional role by allowing digital contact sharing via NameDrop. However, AirDrop is just one thread in the tapestry. Apple’s Handoff feature, for instance, empowers users to initiate an activity on one device and seamlessly pick it up on another. Whether you’re editing a document, browsing the web, or even playing a game, Handoff ensures a seamless transition between your Apple devices.
But the perks of the Apple ecosystem don’t stop there. The universal iCloud clipboard further simplifies cross-device operations. This ingenious feature allows you to copy text or files on your iPhone and paste them on your Mac, iPad, or any other compatible Apple device, and vice versa. It’s a feature that epitomizes the seamlessness and convenience that Apple strives to offer its users.
Gizchina News of the week
In conclusion, NameDrop is a testament to Apple’s commitment to providing its users with a seamless and integrated experience across its range of devices. It simplifies contact sharing, emphasizing the power of proximity and digital connections. When viewed in the context of the broader Apple ecosystem, NameDrop emerges as a compelling piece of the puzzle. Showcasing the brand’s dedication to innovation and user-centric design. As you explore the wonders of iOS 17, remember that NameDrop is not just a feature. It’s a glimpse into the future of how technology can connect us effortlessly. The Apple ecosystem, with its array of continuity functions, weaves a tapestry that facilitates a seamless digital existence, turning everyday tasks into moments of delight. So, embrace the power of NameDrop, and unlock a world of connectivity right at your fingertips.
Key features of iOS 17:
Phone
Personalized contact posters: Create custom contact posters for the people you call most often, with your choice of photo, font, and font color.
Dual SIM message sorting: Sort your messages by SIM card, to easily separate your work conversations from your personal ones.
Check In for a destination: Let your friends and family know when you’ve arrived at your destination safely, with a single tap.
Improved call quality: Enhanced call quality, especially in areas with weak cellular reception.
Messages
All your iMessage apps in one place: Access all of your iMessage apps from one centralized location. Making it easier to find and use the apps you need.
Create one-of-a-kind stickers: Create your own custom stickers to use in Messages, using your own photos or artwork.
Improved autocorrect: More accurate and intelligent autocorrect, to help you avoid typos and grammatical errors.
Edit or unsend messages: Edit or unsend messages after they’ve been sent, giving you more control over your conversations.
FaceTime
Leave a message: When someone doesn’t pick up your FaceTime call, leave them a video or audio message to capture exactly what you want to say.
Share your screen: Share your screen with other people on FaceTime, so you can collaborate on projects or watch videos together.
Improved video quality: Enhanced video quality, especially in low-light conditions.
StandBy
A new full-screen experience: StandBy is a new full-screen experience that displays glanceable information when your iPhone is on its side and charging. You can see the time, date, weather, battery level, and notifications, all without having to unlock your phone.
Interactive widgets: StandBy also supports interactive widgets, so you can control your music, check your calendar, and more, without having to leave the StandBy screen.
Always-On display: On iPhone 14 Pro models, StandBy can be used with the Always-On display. So you can always see your information at a glance.
Other features
Mood tracking and journaling: A new app for tracking your mood and journaling your thoughts and feelings.
Shared AirTags and AirPods improvements: Easier to share AirTags and AirPods with family and friends, and to track the location of lost or stolen devices.
Improved performance and battery life: Overall improvements in performance and battery life, so your iPhone runs faster and longer than ever before.
In addition to these key features, iOS 17 also includes a number of smaller improvements and bug fixes. For example, the lock screen has been redesigned, with new customization options and support for notifications that are easier to read and dismiss. The Files app has also been updated with new features, such as the ability to tag files and create folders within folders.
Overall, iOS 17 is a significant update to the iPhone operating system, with a number of new features and improvements that make it even more powerful and user-friendly.
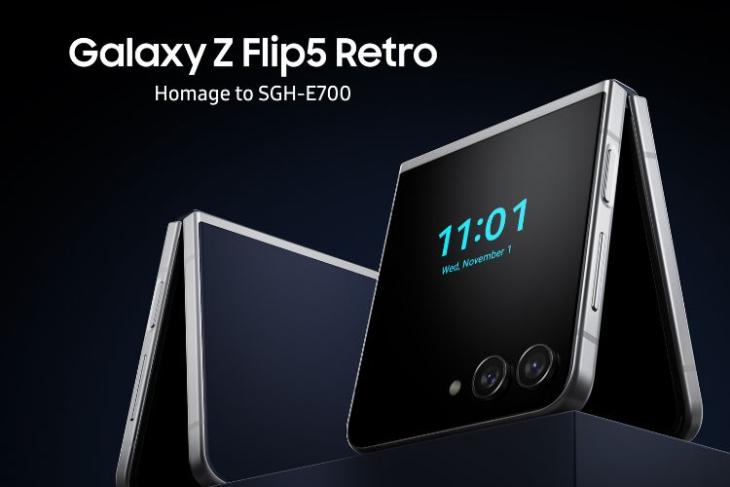
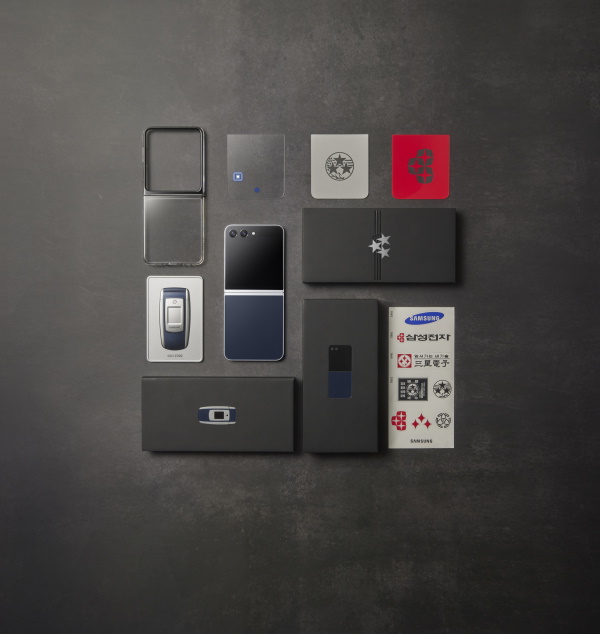
Samsung is all about nostalgia with the launch of the new Galaxy Z Flip 5 Retro. This limited edition is an homage to the 2003 SGH-E700 phone by combining its past innovation and the present one, the Galaxy Z Flip 5! Here’s a look at what this is like!
Samsung’s Retro-fies the Galaxy Z Flip 5!
The Galaxy Z Flip 5 Retro takes inspiration from the popular SGH-E700. The mobile phone became the epitome of innovation back then as it was the first to come with a built-in antenna. The new limited version of the Galaxy Z Flip 5 sees hints of the 2003 model with the presence of indigo blue and silver colors and the UX design showing the 2000s pixel graphics. There’s also the n exclusive animation on the Flex Window, which adds to the nostalgia.
Source: Samsung
Apart from this, the new Galaxy Z Flip 5 Retro comes with a few goodies. This includes the three Flipsuit cards with logos from different eras of Samsung’s history, a Flipsuit case, and a collector card engraved with a unique serial number.
Other than some visual changes, the Retro version of the Z Flip 5 is just like the original model. It comes with a 6.7-inch inner flexible 2X AMOLED display with a 120Hz refresh rate and a 3.4-inch AMOLED secondary screen (bigger than the one on its predecessor). The flip phone is powered by the Snapdragon 8 Gen 2 chipset with up to 8GB of RAM and 256GB of storage. There are dual 12MP rear cameras, along with a 10MP selfie shooter. You also get a 3,700mAh battery, an IPX8 rating, and Android 13-based One UI 5.1.
The new Samsung Galaxy Z Flip 5 Retro will be available in Korea, the U.K., Germany, Spain, and Australia from November 1 and in France from November 2. Sadly, it won’t arrive in India!