Tag: Computers

  • How to Use the Freeform App on iPhone and iPad

    Apple introduced a brand new app called Freeform with iOS 16.2, and it works on all your Apple devices, including iPhone, iPad, and Mac. The company describes the app as a collaborative whiteboard tool that can help you brainstorm ideas with your coworkers or group project members in real time. And not only brainstorm ideas, but you can sketch out graphics or create mood boards with a flexible canvas. So, if you were wondering what is Freeform on iPhone and how to use the app, you are at the right place. This post details everything you need to know about how to use Freeform on iPhone.

    What is Freeform on iPhone?

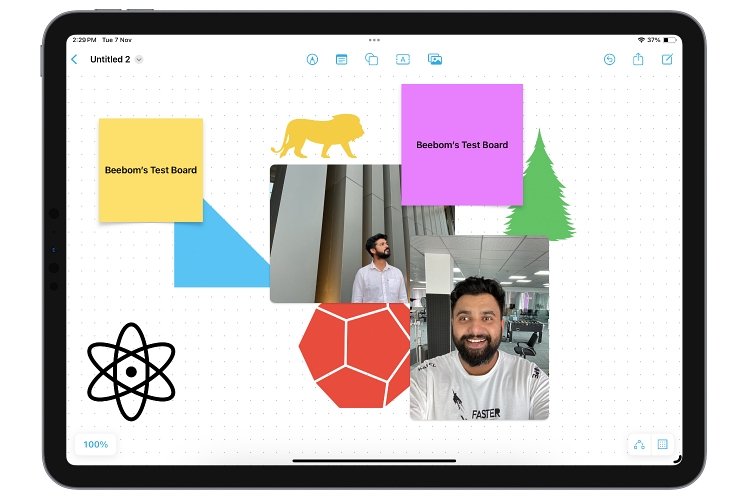
    Like the iOS 17 Journal app, Freeform is a productivity app with loads of creative potential. It’s a great place to bring ideas to life. You can schedule projects, brainstorm ideas, or create mood boards so you’re never out of space to express your thoughts. The app allows you to add photos, video, audio, documents, PDFs, web links, stickers, and more anywhere on an infinite canvas.

    Many of the tools like brushes, shapes, and others in Freeform will be familiar to anyone using the iWork apps like Keynote or Notes. It is also easy to collaborate in real-time with your co-workers teammates, and group project members as Freeform allows sharing the drawing board using SharePlay via messages or FaceTime.

    And since the Freeform boards are stored on iCloud, you can sync them across devices signed in with the same Apple ID. This way you can start creating a new board on your iPhone and finish it on your iPad easily.

    How to Create a New Board in the Freeform App

    • Open the Freeform app on your iPhone, iPad, or Mac.
    • Now, tap on the Pencil icon present at the top of your screen, and a new board screen will appear.
    create a new board

    Things You Can Do with Freeform App on iPhone & iPad

    Here are the various tools you can use with the Freeform app on your iPhone and iPad:
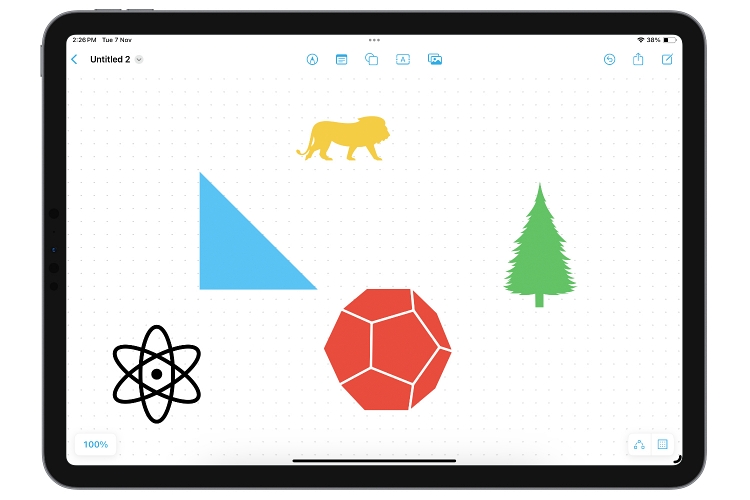
    1. Insert Shapes

    Apple’s Freeform app offers tons of pre-designed “clip art” shapes that are available across multiple categories — Basic, Geometry, Objects, Animals, Food, Nature, Symbols, Education, Arts, Science, People, Places, Activities, Transportation, Work, and Ornaments.

    You can layer multiple shapes by stacking them on top of one another, and it doesn’t end here. You can even change the shape color, draw over them, resize them with drag and drop gestures, break the component pieces apart, and manipulate the design, add borders. There are many tools for working with shapes for your projects, you can group the shapes, adjust the opacity, and much more.

    shapes in Freeform app iPhone

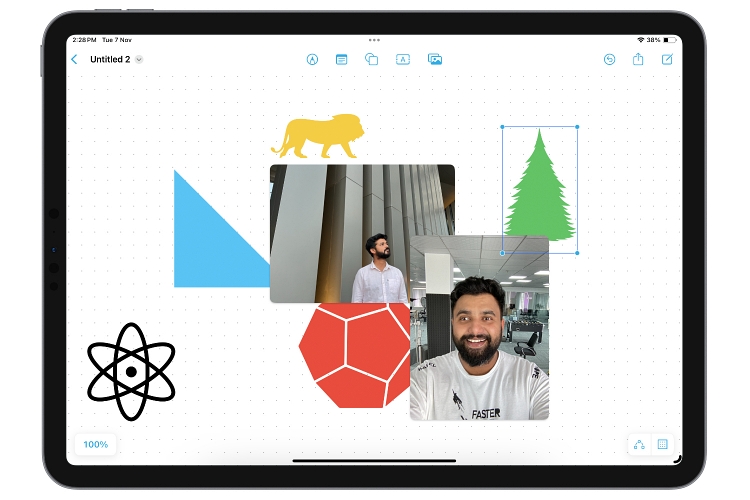
    2. Insert Images, Scans, and Documents

    You can add different types of documents to the whiteboard in the Freeform app on your iPhone. The app allows you to add photos and videos directly from the Photos app. Once you have added a photo or video to your project, you can then resize them with the drag and drop gesture, crop them, view them in full, or even layer the images with another image or shape.

    You can either scan documents using your iPhone’s camera in color or black & white or add documents to the Freeform app directly from your iCloud drive or through a link from Safari. The links and files you add will appear as small tiles and can be rearranged across the whiteboard with the same gestures you use with shapes and images.

    images in freeform app iPhone

    3. Sticky Notes

    Similar to sticky notes we use in the physical world to remember things, you can add digital sticky notes called Stickies to your project. These Stickies that are available in the Freeform app are the same as the Stickies we have been using on our Macs for a long time. Once you add sticky to your whiteboard, you can add text to it and can even change its color by choosing one of the available seven choices.

    Sticky Notes

    While on an iPad, you can use the Apple Pencil to write directly on the sticky, but in the case of an iPhone, you will need to type. You also get various formatting options available, like bold, bullet lists, different font sizes, and more.
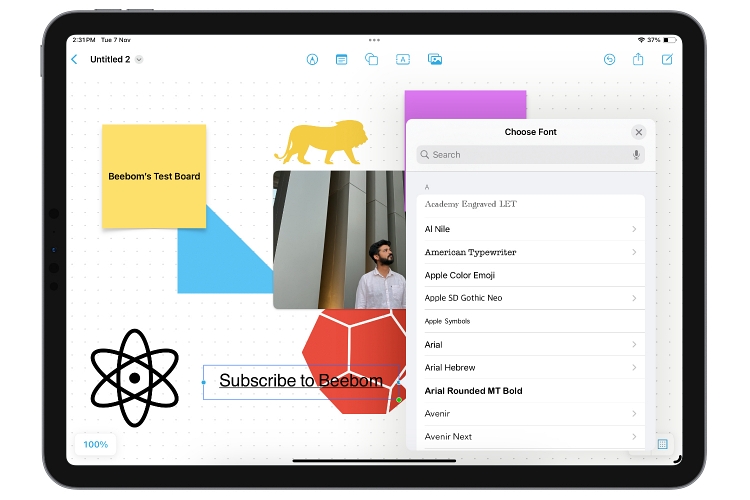
    4. Text Insertion

    You can add a text box anywhere on your Freeform canvas and then add as long or as short text as you want. Adding to it, the app also offers every possible standard formatting option, including but not limited to changing font, color, size, and alignment, as well as adding styles like bolding and underlining.
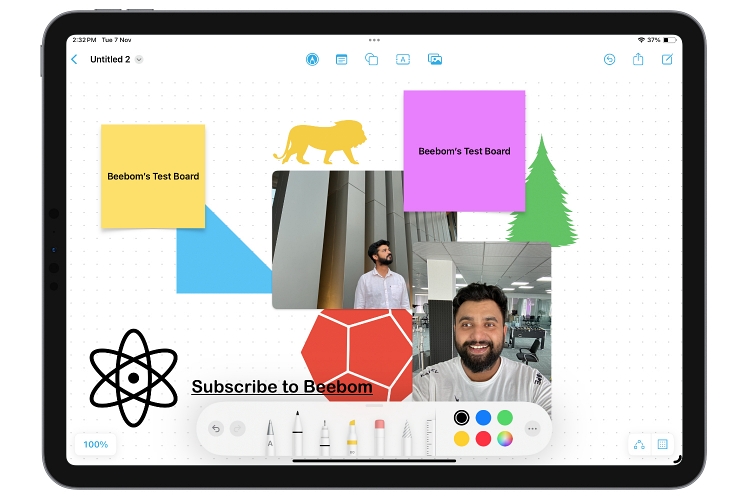
    Text in freeform app iPhone

    5. Drawing Tools

    If you are familiar with the markup tool on your iPhone or iPad, then using the drawing tools in the freeform app will be a breeze because both offer the same set of drawing tools. There are pens, markers, and crayons to choose from, all with adjustable opacity, color, and line thickness. You can use your fingers to draw on your iPhone and fingers or an Apple Pencil on an iPad.
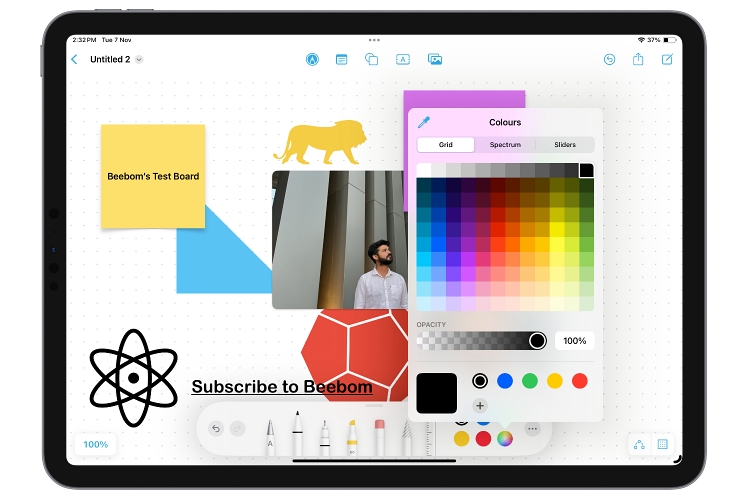
    drawing tools in freeform app iPhone

    6. Color Palette

    The Freeform app offers a whole lot of color options to users. These colors can be added by picking a simple color from a grid, choosing a color from a spectrum interface, using sliders, or even manually typing the color hex code for a specific shade.

    To make things a little easier, the app allows you to save your favorite color at the bottom of the interface. To add more color functionality, you can even adjust the opacity of the color.

    colors in freeform app iPad

    7. Object Movement

    While it is already clear that you can move any object, image, or file you’ve added to the board using the drag-and-drop gestures with your fingers or Apple Pencil, many other movements are hidden from plain sight. To access them, simply tap the added object, and a new pop-up interface will appear with a list of options.

    You can lock and duplicate the objects you added and can even constrain or unconstrain them in proportion, which is helpful if you want to change one dimension and not another.

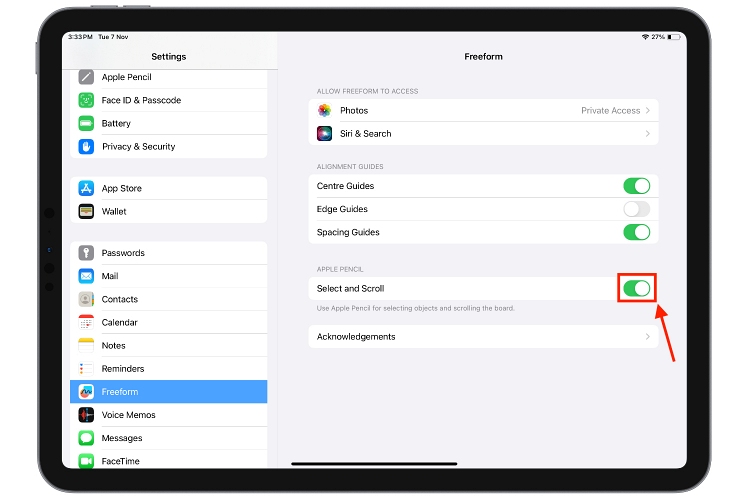
    Note: To use Apple Pencil in the Freeform app on iPad, you first need to turn On the Select and Scroll toggle in the Freeform app’s settings.

    freeform app settings iPad

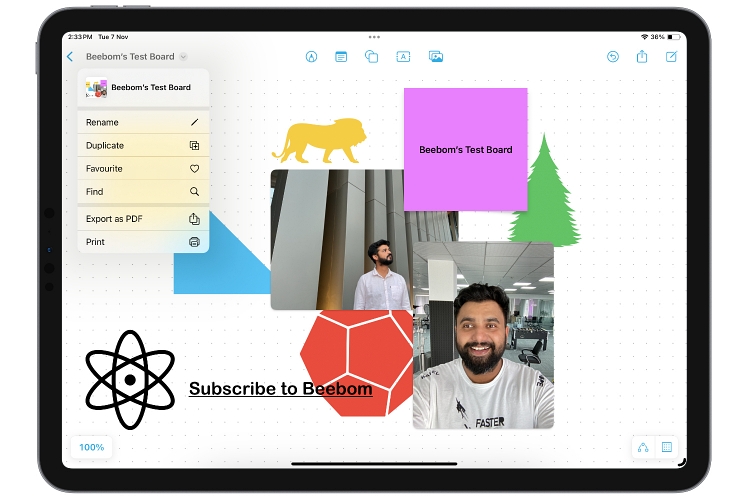
    8. Save, Print, and Share

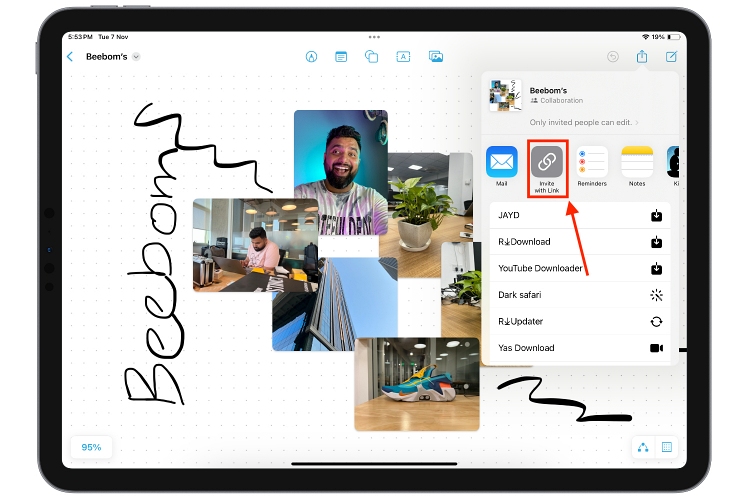
    While the board you created gets automatically uploaded to your iCloud drive, you can save the board to apps like Files and Dropbox. Along with this, the app offers you the ability to save the board as a PDF or even print it out. You can also mail, text, or share links to boards to invite for collaboration.
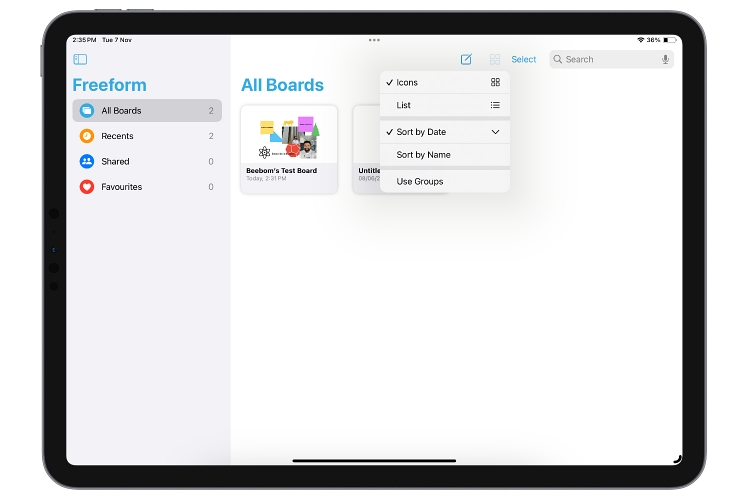
    save board in freeform app

    9. Multiple Boards

    Although the Freeform app offers an infinite whiteboard, this does not at all mean you have to settle with a single board only. You can have multiple Freeform boards, which can be viewed as icons or a list and sorted in various ways, such as by name or date. Groups are available to organize many boards, and there are also separate sections for Recents, Shared, and Favorites.

    sort boards in freeform app

    Creative Ways to Use Apple’s Freeform App

    Now that you know how to create a board and what you can add to it, it is time for you to learn about the different creative ways in which you can use the Freeform app on your iPhone, iPad, and Mac. Here are a few creative you can use the Freeform app in your daily life:

    1. Brainstorm Ideas

    Brainstorming is something everyone should use the Freeform app for. As we explained earlier, you can use the Apple pencil to pen down your most immediate thoughts so you won’t have difficulty remembering them later. Make your ideas visually appealing by adding stickies, shapes, images, and more, and connect them all per your preference.

    As the Freeform board isn’t constrained by borders, you do not have to worry about the space; you can simply zoom out on the board to reveal more empty space.

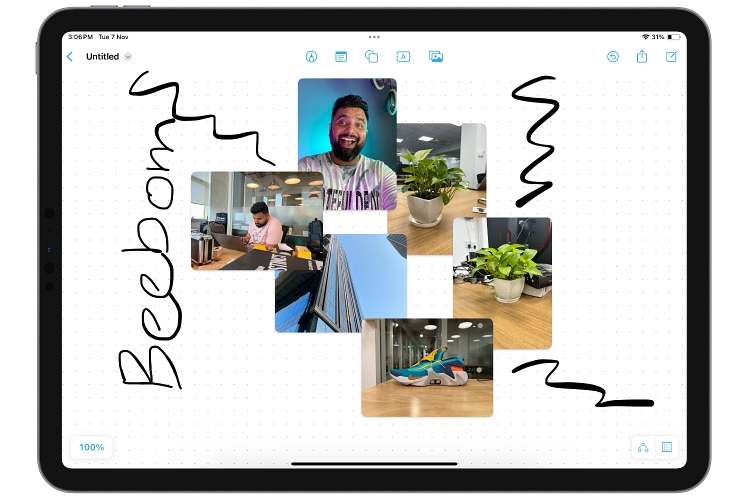
    2. Create a Mood Board

    Now, this is the most creative way you can use the Freeform app on your iPad. As detailed above, you can add as many images and videos to your board by important them from the Photos app, or if you are an iPad user, you can open the Photos app in split screen on iPad with the Freeform app and drag & drop images with your finger or Apple Pencil.

    mood board in freeform app

    One can argue that why use Freeform to create Mood Boards when there is N number of third-party apps available on the App Store for the same, but for power users like me, using the built-in app that does the same as other dedicated third-party apps is much easier.

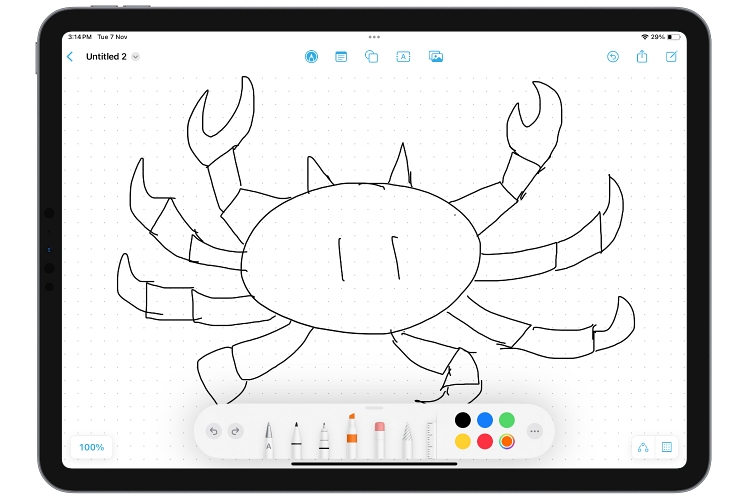
    3. Showcase Your Drawing Skills

    Freeform app is for everyone, from people who like to jot down their thoughts to those who like to draw instead of going through the hassle of typing their ideas. And if you use an Apple Pencil, you can use the Freeform app’s canvas to showcase your sketching talent. The app lets you change color, stroke, highlighter, and more to bring your creativity to life on the go.

    sketching in free form app

    4. Collaborate in Real Time

    As stated by Apple, the Freeform app is designed as a collaboration tool, though you can share created boards with other iPhone, iPad, or Mac users. Once the invite gets accepted, all the participants can work together on the same board, adding images, texts, links, and more for group brainstorming sessions. All the changes made by the participants to the whiteboard are synced for all users in real time.

    How to Use the Freeform App on iPhone and iPad

    That’s pretty much everything you need to know about the Freeform app on your iPhone and iPad. Remember, the ideas we shared are just some ideas to start with Freeform. The possibilities are endless. So, tell us in the comments how you will employ the Freeform app to boost your productivity.

    Source

  • Microsoft launches “Windows App” to remotely connect to PC on iPhones, iPads, & other devices

    Microsoft has recently launched a new “Windows App”. This new app allows users to remotely connect to their PCs from iPhones, iPads, and other devices. It provides a secure way to access a remote PC or virtual apps and desktops made available by an administrator. At the Microsoft Ignite 2023 conference which kicked off today, the company made the announcement. This new Windows app can remotely connect to Windows 365 and other devices.

    Windows App

    This app is currently launched in preview form and is available for iOS, Windows, macOS and other platforms. Users can remotely connect to Windows 365, Azure Virtual Desktop, Microsoft Dev Box or personal remote desktop PC no matter where they are.

    At the launch of the app, the company did not reveal the development details of the app. However, users who have used the app shared the screenshot below which shows that after opening the app, users will see a list of cloud computers and individual apps. This means that users can launch installed apps directly from the Windows App Launcher to apps on cloud PCs.

    Windows App

    Microsoft officially stated that the app is only available on iOS, Windows, macOS and the web. At the moment, the company has not launched the app on Android. However, from the screenshots below, we can see that the app can also run on Android. This seems to suggest that support for the Android system is coming soon. Nevertheless, since the app is not officially available for Android, it is recommended that you avoid using it on Android.

    Key Features of the Windows App

    The Windows app offers several key features that enhance the remote user experience. These features include:

    Gizchina News of the week


    • Productivity: The app enables users to remain productive regardless of their location, allowing them to access their workstations from anywhere.
    • Compatibility: The app is compatible with various devices, including iPhones, iPads, and other platforms, providing flexibility and convenience for users.
    • Easy Setup: Users can easily set up their PCs to accept remote connections and add remote PC connections or workspaces through the app.
    • Multiple Monitor Support: The app supports multiple monitor setups, enhancing the user’s remote desktop experience.

    Windows App

    How to Use the Windows App

    To use the Microsoft Remote Desktop app, users can follow these steps:

    1. Download the Windows app from the Microsoft Store on their respective devices.
    2. Set up their PC to accept remote connections.
    3. Add a remote PC connection or workspace to the app.
    4. Connect to the remote PC using the app on their device.

    Benefits of the Windows App

    The launch of the app brings several benefits to users, including:

    • Enhanced Accessibility: Users can access their PCs remotely, enabling them to work or access files from any location with an internet connection.
    • Flexibility: The app provides flexibility for users who need to access their workstations while on the go, contributing to increased productivity and efficiency.
    • Secure Connection: The app ensures a secure connection between the user’s device and the remote PC, safeguarding sensitive data and information.

    Future Developments

    The current version of the Windows app works for Windows and other platforms. The old version of the app was designed for Windows alone. However, the company has stated that it will no longer update the old version of the app with new features. Microsoft recommends users download the Windows Desktop client for the best Azure Virtual Desktop experience.

    Final Words

    The launch of the new Windows app represents a significant advancement in remote connectivity, offering users a convenient and secure way to access their PCs from various devices. With its user-friendly interface and robust features, the app will most likely enhance the remote working experience for individuals and businesses alike.


    Source

  • Dudley should be in Street Fighter 6; here’s his full story and where it might go next


    When someone brings up a boxer in Street Fighter, the uncouth and unclassy Balrog inevitably comes to mind, but Capcom also designed an antithesis character to Rog in the form of the highly-refined and well mannered ultimate gentleman: Dudley.


    The much more proper pugilist is easily one of the coolest and most charismatic characters in all of Street Fighter and yet has only popped up as playable in two main entries: Street Fighter 3 and Street Fighter 4. Let’s take a look back at the character’s history and speculate how he might look if he joined SF6 as DLC as we recap Dudley’s full story leading up to Street Fighter 6.


    In his two appearances, Dudley’s story threads are somewhat light even a little arbitrary, but they do showcase his personality which is so defined by convictions and admirable qualities that it’s hard to be anything but charmed by him.


    Just like the soil in his flourishing rose gardens, Dudley’s design is a perfect foundation for plenty more appearances and arcs, and developers would do well to bring him back into the fold as soon as possible as his speedy and combo-filled fighting style is as fun to watch as it is to play.


    Born to a high class English family with an extremely successful (at least at the time) father, Dudley grew up with a matter of fact onus to live up to ridiculously high standards. When his father unfortunately lost his fortune around the time Dudley was entering college, he got a real shot at proving his own worth outside of his father’s shadow.


    Dudley’s affinity for boxing would quickly pay off as he shot up through the ranks and became the English champion, garnering back his family’s lost estate piece by piece until all but one item was back in the family’s possession.


    This item was non other than Dudley’s father’s prized red Jaguar, a car Street Fighter 3 fans will know well at this point.


    Dudley is actually unable to find the antique vehicle during the course of Street Fighter 4, and really doesn’t accomplish much save for having an initial interaction with his boxing counterpart, Balrog, who is different from Dudley in just about every way save for the fact that they both don boxing gloves (all the damn time).


    Balrog is actually the only character (at least up until this point) that gets Dudley to break from his gentlemanly ways and hurl an insult at. Said insult isn’t the worst (Dudley calls him “not much of a boxer” in their rival scene interaction) but this is a notable departure from the character’s constant cordiality.


    Dudley actually leans into this a bit more in Third Strike when he lobs a few more insults at foes, which kind of sets up a potential arc for him should Capcom bring him back in Street Fighter 6 as DLC.


    There’s a good bit more to the story and we cover an SF6 fantasy story line in the full video below. Give it a watch, drop a like and a comment to help with the old YouTube algorithm, and let us know how much you’d like to see Dudley make a Street Fighter comeback.


    Source

  • You Can Now Get 6 Months of Free Apple Music If You Have a PlayStation 5

    Free Apple Music on PS5

    To put more effort into promoting Apple Music on the PlayStation, Apple has partnered with Sony and is now offering a free Apple Music subscription for up to 6 months to all Sony PlayStation 5 owners.

    While Apple already offers a free Apple Music trial subscription for one month, PlayStation 5 owners can extend the free trial for up to five extra months, making Apple Music subscription free for 6 months for new Apple Music users. In simple words, the promotion combines Apple’s 1-month trial with a five-month offer from PlayStation. And if you have already used the 1-month trial in the past, you can still get a free Apple Music subscription for 5 months.

    PS5 owners can redeem the free Apple Music offer by November 15, 2024. Also, the offer can be redeemed only on the PS5 console, and once the offer is claimed, you can enjoy the free Apple Music service on any compatible device provided you are signing in with the same account.

    As per PlayStation, you can stream any song on Apple Music in the background while playing any game. To initiate the Apple Music streaming in the background, you only need to press the PS button on the controller, open the Music pane, and then play a track. Not only this, your PlayStation 5 will even suggest songs relevant to the game you are playing.

    How to Get Free Apple Music on PS5

    • Download the Apple Music app on your PlayStation 5 console.
    • Open the Apple Music app and sign in with your existing Apple ID, or create a new Apple ID if you have none.
    free Apple Music offer on PS5
    • The free Apple Music subscription offer will appear to eligible customers. Claim it and enjoy up to 6 months of Apple Music at no extra cost.

    If you face any issues when redeeming the offer, contacting Apple Support is advised. After the free trial is up, $10.99 per month will be charged to the payment method on file. For additional terms and conditions, you can refer to the official Apple Music-PlayStation offer webpage.

    Also, the offer isn’t available to Apple One subscribers or those who have already subscribed to Apple Music. Also, check out the best PS5 SSD you can buy to boost your PS5 performance.

    Source

  • (Safest) How to Get a Free Joystick for Pokemon Go on iOS 17 & Android-2023

    Pokémon Go is an impressive location-based game that allows you to capture Pokémon in a virtual/augmented reality environment. The game’s principle involves going outside to look for and catch Pokémon in your surroundings. However, it may not be possible for some players to walk around to catch Pokémon. Fortunately, through the use of third-party apps, it’s possible to get a virtual Joystick and move anywhere to catch new wild Pokémon.

    Part 1: Advantages of using a Joystick on Pokémon Go

    There are multiple benefits and advantages to using a Pokemon Go joystick to navigate through Pokémon’s Go Map. For example, you no longer need to move with the phone when you’re looking for a new Pokémon. The on-screen joystick will allow you to move anywhere you need in a natural way that makes the game think you’re actually moving.

    The use of a virtual Joystick on Pokémon Go allows you to move kilometers without actually moving. You can capture many Pokémon in the comfort of your home. You can play even on rainy days when it’s hard to move outside. Depending on your location, with a joystick, you can move on to places where rare Pokémon are usually found.

    Part 2: Does the Joystick Still work in Pokémon Go

    Is still possible to use a virtual Joystick Pokémon Go, there are multiple solutions and through this article, we will present you with some. There are methods that will require you to root your Android or Jailbreak your iPhone. However, we will also present the safest method to enable joystick a Pokemon Go Joystick on iOS.

    Part 3: How Can You Get a Joystick in Pokémon Go?

    As we’ve mentioned above, there are multiple ways to get a functional Pokémon Go Joystick. However, some methods will require you to go through risky processes like rooting or jailbreaking your device. Fortunately, there is a simple software that will allow you to use a joystick in 2023 without security concerns, and we will talk about it at the top of our list.

    Method 1: Tenorshare iAnyGo –Safest Pokémon Go Joystick for iOS 17 & Android 14

    We will start our list with the software called Tenorshare iAnyGo. The app offers way more than allowing you to use a joystick, it’s just one of the many features offered here. The app allows you to spoof your device’s location to any area desired and you can conveniently use a joystick to navigate through the area without any limitation. In other words, you will get a sort of Pokemon Go GPS Joystick to freely play as you wish.

    Besides the virtual Joystick, Tenorshare iAnyGo also provides other rich and interesting features. For example, it keeps historical records of the areas you’ve visited. When moving, you can also adjust the speed to make the experience faster when you’re trying to locate a new Pokémon. It not only brings a Joystick to the gameplay but greatly enhances the experience.

    Tenorshare iAnyGo Major Highlights:

    • Freely change GPS location to anywhere without jailbreak/root.
    • GPS joystick to flexibly control the direction of movement in games.
    • Works with all location-based apps, such as Pokémon GO (iOS), Monster Hunter Now (iOS), WhatsApp (iOS), Facebook, etc.
    • Import/Export the GPX file to create your own routes.

    The app does not require you to root or jailbreak your Android or iPhone. It’s safe to use and has handy solutions to improve your experience with the game. Check the step bellows and find out how to easily enable a fake GPS joystick on Pokemon Go for Android and iOS.

    Step 1 – First, Free Download Joystick For Pokemon Go through Tenorshare’s Website.

    Step 2 – After the download, install the program. It will take just a couple of minutes depending on your PC’s settings.

    Step 3 – Launch Tenorshare iAnyGo and note that the default mode is “Change Location”. Just like we’ve said, the app offers many other features besides the joystick.

    Tenorshare iAnyGo

    Step 4 – Connect your Android/iPhone to the computer via a USB Cable. Once your device is connected, click the Enter button to get started. For Android devices, make sure to enable the USB Debugging on Android’s Developer Settings.

    Step 5: Select the device you wish to modify the GPS location.

    Step 6: Once the app is connected, you’ll be able to select a location on the Map. You can enter the address/GPS coordinate you want to teleport in the search box.

    Free Joystick Pokemon Go

    Once you’ve successfully changed your location, you will be able to control the movement with an on-screen joystick on Pokémon Go. The app also features a cooldown feature that reminds users to not change their location too frequently. This will protect them from being banned for “strange behavior”.

    Step 7: To use the Joystick on Pokémon Go, just pick the “Joystick Movement” mode. Launch the program and choose the “Joystick Movement” mode on the home screen. After that, you will find a joystick in the lower-left corner of the screen.

    Gizchina News of the week


    Free Joystick Pokemon Go

    With the Joystick you can set the slider to adjust your movement speed on the joystick. You can simulate walking, biking and even driving with it. However, for playing Pokémon it’s better to be somewhere between the walking and biking movement.

    The app also allows you to start an automatic movement by dragging the middle button to the circle and releasing it. The GPS will start to move automatically at the set speed. It’s possible to tweak the direction freely in 360 degrees during the movement.

    Tenorshare iAnyGo offers multiple features to improve your experience. It’s safe and with just a few minutes you will be conveniently playing the game with a joystick. It’s a valid Pokemon Go Joystick Android solution! It will also work flawlessly on iOS!

    YouTube Video:

    Method 2 – iPoGo App (Jailbreak)

    There is also a Pokemon Go Joystick iOS alternative. However, it may be risky and complicated for certain users. We are talking about the iPoGo app. This app also works by spoofing your GPS location, and it has a virtual joystick as one of its key features. You can enable the Joystick inside the app’s settings. The app has other features and aims to improve your experience with the game.

    Free Joystick Pokemon Go

    However, it requires you to jailbreak your iPhone. This means it won’t be available for modern iPhones with newer iOS releases. The app is also risky to use since you can be easily detected by Niantic and banned.

    Part 4 – Is there any Free GPS Joystick for Pokemon Go?

    When it comes to Android, there is also free GPS joystick alternative – the PGsharp application. It does allow you to play with a joystick on Android, but it comes at the expense of certain risks.

    PGSharp 

    The PGSharp app allows you to fake your GPS location for Pokemon Go. It allows you to move through the new location with the use of a virtual joystick. You can move freely with the joystick and can tweak the movement speed.

    Free Joystick Pokemon Go

    Although the app allows you to fake your GPS location and use a virtual joystick for Pokémon Go, it’s not available on Google Play Store. It requires you to download the apk from the app’s website and sideload it on your Android phone. For non-advanced Android users, the process can be tricky and even risky if you don’t know How to Download Pokémon Go Joystick APK in your device.

    Part 5: Tips to avoid getting banned in Pokémon Go

    Obviously, Niantic wants all the players to go outside and play Pokémon Go as it was planned to be. We know that this is not possible for some players, that will try to find solutions like the virtual joystick. If you need to spoof your location and play with a joystick, there are some tips to follow in order to not be banned by Niantic.

    • Pay Attention to the Cool time Chart – Don’t keep changing your location without a time interval between the changes. If you keep changing without respecting the cooldown time you will be detected. Tenorshare iAnyGo comes with a cooldown chart that will advise you to not change your location and will start a countdown to show you when it’s the appropriate time to change it again.
    • Make Sure to Log out your Account before spoofing location in Pokémon Go
    • Turn on/off Airplane Mode Before spoofing in Pokémon Go.

    Part 6: Location Spoofers, VPN and Tenorshare iAnyGo, Which one is better?

    Nowadays, there are multiple methods to spoof your GPS location and make Pokemon Go think you’re on a different regions. There are also VPN solutions that will completely change your phone’s location. However, on top of the offered solutions here, we can list Tenorshare iAnyGo as the most practical and reliable app to get access to a Joystick on Pokémon Go. The app not only changes your location, but also comes with security features like the cooldown chart to prevent you from changing location often.

    Tenorshare iAnyGo won’t ask you to root or jailbreak your device, keeping your device’s integrity while you can enjoy the best experience with Pokémon Go and other location-based games.

    Free Joystick Pokemon Go

    Conclusion

    Considering all the benefits, we strongly recommend Tenorshare iAnyGo as the safest and most effective way to play Pokémon Go with a joystick on iOS and Android. It supports newer Android and iOS versions and you won’t need to risk your data and your progress in the game.

    Hot FAQ about Pokémon Go Spoofing:

    1 – How to Play Pokémon Go without Walking?

    You can use Tenorshare iAnyGo’s in-app joystick to simulate movement in the game. Furthermore, you can set any location and use the Joystick to navigate. You can do all this at the conform of your house.

    2 – How to bypass the Pokémon Go speed limit

    Tenorshare iAnyGo can easily bypass the speed limit in the game. You can tweak your movement in the map through the app’s intuitive UI. There is a convenient slider that will allow you to set up different kinds of movement speeds.


    Source

  • Here’s every character on Tekken 8’s launch roster


    Tekken 8’s January launch is growing ever closer and Bandai Namco has officially revealed every single member of the game’s 32-character launch roster.


    There are plenty of Tekken staples that have appeared multiple times in franchise entries over the years, but also a few brand new fighters that’re joining the fray. We’ve each and every one listed below (along with a factoid or two to go with) so you can make a fully informed decision when choosing your main.


    To start with, 32 characters is a relatively large bunch for the very beginnings of a modern fighter. With the assumption that an established AAA title like Tekken 8 will have plenty of DLC comers in the future, it’s lovely to see Bandai willing to give us a wealth of options right off the bat.


    Azucena


    This Peruvian MMA fighter will be making her Tekken debut, though she’s already been playable as part of Tekken 8’s beta tests. She’s all about her coffee farms, and aims to promote her own personal blend and help the Ortiz family’s business grow by garnering popularity via winning the next King of Iron Fist Tournament.


    Victor Chevalier


    This brand new Frenchman is something of an anime John Wick with his brutal close-range gun and sword attacks. He teleports about the arena with movements similar to the likes of Raven and Master Raven, which makes a lot of sense given he’s the director and trainer of the Raven unit.


    Reina


    Reina is the most recently revealed character for Tekken 8 and next to nothing is known about her yet. Her nickname is Purple Lightning and she uses rapid, electrically charged kicks to get the job done in battle.


    Kazuya Mishima


    Kazuya has been around since the very beginning and is still going strong. Get ready for Electric Wind God Fists galore as this iconic move becomes easier to perform when Kazuya has the Heat mechanic activated.


    Jin Kazama


    Jin was introduced back in Tekken 3 as the game’s protagonist, and has been feuding with his father, Kazuya, pretty much ever since. The battle will rage on as he and his dad were the first two characters revealed in Tekken 8, and indeed, it wouldn’t feel much like Tekken without them.


    Jun Kazama


    Jin’s mother, Jun, first appeared back in Tekken 2, but hasn’t been as prominent as her family members. She made a return in Tekken 7 and looks to continue leveling up her attendance record here in T8.


    King


    You see this jaguar mask and you instantly know what franchise you’re playing. This Mexican wrestler has been the go-to command grab character for Tekken since the very beginning, and has appeared in every entry since.


    Paul Phoenix


    Like King, the hot-headed American brawler, Paul, has been in each and every Tekken entry since the franchise’s inception. Similar to his Street Fighter counterpart, Ken Masters, Paul looks like he’s seen better days as he appears a little more on the vagrant side than usual. He can still dole out the damage with powerful punches, though, and we all know that’s what counts.


    Marshall Law


    You’re always bound to get one of the Laws and this time around, it’s Marshall. The Bruce Lee homage comes equipped with many of Lee’s iconic moves, including flip kicks and one-inch punches.


    Jack-8


    The nice thing about Jack is that if you ever forget which Tekken you’re dealing with, you just have to peep his name (save for his one missed roster in Tekken 4). The robotic big body beats and blasts his way through foes with gnarly haymakers and launchers that are sure to lop off big chunks of health bars at a time.


    Lars Alexandersson


    The protagonist of Tekken 6 and illegitimate son of Heihachi Mishima returns with more “enemy of my enemy” energy as he reluctantly joins with half-brother Jin to take down Kazuya and bring about world peace. Lars is quick, agile, and great for players who want to counter overly aggressive foes.


    Ling Xiaoyu


    Xiaoyu has been kicking butt ever since Tekken 3, and brings her Chinese martial arts to Tekken 8. Her quick and graceful style is great for those who like fast fighting in close quarters.


    Nina Williams


    The silent assassin has been breaking hearts and beating baddies (and good guys) since the very first Tekken. She’s changed up her appearance quite a bit in Tekken 8 with shorter hair and a leather jacket, and continues to user her unique blend of Aikido, Hapkido and Koppojutsu to put the hurting on enemies.


    Leroy Smith


    The reception to Leroy after his Tekken 7 debut was undeniable, and so it comes as little surprise that Bandai is bringing him back in Tekken 8. The Wing Chun fighter is all about that kung-fu style, though he very much personalizes it with special maneuvers such as when he calls his dog, Sugar, in for a little help.


    Asuka Kazama


    Ever since she joined the cast in Tekken 5 Asuka has been a franchise mainstay. She uses a lot of the same general techniques and movements as her fellow Kazama characters, though with a looser and less “by the book” approach that gives her her own unique flavor of fighting.


    Lili De Rochefort


    Another Tekken 5 original, Emilie “Lili” De Rochefort is a bit of a spoiled princess, but with enough fighting prowess to back it all up. She fights with a flair for dance and gymnastics as she nails foes with versatile spins, cartwheels, handstands, tumbles and pirouettes.


    Bryan Fury


    Bryan has been giving off those super angry serial killer vibes ever since Tekken 3, and brings that chaotic fighting energy to the latest installment. Those who like lots and lots of maniacal punching until whatever it is they’re assaulting is totally unrecognizable will love Bryan.


    Hwoarang


    The Taekwando master from Tekken 3, Hworang has been scoring wins with his machine gun kicks for a good two and half decades now. We can expect more of the same as he smacks foes from various distances with his rapid fire feet in Tekken 8.


    Claudio Serafino


    Every fighting game needs their exorcist, and Claudio returns from his Tekken 7 debut to make sure any and all demons are shown what for in Tekken 8. Claudio uses a lot of the regularly seen standard punches, kicks, and shoulder tackles, but does so with a particularly flamboyant style.


    Raven


    Raven showed up in Tekken 5 and has been in every entry (save for Tekken 7 where his counterpart, Master Raven, gave him a game off) since. The Dark Talon of Death is a ninja, through and through, and fights with agility and deception.


    Leo Kliesen


    Leo will be making his third appearance in a row after debuting in Tekken 6. The Baji Quan-using German is all about explosive, short range power.


    Steve Fox


    Steve has been a total fan favorite ever since Tekken 4. The boxer relies solely on his fists to get the job done, though he’s no slouch when it comes to maneuvering and fancy footwork. Despite being a boxer, he’s not at all afraid to punch below the belt.


    Kuma


    Heichachi Mishima’s pet bear popped up all the way back in the first Tekken and has appeared (in one form or another) in most entries since. His style “Kuma Shinken” is all his own, and is pretty much what you’d expect when you hear about “a bear that stands on two legs and does martial arts.”


    Yoshimitsu


    Though a swordsman from the very first installment, Yoshimitsu always has some new and out there theme attached to him. This time around he’s a mechanized space ninja, but you can expect a lot of ninjustu paired with supernatural attacks.


    Shaheen


    Fresh off the momentum of his Tekken 7 debut, Shaheen is bringing his military style, close quarters combat back in T8. He adds quite a bit of flair to his beat downs with highly acrobatic flips, slides, and slams.


    Dragunov


    Sergei Dragunov was first introduced in Tekken 5 and uses a modified version of Sambo to put enemies down.


    Feng Wei


    Feng is another Tekken 5 original who uses God Fist Style Chinese Martial Arts, a super aggressive style based on the Cantonese martial art Hung Gar.


    Panda


    Panda is very similar to Kuma, but has been branching out via baby steps to be a separate character. In Tekken 8 she actually shares some attacks with Xiaoyu, marking perhaps her most significant departure from being a Kuma copy yet.


    Lee Chaolan


    Series regular Lee has only missed Tekken 3 thus far, and continues his otherwise spotless attendance in T8. Though he started as a Mishima-style character, Lee branched out in Tekken 4 to become much more mixed and now samples from JKD, taekwondo, boxing and other martial arts.


    Alisa Bosconovitch


    Alisa is an android that made quite the splash in Tekken 6. Essentially a robot created to look like the daughter of her creator, Alisa has many weapons build into her design as she boasts chainsaws, wings, thrusters, and other hidden abilities.


    Zafina


    A Tekken 6 original, Zafina brings the exorcist count on Tekken 8’s roster up to two. Her spider-like fighting style is filled with contortionism and insane feats of flexibility unlike most any real life martial art.


    Devil Jin


    Think Jin, but with devil wings and eye lasers. He’s been part of Jin’s story since Tekken 3, but first became playable as a unique character in Tekken 5.


    Tekken 8 is still scheduled to launch on January 26, 2024 for the PlayStation 5, Xbox Series X|S and PC.


    Source

  • OPPO Begins ColorOS 14 Global Rollout; Here’s What’s New

    oppo releases color os 14 software for its smartphones

    Oppo, the highly popular smartphone maker, has made an important announcement today regarding its phone software known as Color OS. The public beta for the new version, Color OS 14, began back in October for selective devices. Today, the company has announced that ColorOS 14 has started its global rollout exit from the beta stage to the stable version.

    Let’s talk about the new features in Color OS 14. Oppo says it is introducing an optimized Aquamorphic design which essentially carries forward ColorOS 13’s approach. The design language aims to dynamically adapt the smartphone’s UI colors in accordance with the context. Basically, the system UI colors are matched upon different factors such as the time of day and your phone’s current status. Oppo also touts that this new design is ‘inspired by water’ hence the name.

    Next, there is Aqua Dynamics. This is a new UI feature that dynamically integrates various apps & common interactions done on a smartphone and puts them at the top. It looks very similar to iPhone’s dynamic island which is present across Apple’s new 2023 lineup. When you are in the middle of a voice or screen recording, you can continue monitoring its status while doing other things on your phone.

    Oppo Color OS 14 Features
    Color OS 14 Brings Aquamorphic design, Aqua Dynamics, new AOD wallpapers, and more Image Courtesy: OPPO

    Apart from this, Color OS 14 also brings a few new useful tools. The new File Dock is very useful for conveniently storing files and other stuff (such as Amazon listings, images, books). After doing that, the File Dock keeps all your data for 30 days, and you can quickly access it! There is also a new Smart Image Matting feature. This lets users remove the background from a subject in their photos. Oppo is also introducing new Always on Display (AOD) wallpapers, simultaneously promoting a ‘go green’ initiative with it.

    OPPO ColorOS 14 Trinity Engine
    Image Courtesy: OPPO

    Lastly, Oppo is also introducing an Upgraded Trinity Engine that brings CPU, RAM, and ROM Vitalization. These essentially work on continuously optimizing the system’s computing resources, speeding up memory performance, enabling higher app efficiency, and more.

    Color OS 14 Release Date & Device Eligibility

    Sadly, not all Oppo smartphone users will get the stable ColorOS 14 update immediately. It is only the Find N2 Flip, Oppo’s flip-style foldable phone, which is getting a new Color OS 14 stable update imminently along with the October security patch. The update is confirmed to have begun rolling out in selected regions.

    Oppo has not yet confirmed when exactly the stable versions of the Color OS 14 update will reach other Oppo smartphones. However, the company had previously talked about the Color OS 14 global beta version and has even provided a roll-out timeline for the same. As we just said, the Find N2 Flip is the first to receive a stable version of Color OS 14. We will update you once the stable Color OS 14 version begins rolling out widely to other devices and if we receive any further details on the device eligibility.

    oppo color os 14 beta software release timeline for various oppo smartphones

    Are you eagerly waiting for the Color OS 14 update for your phone? Do let us know your thoughts on the Color OS 14 update in the comments below.

    Source

  • 4 Easy Ways to Take Screenshots on Your Computer

    Most smartphone users are familiar with taking screenshots on mobile devices to show others certain things you’re viewing. However, the feature that is present in smartphones, originated from PCs. While it is a pretty standard feature for expert PC users, it may not be for newcomers. Screenshots can be useful in various scenarios, especially at work. You can record the content you’re working on, take a screenshot to better illustrate things you’re doing, or guide other users through certain tasks. You can also capture screenshots to show bugs, to have proof of your work, and more. There are many reasons to know how to capture screenshots on a PC, and through this article, we will guide you through the 4 easiest methods to do so. (Via).

    There are multiple ways to accomplish this simple task on Windows PCs. We’ve detailed the easiest methods below. They will work well in Windows 11 or Windows 10, and we will also teach you to capture screenshots on Mac and Linux Distros. So, without further ado let’s dive into the 4 easy ways to take screenshots on PC.

    How to Take a Screenshot on a Windows PC with the Snipping Tool

    With modern Windows releases, Microsoft shipped the Snipping Tool to users. It’s a built-in screen-capture tool that does its job in a satisfactory way. It’s not the most robust or versatile feature when you want to take simple snapshots. However, it allows the user to better determine and capture portions of their desktop and display them as a screenshot.

    How to use the Snipping Tool

    To start using the Snipping Tool for Screenshots, simply type “snipping tool” into the taskbar’s search box and select the resulting app.

    Step 1: Windows 10 users will see a notification that it’s “moving to a new home” in a later update. In Windows 11, the tool is still available, but Microsoft encourages users to try the Win + Shift + S keyboard shortcut.

    Step 2: On Windows 10, select the Mode button to expand the menu. You find four screen-capturing options: Draw a Windows (Free-Form Snip), Box in an Area (Rectangular Snip), Capture the Current Windows (Window Snip), and capture the entire screen (Full-screen Snip). On Windows 11, you’ll need to select New or Press the Win + Shift + S keyboard shortcut in order to start a snip. Once you’ve done either, the screen will darken a bit and you’ll be presented with the four “mode” options we’ve mentioned above.

    Step 3: Select one of the modes and start taking your screenshots. The Snipping Tool interface will display your screenshot. You can even perform some light edits like using a pen or highlighter, or erase something. In Windows 11, the editing screen will show up automatically. If it does not show up, you’ll have to select a notification that pops up first in order to open the editing screen.

    Step 4: Once you’re done editing with the Snipping Tool, select File in the upper-left corner and then click the Save option listed on the drop-down menu. In Windows 11, you need to select the “Save as Disk” icon in the top-right corner. Name your file on the screen that pops up, and select the Save button.

    How to Capture Screenshot on Windows 10 with Old Snip & Sketch Tool

    On Windows 10 there is also another tool to capture screenshots. Before the Snipping Tool, users have been served with the Snip & Sketch Tool. This feature is no longer available with Windows 11. However, if you’re a die-hard Windows 10 user and want to use the former solution, we can also give you some tips on how to use it.

    Step 1: In older releases, you can call forth the Snip & Sketch Tool with the Windows + Shift + S shortcut. The screen darkens and renders a five-button toolbar along the top. You will get the same functions found in the older Snipping Tool. However, if won’t save your screenshots as a file. Instead, the image goes straight to your clipboard first.

    Step 2: You will also see a desktop notification that informs you that the image has been copied to the clipboard. The same notification gives you the option to edit the captured image within the Snip & Sketch app. You can access this latter option by selecting the desktop notification. If you select the notification, the screenshot loads within the app. From there, you’ll be able to crop the image and apply a pen, pencil, highlighter, or eraser.

    Step 3: If you load the Snip & Sketch app instead, select the drop-down arrow next to the “New” Button in the top-left corner and select “Snip Now” in the drop-down menu. The screen darkens, and the five-button toolbar appears. Take your snip, and your desired image should automatically load in the Snip & Sketch app, ready for further editing.

    Gizchina News of the week


    Step 4: Save the image anywhere on your PC by choosing the Disk-style button. If you want to edit and save the screenshot using any installed image editor, select the Three-dot icon on the toolbar and choose the “Open With” option on the drop-down menu. In Windows 11, we have the “Edit in Paint” button, to edit the screenshot via Microsoft Paint’s app.

    How to Take A Screenshot on a Windows PC using Classic Keyboard Shortcuts

    If you’re a fan of the classic method, we will also teach you on how to capture with the conventional PrintScreen shortcut. However, you will be surprised to know that Windows provides up to six methods for taking screenshots using keyboard shortcuts. The first three methods are based on the Print Screen (PrtScn) key, while the remaining use the Windows (Win) key.

    On external keyboards, you’ll find a dedicated PrtScn key located in the upper-right corner. When it comes to laptops, the command may be combined with another function on a single key. Some models will require you to press the Function (Fn) key to enable the Print Screen Commands. Below, you will see details about the six screen-capture commands available:

    The Keyboard Shortcuts (Windows)

    • Print Screen (PrtScn): Captures the entire screen. By default this method does not save the image as a file. It merely sends the captured image to the Windows clipboard. On Windows 11, the Print Screen Button may automatically open the Snipping Tool. However, this can be disabled.
    • Alt + Print Screen: Captures a Single Window. It’s useful when you want to show only a particular window rather than your computer’s entire screen. This does not save the image directly, and only puts the print on the clipboard.
    • Win + Print Screen: Captures the Entire Screen. The main difference here is that Windows saves the image as a file. By default, it is sent to C:UsersPictures>Screenshots or C:UsersOneDrive>Pictures>Screenshots.
    • Win + Shift + S: Captures a screenshot using the built-in screenshot tool called Snip&Sketch (Or the new Snipping Tool app in Windows 11). The screen dims and provides four choices on a small toolbar. This tool does not save captures as an image. It merely sends them to the clipboard.
    • Win + G: Opens the Xbox Game Bar. Select the Capture Button and then the Camera Icon. This tool will save the image to C: Users>>”UserName”>Videos>>Captures.
    • Win + Alt + Print Screen: Captures the active window and saves the file directly. This command saves an image to C: Users>

    In some cases, the screen flickers or dims to signify that Windows has grabbed a screenshot. If this does not happen, Open the File Explorer and head to their respective default locations to see if Windows saved your image.

    Take a Screenshot on a Windows PC: Using OneDrive

    If you’re an avid user of OneDrive and its features, you can use the cloud app to take screenshots and share them to other devices that are synced. It does not save screenshots by default. So you need to select the Cloud icon next to the System Clock. If the the icon is not appearing, you need to open the OneDrive app and sign in to your account. After selecting the Cloud icon, choose the Help & Settings gear icon and select Settings on the pop-up menu. Next, choose the Backup tab in the resulting pop-up window. Check the box under Screenshots and select OK.

    Once the Screenshots are assigned to OneDrive, you can use the above methods to automatically save a Print to OneDrive. You will receive a notification once your image is saved. You can them access the screenshots on any device synced to your OneDrive account.

    How to Take Screenshots on Other Devices (Mac, Linux, Chromebook or Surface)

    On Mac computers

    If you’re a Mac user, and wants to take a screenshot there are also some methods to capture the screenshot. It’s simple and the easiest method involves the use of some keyboard shortcuts. The Command + Shift + 3 will capture the whole screen, while the Command + Shift + 4 will let you draw out a selection box.

    With Surface

    To capture a screenshot on a Microsoft Surface device simply Press and Hold the Volume Down Button + Power button at the same time. It’s the easiest of the methods.

    On a Chromebook

    There are a few different methods to capture screenshots with Chromebooks, but the easiest is the keyboard shortcut. Press Control + Show Windows keys to capture the whole screen. Meanwhile, the Control + Shift + Show Windows will let you capture a selected area.

    On Linux

    Linux will also support the keyboard shortcuts for the print screen. You may find different options through the various Linux distributions available. So, the simplest method that will work across different Linux distros is the keyboard shortcut method. You can simply press the PrintScreen button to capture the whole screen, or the Alt + PrintScreen to capture the current window.

    Conclusion

    As you can see there are multiple ways to capture screenshots regardless of your Operating System and Computer. It’s a neat and simple feature that can be quite useful for work environments and even for casual things.


    Source

  • Next Super Smash Bros. entry potentially hinted at with Bandai Namco’s Studio 2/Studio S announcement


    As highlighted by Source Gaming, Bandai Namco has announced the creation of Studio 2/Studio S. This studio apparently exists solely for the purpose of contract game development for Nintendo.


    It would appear that Studio 2/Studio S already has quite a bit of experience under their belt as they consist of a team that were involved with the development of games like Mario Kart 8, Mario Kart 8 Deluxe, Mario Kart Tour, Mario Sports Superstars, and ARMS. Perhaps even more noteworthy, however, is that they were also the developers behind Super Smash Bros. for the 3DS, Super Smash Bros. for the Wii U, and Super Smash Bros. Ultimate.


    Most curiously, it’s been reported that the website for this special studio is currently looking to hire for new positions. In particular, they’re looking to fill positions with those experienced in action games, some of which are of the “side-view” variety.


    According to the website, there are currently 152 members already employed at the studio. It’s certainly interesting how Bandai Namco wishes to expand the team further with more members with this very specific experience.


    Back during the development of Super Smash Bros. 4 in 2013, Masahiro Sakurai, cocreator of the Super Smash Bros. series, sat down for an interview with Gamespot. It was during that interview where Sakurai noted how he tends to think of the Super Smash Bros. series falling into the “four-player battle royal action” category, rather than the fighting game genre.


    “When planning the development of a new game, I always take a lot of care to discuss the concept and try to define it as best I can,” said Sakurai back then. “For example, I like to think of Smash as a four-player battle royal action game. You’ll notice that’s a lot longer than saying it’s a fighting game, because ‘fighting game’ is a completely different label.”


    The Super Smash Bros. series has always been a 2.5D platform brawler that can fit into the categories of an “action game” that is played with a “side-view.” Needless to say, there’s a good possibility that Bandai Namco are potentially revving up to begin development on the next project within the Super Smash Bros. series.


    On multiple occasions, Masahiro Sakurai has talked about how Super Smash Bros. Ultimate’s theme of “Everyone Is Here” was only possible because of the involvement of Bandai Namco during the development for Super Smash Bros. 4 which carried over into Super Smash Bros. Ultimate. As such, this resulted in a much more seamless transition between the development of the two titles.


    Sakurai has also mentioned many times that he doesn’t feel as though the “Everyone Is Here” theme can be repeated in a future entry. Furthermore, even he’s unsure of where the series can go at this point, though he notes that he’ll probably need to be involved with development when the time comes again.


    With rumors about the Nintendo Switch follow up, many have already considered the possibility of a “Super Smash Bros. Ultimate Deluxe” for the new console. Coincidentally, Studio 2/Studio S was involved with the development of Mario Kart 8 for the Wii U and Mario Kart 8 Deluxe for the Switch.


    It’s also worth noting that Mario Kart 8 Deluxe and Super Smash Bros. Ultimate are the first and third best-selling titles on the Switch with 57.01 million and 32.44 million units sold respectively. Needless to say, Studio 2/Studio S already has an outstanding track record when it comes to developing games for Nintendo, so it’d certainly make sense for Nintendo to use them again when the time comes to begin development for the next Super Smash Bros. entry.


    Source

  • Android 14 QPR2 Beta 1 Update Released for Pixels with New Features

    Android 14 QPR2 Beta 1 Update

    After three Android 14 QPR1 Betas, Google has finally released the first beta of Android 14 QPR2 for the Pixel devices, and it comes with a few new and previously announced features. And of course, it wouldn’t be an Android update if the new build doesn’t add new features that are hidden and are “coming soon.” Here are all the new features in the Android 14 QPR2 Beta 1 update for Pixel devices starting Pixel 5.

    Record a Particular App Screen

    Screen sharing update

    The screen recorder feature now allows you to record a particular app. It keeps recording the app until it’s killed, meaning when you switch to using a different app, it keeps recording the previous app. While recording a particular app, it doesn’t let the notification pop-ups or UI elements bomb the recording, which is pretty cool and useful.

    New Privacy Indicator

    New Privacy Indicator

    When an app uses your phone’s camera or microphone, you can now swipe down and tap on the green privacy indicator to reveal a new UI. Doing the same previously would launch a full-screen Safety Cernter-like UI.

    Faster Update Installation

    Updating a Pixel used to take forever, until Android 14 QPR2 Beta 1. If you recently updated your Pixel, you may have noticed a substantial improvement in the installation speed, and the same is not coincidental.

    According to Mishaal Rahman and a user “Moshe,” the update may have been installed faster this time because the Pixels now use Tensor’s mid cores to boost the update process. This was reported from a Pixel 8 the installation on our Pixel 6 was also blazing fast unlike prior betas.

    Quarantined Apps

    Quarantined Apps - Android 14 QPR2 Beta 1 Update

    Users can now “Quarantine” apps by going to the Quarantine Apps section in the Developer Options. Toggling on apps in the same menu stops them from opening, which doesn’t exactly explain why this feature exists in the first place. We should hear more about this as more details about the builds are revealed.

    Turn Off “At a Glance” For Good!

    A huge addition that’s coming soon to the Pixel Launcher is the ability to get rid of the At a Glance widget from the home screen. This was a much-requested feature and Google has finally listened to the requests from people in this new Android 14 Beta update. If you, on the other hand, like At a Glance, you have to use Smartspacer, an app that improves At a Glance.

    A New “Your Pixel is up to date” Screen

    New Pixel is Up to Date Screen - Android 14 Update

    I was convinced that my phone had been wiped by the new update after this new screen flashed on my face. It turns out, it’s just a new screen that Google has added as a replacement for the “Your phone was updated” pop-up.

    Features “Coming Soon”

    • Remove Authenticator Unlock (Watch Unlock alternative for AOSP)
    • Bluetooth Quick Setting tile
    • Private Space (Probably a feature to hide apps)
    • Keyboard vibration in Settings
    • Notification Cooldown (May lower notification volume when an app spams notifications)

    And that’s all the features that are new and upcoming in the new Android 14 QPR2 Beta 1 update. Do let us know your thoughts about the same in the comments section below.


    Source