The Fortnite OG map event is coming to an end soon. And now, with the next Big Bang event update announced by Epic Games, it is obvious that something grand is afoot at the end of this chapter.
Recently, there have been leaks of what is coming for the final act of chapter 4, and well, it is none other than the Real Slim Shady “Eminem”. All the leaks were finally confirmed when the RAP GOD himself shared a teaser on his X (formerly Twitter) account.
Fortnite Eminem Skins First Look Leaked
Fortnite last had a concert in 2021 featuring Ariana Grande where she got her skin and its variants added to the game. With no Eminem album or single around the corner, it will be interesting to see what the concert/ event will be about.
However, leakers suggest that the concert for Eminem is not planned as a concert-only event. This means there will be more than just a concert in the finale of the OG chapter. Now that the Big Bang update of Fortnite comes on December 2, confirmed by Fortnite, players are super excited.
The leaked Eminem skins coming to Fortnite, shared by leaker FNBRIntel on X (formerly Twitter), suggest him being a Marshall Mafia enforcer. Moreover, the skin variants coming to the game include a Marshall Magma version, a Slim Shady version, and a Masked Demon version. Here is a look at the leaked variants of the Eminem skins.
We can speculate that players will have to attend the live event or concert to unlock the skin or its variants. The update will go live right after a week of Fortnite x Invincibles skins drop. The rumors also suggest the Lego collaboration is on the way, so be on the lookout for that.
Recommended Articles
Epic Games Finally Responds to Fortnite’s Skin Restrictions
Sampad Banerjee
Nov 21, 2023
A Complete List of Age-Restricted Fortnite Skins
Ishan Adhikary
Nov 19, 2023
Moreover, we can also speculate what are the big changes coming in the event on December 3, 2023, along with Eminem’s skins. Let us know in the comments what you think of the Eminem x Fortnite collaboration.
Ishan Adhikary
A Gamer since day 1. Love playing games and critically observe it like a nerd. Spent all my childhood playing games and not reading books. I play a lot of different games. If I am not writing then probably I am shooting down some heads in Valorant or Fortnite. I might end up in your Roblox lobbies in my chill time. Or else, just reading other authors and listening to music.
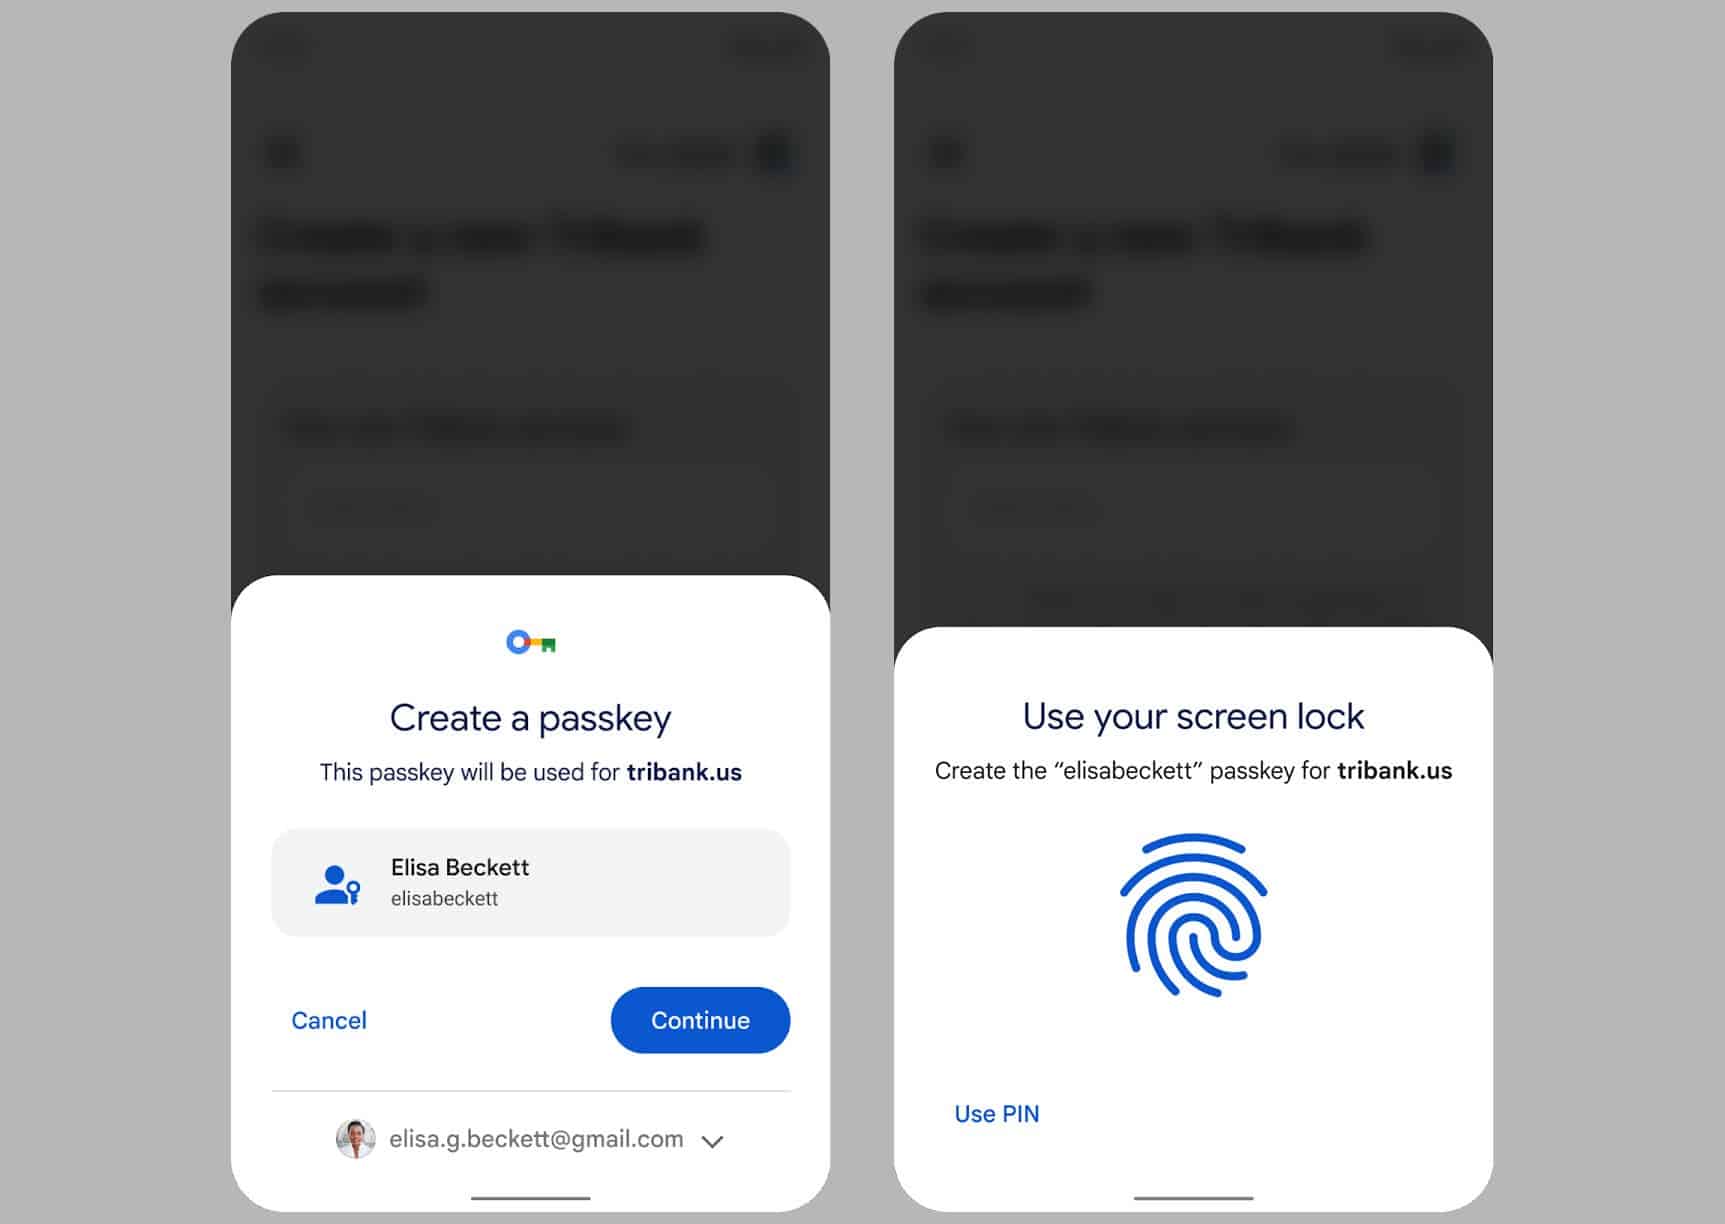
If you’ve been keeping up with tech news, you might know that passkeys are now available to help you keep your Google account safe. Passkeys are said to be a safer option than passwords. But how do they work, and how can you use them to protect your accounts? This guide is here to help you understand. Passwords can be not very safe because people often choose something easy to guess, like “password123,” or use the same password for different websites. This means if one account is hacked, many others could be at risk. Passkeys, on the other hand, use your unique biometric data, such as your fingerprint or picture, to protect your logins. This makes it much more difficult for unauthorized access.
For instance, since there’s no password to steal, phishing attempts become useless. Plus, you don’t have to remember a complex password, reducing the risk of compromising your security with an insecure choice. Don’t worry about facing a complicated process to create your first Google passkey. The search giant has made it simple to get started. Just follow the steps below to secure your Google account in a few minutes.
How to Create a Google Passkey
To start, log in to your Google account and go to your account settings. On the left side, click on Security. Scroll down to the “How you sign in to Google” section, and then select Passkeys.
Next, click on “Create a passkey” on the following page.
You might see a prompt asking you to let your web browser access your system’s passkeys. If that happens, follow the on-screen instructions to allow it.
Now, choose whether you want your device or your browser to store the passkey.
After making your choice, a prompt will appear asking you to enter your biometric data.
If you’re using a MacBook, it could be a Touch ID request for your fingerprint. On an iPhone or Android device, it might be a request for Face ID or Android facial recognition. Simply use your fingerprint reader or facial recognition camera, and your passkey will be created. If it’s successful, you’ll see a pop-up window titled “Passkey created.”
Gizchina News of the week
From now on, when you log in to your Google account, the default option will be to use a passkey instead of a password. To view all your created passkeys, go to Security > Passkeys in your Google account settings. Here, you can name each passkey or delete them if you want.
How to Remove Passkey as Default Log-in
Passkeys are indeed more secure than passwords, but for various reasons, you might still prefer to use a password as the default sign-in method. If you prefer using a password as the default sign-in method, go to your Google account settings page and click on Security in the left-hand sidebar. Scroll down until you find “Skip password when possible.” Click on it, then turn off the toggle on the next page.
Conclusion
Passkeys offer a more secure way to sign in to your Google account compared to using a password and setting them up is fast and simple. There aren’t many reasons to disable them, as they can save you from the trouble of remembering multiple complex passwords and reduce the risk of using the same password repeatedly.
Many websites are adopting passkeys, and in the future, they might replace passwords altogether. Hopefully, this shift will contribute to keeping your accounts and logins more secure in the long term.
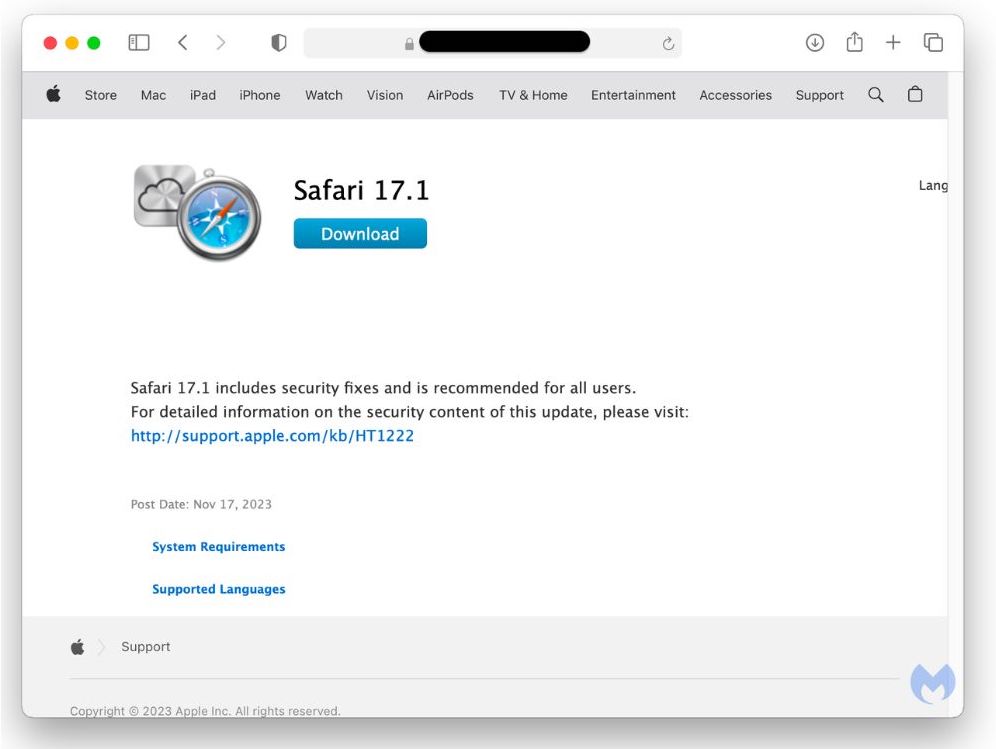
First spotted in early 2023, a potent malware called Atomic macOS Stealer (AMOS) has become a growing threat. It’s a powerful piece of malware that targets Apple users and tricks them into installing the software on their machines. Once installed, it can steal iCloud Keychain passwords, credit card information, files, and more. And now, in the latest iteration, AMOS is being delivered to Mac users via fake Safari and Chrome updates.
How AMOS Malware is injected into Macs
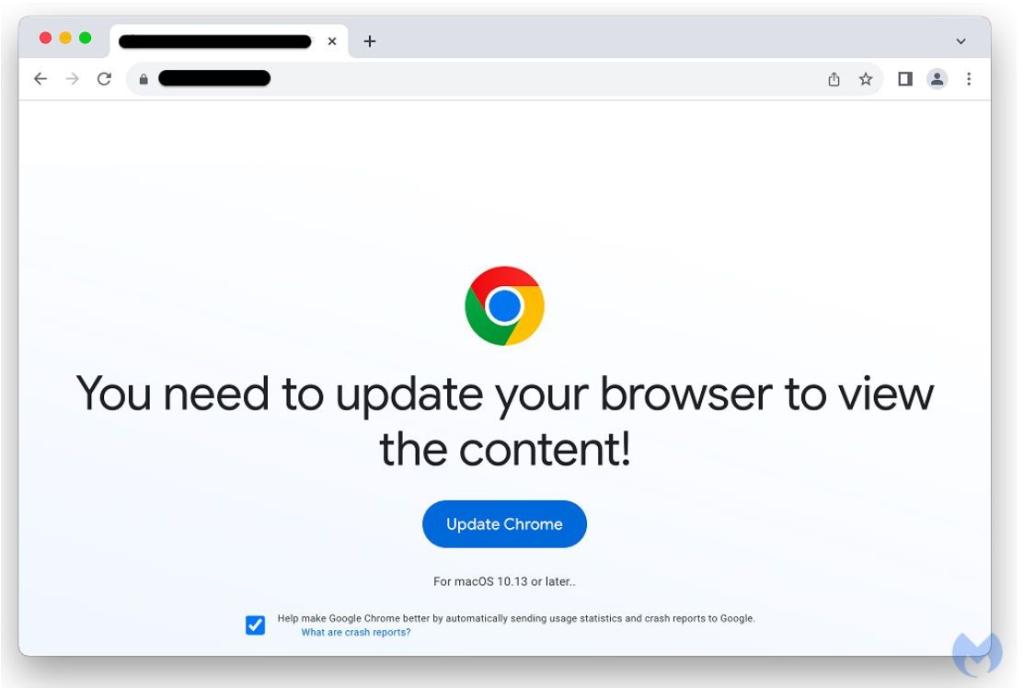
The early signs of AMOS threats were reported in March and April. In September, the security researchers at Malwarebytes discovered that Mac users were tricked into installing AMOS via fake Google Search Ads. Now, Malwarebytes reports that AMOS is injected into Macs using compromised websites to deliver fake Safari and Chrome updates. This fake browser update chain is labeled as “ClearFake”, and was previously seen against Windows as well. Let’s see how to spot fake updates and avoid the AMOS threat on Macs.
Fake Safari and Chrome Updates
Here’s a fake Safari update that mimics the official website. It’s quite easy for Apple users to spot it as there are outdated Safari and iCloud icons. However, if someone is new to the Apple ecosystem, it’s easier for them to fall for this. So, beware.
Below is a more convincing Google Chrome update template that closely resembles the authentic one.
Recommended Articles
How to Fix “macOS cannot verify that this app is free from malware” Error
Vikhyat Rishi
Oct 10, 2023
How to avoid AMOS Malware on Macs
While the AMOS malware is a threat, the good news is that it is totally avoidable. Here’s how:
First, never download any software updates from unknown or untrusted sources. Rather, make sure to only update Safari directly in your Mac’s System Settings. For Chrome, only rely on the Chrome app or Google’s official website.
If an app asks you to bypass macOS Gatekeeper protections, be very cautious and simply skip that app.
If you’re using a new website, check when it was created, and don’t trust any random pop-ups, ads, or download triggers.
Securing your Android device with a lock screen is essential for privacy, but what happens when you forget the password or pattern? In this guide, we will explore four proven methods to unlock Android phone pattern lock without factory reset. Whether you’ve forgotten your password, PIN, pattern, or fingerprint ID, we’ve got you covered.
Can You Bypass Android Lock Screen without Factory Reset?
Many users dread factory resets as they erase all data on the device. The good news is, you can indeed bypass the Android lock screen without resorting to this drastic measure. Let’s delve into the methods that allow you to regain access to your device without losing valuable data and how to bypass Android lock screen.
How to Bypass Android Lock Screen when You Forgot Password
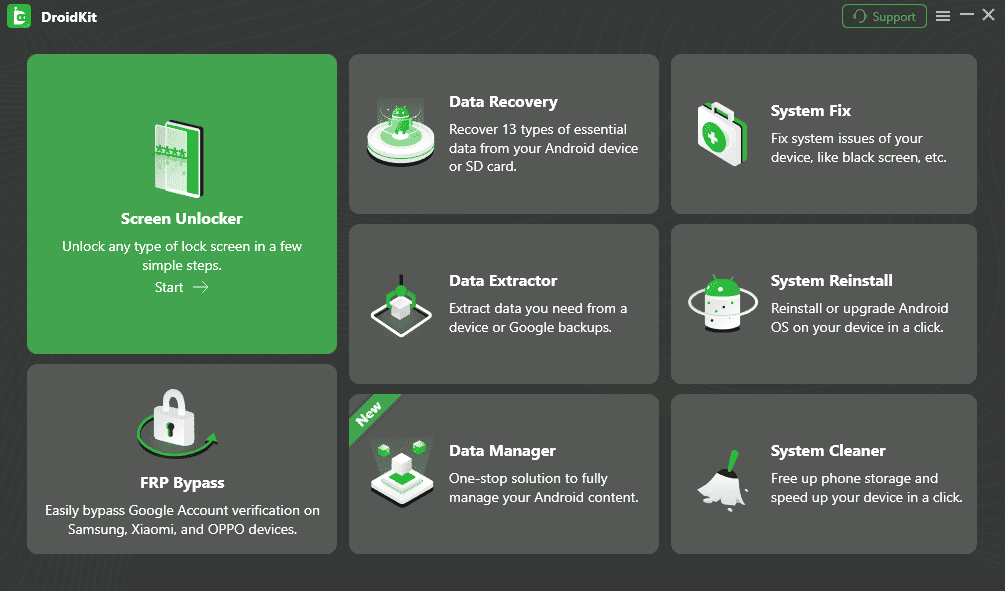
DroidKit’s Screen Unlocker is a powerful tool designed to effortlessly remove screen locks on a wide range of Android devices. Supporting up to 20,000+ models, including popular brands like Samsung, Xiaomi, and Huawei, DroidKit ensures a hassle-free unlocking experience. The tool can handle various types of locks, such as digital numbers, custom PINs, passwords, patterns, fingerprint IDs, and even face recognition. What’s more, there’s no need to root your device or possess advanced technical skills. The process is simple: Connect the device, put it in recovery mode, and with just one click, DroidKit removes the lock, as shown in the guide below.
Step 1. Connect Your Android Device to Computer with a USB Cable
Download and install DroidKit on your computer. Connect your Android device to computer with a USB cable. Then, launch DroidKit on your computer and choose “Screen Unlocker” mode. And you will see the interface below. Click “Start” button, then, choose Device Connected button.
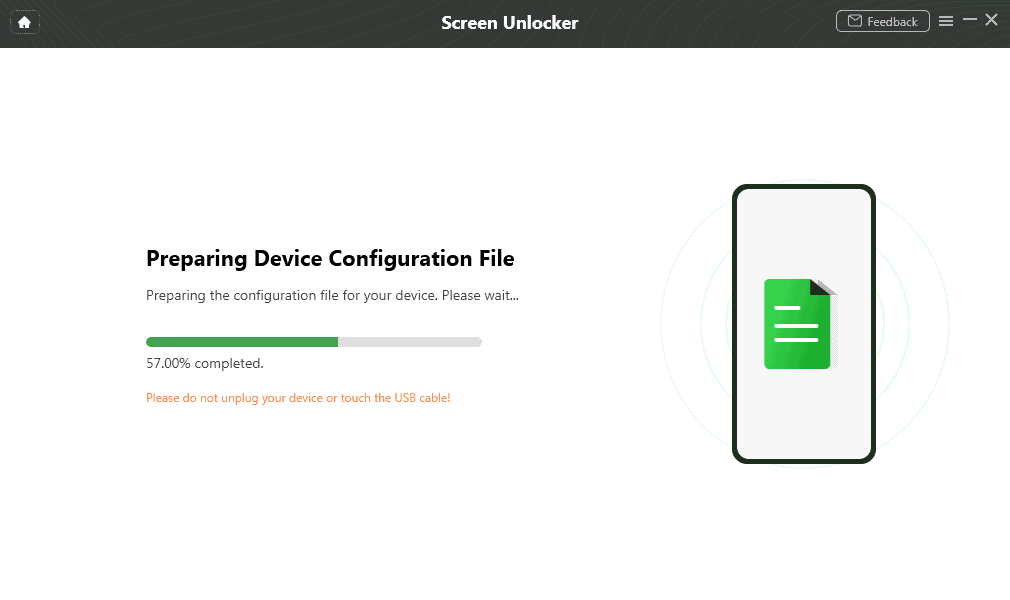
Step 2. Prepare Device Configuration File
Then, it will start preparing the configuration file for your device. Once the preparing process is completed, the below interface will be displayed.
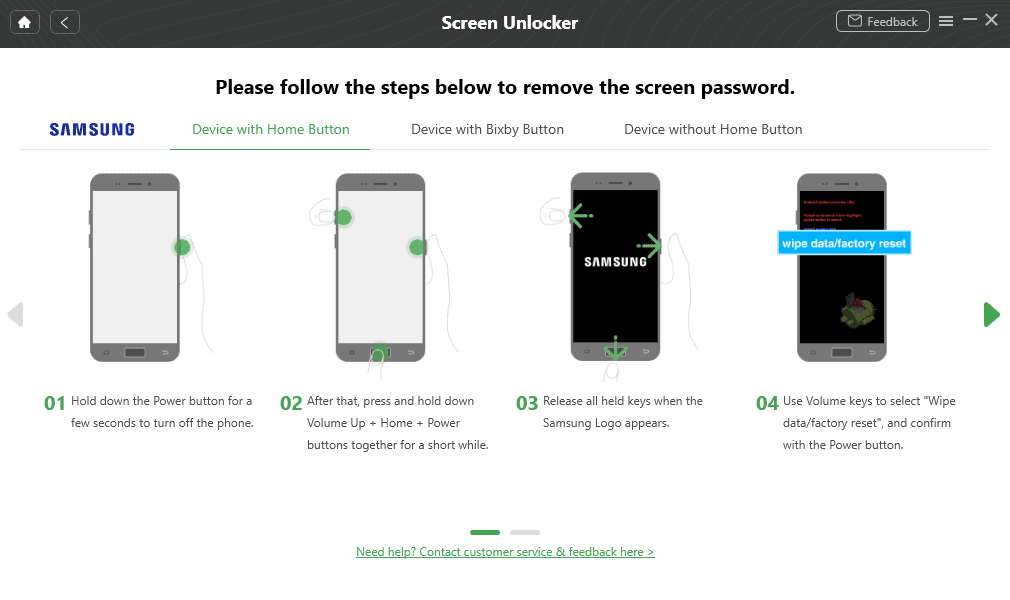
Step 3. Put Your Device in Recovery Mode
Follow the instructions of DroidKit interface to put your device in Recovery Mode based on device with/without home button/with Bixby button, and Wipe Cache partition on your device.
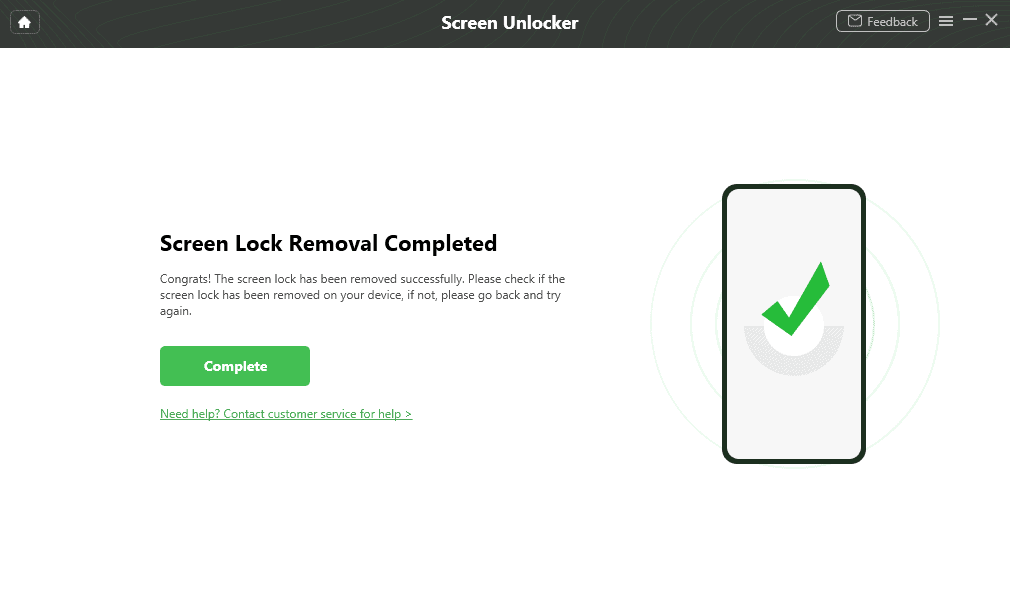
Step 4. Remove Android Screen Lock
After completing Wipe Cache Partition, it will start to remove Android screen lock. It will take some time. After the removal process completes, your device will be started. And you can access your Android device without entering any password and view all your data on the device with no limits.
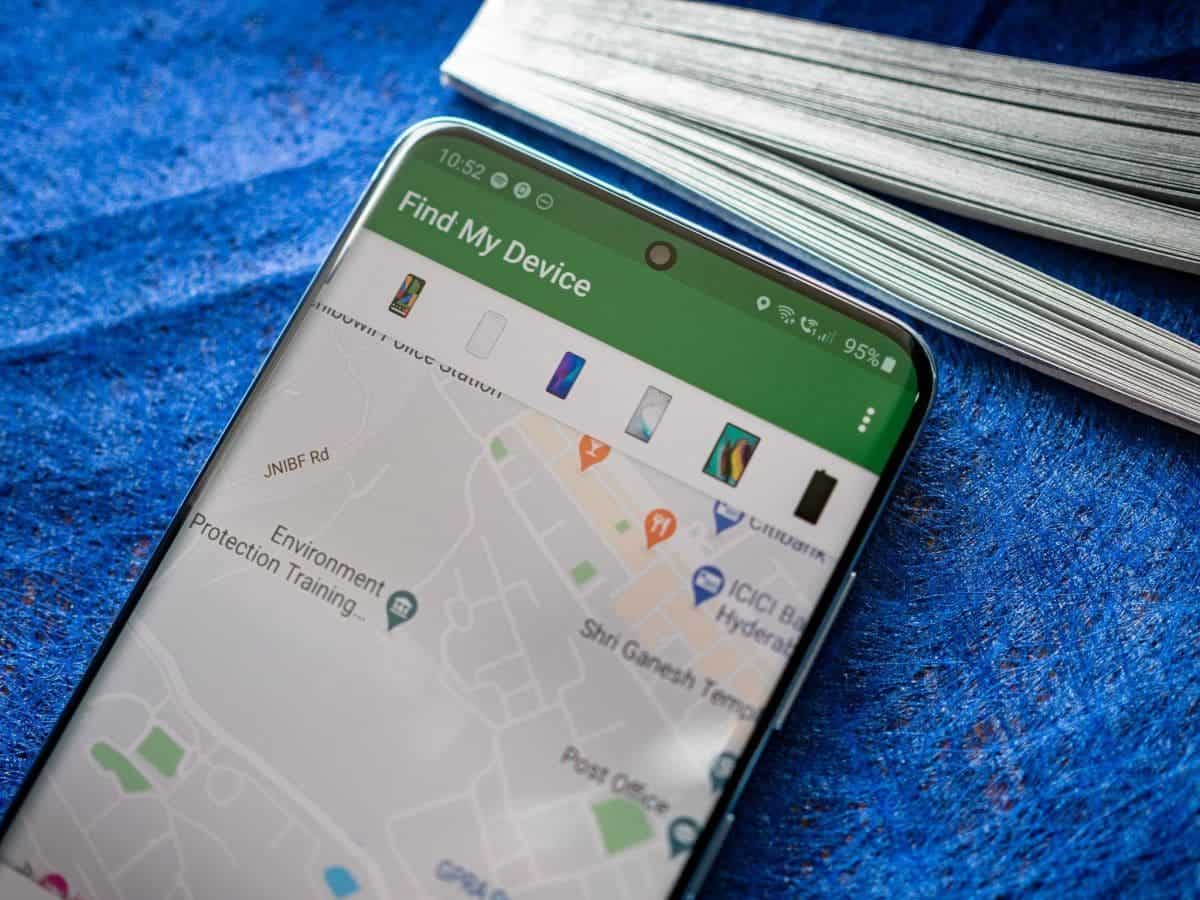
How to Bypass Android Lock Screen without Reset via Find My Device:
Image Source: AndroidCentral
For those who prefer an official solution, Google’s Find My Device offers a method to remotely lock or erase your device. This can be handy if you’ve misplaced your device and want to ensure your data’s security while having the option to unlock it once you retrieve it.
Here are the steps to bypass Android lock screen without reset via Find My Device:
Ensure Find My Device is enabled:
Go to your device’s settings.
Select “Security & location” or “Google” and then “Security.”
Look for “Find My Device” and make sure it’s turned on.
Access Find My Device:
Visit the Find My Device website on a computer or use the Find My Device app on another Android device.
Sign in with your Google account:
Use the Google account associated with the locked device.
Locate your device:
Once signed in, the service should attempt to locate your device on a map.
Remove the lockscreen:
You have options to secure your device, such as locking the screen, playing a sound, displaying a message, or unlocking the lock screen.
How to Unlock Android Phone Pattern Lock without Factory Reset:
Gizchina News of the week
If you’re using an Android device running version 4.4 or earlier, you can use the “Forgot Pattern” option to unlock your phone without a factory reset. This method allows you to retain your data while regaining access to your device. But, it works only for the old version of the Android operating system.
If you’re using an Android device running version 4.4, the “Forgot Pattern” feature should still be available to help you unlock your device without a factory reset. Here’s how to use it:
Enter an incorrect pattern multiple times until you see the “Forgot Pattern” prompt appear.
Tap on the “Forgot Pattern” option.
You will be presented with two options:
a. Google Account: If you have linked your Google account to your device, you can use this option to unlock your phone. Enter your Google account credentials, and your phone will be unlocked.
b. Backup PIN: If you had set up a backup PIN when you first created your pattern lock, you can use this option to unlock your phone. Enter your backup PIN, and your phone will be unlocked.
How to Unlock Android Phone without Password via ADB:
Advanced users can use Android Debug Bridge (ADB) to unlock their devices without a password. This method requires a computer, USB cable, and a basic understanding of command-line operations. While it’s a bit more technical, it provides an alternative for users comfortable with command-line interfaces.
To unlock an Android phone without a password using ADB, follow these steps:
Enable USB debugging on your Android device.
Install ADB on your computer.
Connect your Android device to your computer using a USB cable.
Open a command prompt or terminal window on your computer.
Verify that your device is properly connected by entering the following command in the command prompt:
Unlock the device by entering the following command in the command prompt:
adb shell input keyevent 82
Unlock the screen by entering the following command in the command prompt:
adb shell input keyevent 82
Access the home screen by entering the following command in the command prompt:
adb shell input keyevent 3
Perform a factory reset on your device (optional) by entering the following command in the command prompt:
Conclusion
In conclusion, forgetting your Android lock screen password doesn’t have to be a nightmare. In addition to the official Find My Device method and the Android 4.4 “Forgot Pattern” option, advanced tools like DroidKit’s Screen Unlocker offer a user-friendly and efficient way to bypass the lock screen without compromising your data. DroidKit, as a comprehensive Android toolkit, goes beyond screen unlocking and can assist users in various scenarios, including data recovery, FRP bypass, and system issue fixes. Regain control of your Android device without the fear of data loss with these proven methods.
The very tectonic plates of the AI industry have shifted drastically in the last few days. Sam Altman was pushed out of OpenAI, and the biggest investor of OpenAI (Microsoft) ended up announcing that it would be hiring him. Satya Nadella, CEO of Microsoft, was aspirational in having a new AI research team led by Sam Altman. However, these plans are no longer in place.
Today, the X (formerly Twitter) handle of OpenAI has announced that Sam Altman is returning to OpenAI as CEO. Essentially, everything is back together how it was – with one exception: the board will be changing.
We have reached an agreement in principle for Sam Altman to return to OpenAI as CEO with a new initial board of Bret Taylor (Chair), Larry Summers, and Adam D’Angelo.
We are collaborating to figure out the details. Thank you so much for your patience through this.— OpenAI (@OpenAI) November 22, 2023
A new initial board comprising two new members, Larry Summers (former US Secretary of the Treasury) and Bret Taylor (former CEO of Salesforce), will be coming into effect. Adam D’Angelo (CEO and co-founder of Quora) retains his position as a board member at OpenAI.
It is essential to highlight that the OpenAI board exists to serve a highly specific objective – which is not to prioritize the monetary profits of OpenAI shareholders but to focus on thecore belief and vision of OpenAI.
Source: openai.com/about
Recommended Articles
Sam Altman Not Coming Back as OpenAI CEO; New Interim CEO Appointed
Satyam Kumar
Nov 20, 2023
OpenAI Fires Sam Altman as CEO; Cites Lack of Candor
Upanishad Sharma
Nov 18, 2023
Sam Altman Was About to Join Microsoft – How Is Nadella Reacting to OpenAI CEO Coming Back?
Microsoft is a major investor & partner of OpenAI (Image Courtesy: DevDay Conference 2023)
All these prominent leaders in tech did not want innovation in the field of AI to stop. There were interviews conducted over the last few days, and there were many things said on social media platforms too. Satya Nadella (CEO of Microsoft) continually assured the tech industry that Microsoft’s main objective here is that innovation of AI has to move forward.
Even as the situation was intensifying, Satya Nadella stated he was ready to keep partnering with OpenAI. He also said that he would partner with Sam Altman, Greg Brockman, and other employees who might have left. Microsoft wanted to keep working towards AI development, no matter how that configuration was going to be structured.
Overall, Microsoft is positive about Sam Altman’s return as CEO. Nadella spoke directly on X about the management. Sam Altman continues to be thankful for Nadella’s support. It is unclear whether Emmett Shear (interim CEO of OpenAI) is retaining any position within the company.
We are encouraged by the changes to the OpenAI board. We believe this is a first essential step on a path to more stable, well-informed, and effective governance. Sam, Greg, and I have talked and agreed they have a key role to play along with the OAI leadership team in ensuring… Satya Nadella (@satyanadella) November 22, 2023
Beebom’s Take: Homecoming?
It has been a rocky situation at OpenAI. Despite losses, things look good as far as the growth in artificial intelligence is concerned. There have been leadership changes and reversals, too.
When Sam Altman left, it took less than two days for almost everyone at the OpenAI HQ (reportedly 700 out of 770 employees) to align with him. Co-founder George Brockman and OpenAI Chief Scientist Illya Sutskever too, signed a memo signifying their support for Altman. It was truly a rollercoaster ride for everyone involved.
The unity in OpenAI’s team was clear – and if something wrong had happened, it looked like most of them were going to work together anyway. Now that OpenAI’s CEO is back, a new board will be set up to address the company’s needs. It is a historical moment that will be etched in our memories forever as artificial intelligence moves forward. There is finally hope for the company to move forward in a manner that is stronger than ever before!
Do you think OpenAI will continue to innovate and surprise us all with the planned innovations Sam Altman had talked about during the first DevDay conference? Let us know your thoughts on Sam Altman’s return as CEO in the comments below!
The time has finally come when you can get a super light and performance-focused wireless gaming mouse without breaking the bank. Shortly after debuting the M2 Mini, Keychron has debuted the M3 Mini Metal Edition.
While the M2 Mini was already light in weight, the Keychron M3 Mini Metal Edition comes with a metal body. But even with this choice of material, Keychron has managed to keep the body lightweight, weighing in at just 64 grams. However, it’s not just the body that makes the unit a great pick as a wireless gaming mouse. It packs performance-focused specs too.
Key Highlights of the Keychron M3 Mini Metal Edition
The build and the design of the M3 Mini Metal Edition are among the biggest highlights of this wireless gaming mouse. It’s made of magnesium alloy with holes in the shell, which gives it a sleek, futuristic, and gamer-focused look.
Gizchina News of the week
Under the hood, the M3 Mini Metal Edition comes with the PixArt 3395 sensor. It’s known for delivering high precision and accurate tracking. Moreover, it offers a wide DPI range, from 100 to 26000, making the mouse suitable for gaming and work. And thanks to the high polling rate of 4000Hz in the 2.4G wireless mode, it ensures responsive and smooth cursor movement.
Regarding the buttons, the Keychron M3 Mini Metal Edition features Huano 80M micro switches. This gaming-focused mouse switch is best known for offering a satisfying click and enhanced durability. On the note of buttons, the wireless gaming mouse has dedicated switches for changing the polling rate and DPI on the fly.
In terms of connectivity, the M3 Mini Metal Edition can work in three modes: Bluetooth 5.1, wired USB-C, and 2.4G. For the 2.4G mode, you need to use the bundled 4K wireless receiver. As for the battery, the wireless gaming mouse features a large 600mAH cell, which can offer up to 135 hours of run time.
When it comes to pricing, the Keychron M3 Mini Metal Edition is available for US$99. That is a pretty reasonable price, especially when you consider the price tags of other high-end gaming mice.
There are times when your Chromebook screen refuses to turn on. While on the surface, it might look like a hardware issue, some software problems might cause the screen to go blank. So, in this article, we bring you an instructive tutorial on how to fix a Chromebook showing a black screen. From brightness issues to damaged ChromeOS partitions, we have covered everything in this guide.
1. Increase the Brightness Manually
This is a preliminary check before we move to other solutions. Unlike other desktop operating systems, ChromeOS allows you to completely turn off the screen by decreasing the brightness all the way down. It might give the impression that the screen has malfunctioned, but that’s usually not the case.
On your Chromebook keyboard, keep pressing the increasebrightness button on the top row. It should light up the display on your Chromebook. In case that doesn’t work, move to the next method.
2. Connect Chromebook to a Power Source
Often, due to prolonged usage, Chromebooks don’t function on the battery alone and the screen goes black. So connect your Chromebook to a power source, and turn on the device. See if a white light blinks near the power connector. If that’s the case, your Chromebook should turn on after some time. I would also suggest pressing the increase brightness button to rule out any brightness issues.
In case, an orange indicator blinks, it means the battery is completely exhausted and you need to connect the Chromebook to a power outlet and wait for some time. Now, press the power button and check if the black screen on your Chromebook has been fixed or not. Also, try a different charger if your Chromebook doesn’t respond at all (no light blinking) after connecting the charger to the power source.
3. Hard Reset Your Chromebook
After ruling out brightness and power issues, if your Chromebook still shows a black screen, you can try the hard reset option. That said, keep in mind, that it will wipe out all your local data and remove your Google account. Here are the steps to follow.
Disconnect the power cable and remove all connected devices such as USB peripherals.
Make sure no light is blinking, and your Chromebook is completely powered off.
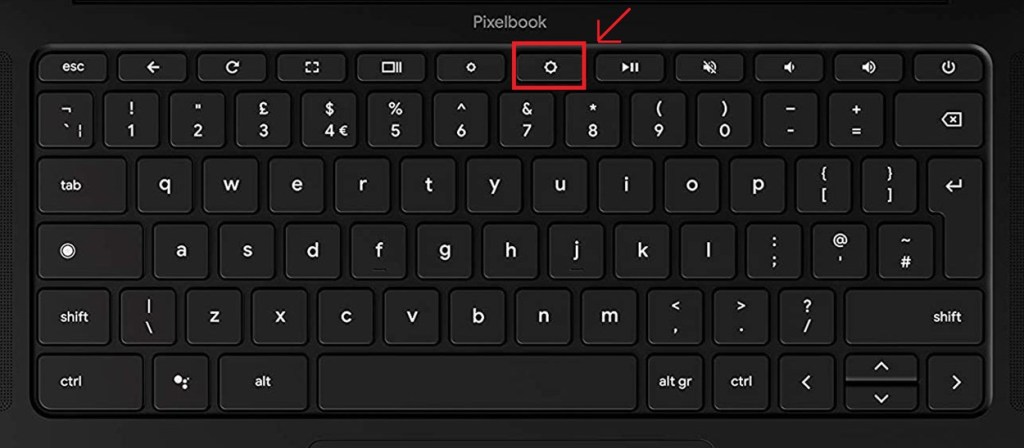
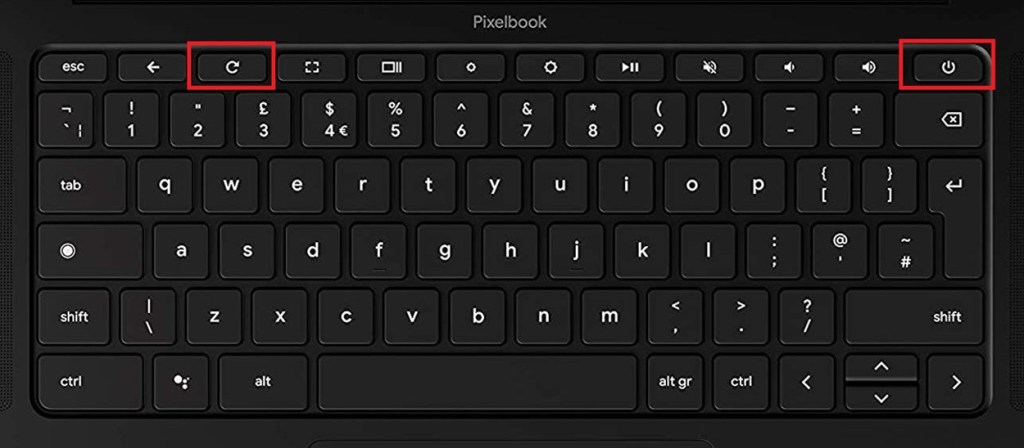
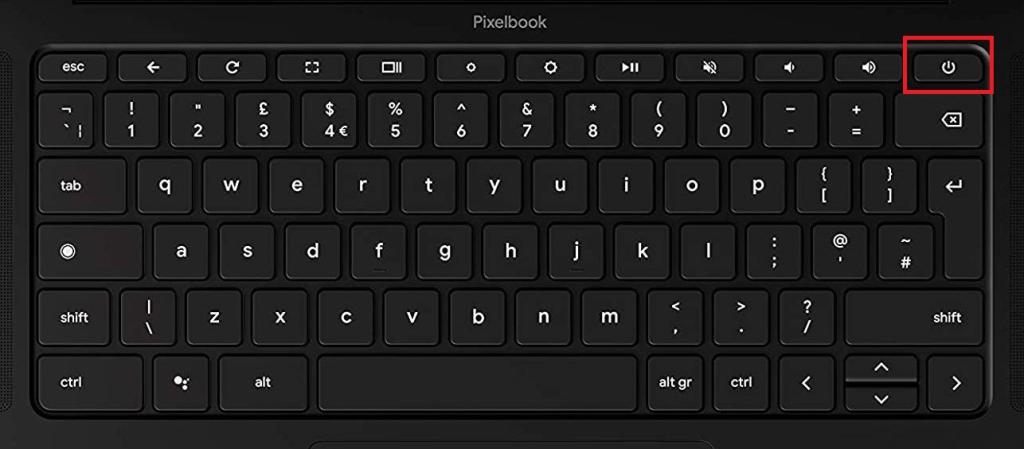
Now, press and hold the Refresh key and the Power button simultaneously in the top row.
Note: In case your Chromebook is not booting, connect it to a power source and then press the above key combination at once. If the screen still doesn’t turn on then press “Esc” with the other two keys.
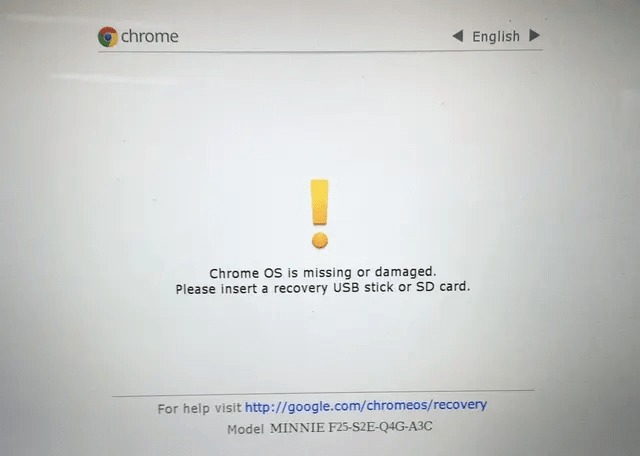
The screen should turn on now which rules out hardware issues. Once the screen lights up and shows “Chrome OS missing or damaged,” you can release all the keys.
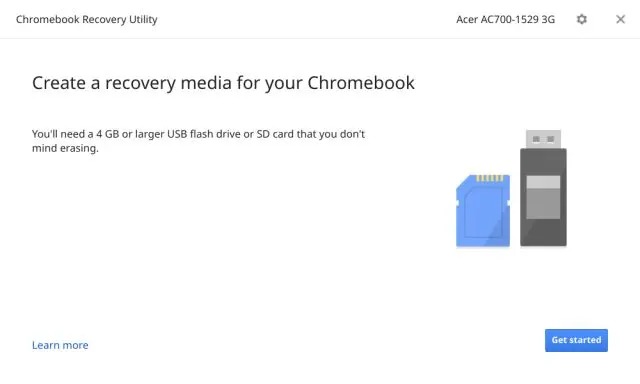
Next, you need to create a recovery utility on a USB thumb drive on another Chromebook. You can follow our guide to install a fresh copy of ChromeOS and find detailed instructions.
4. Force Shut Down Chromebook
If the above method didn’t fix the blank screen issue on your Chromebook, go ahead and force shut down your Chromebook. Here is how to do it.
Disconnect all the USB peripherals and the power cable from your Chromebook.
Now, press and hold the power button for 10 seconds. After powering off, no light indicator should blink.
Next, close the lid and wait for three to five seconds.
Now, simply open the lid of your Chromebook and wait for 10 seconds. The screen should turn on right away.
If the screen is still blank, press and hold the power button for 10 seconds and check if the display turns on. If not, you should try using the hardware recovery button found on some older Chromebooks.
5. Press the Hardware Recovery Button
Image Courtesy: chromium.org
Some older Samsung Chromebooks come with a dedicated hardware recovery button on the back. If you have an old Samsung Chromebook and it is showing a black screen, you can try pressing the recovery button. The hardware reset key can generally be found on the back of the Chromebook.
Google has even shared an official list of ChromeOS devices that come with a hardware recovery button and the instructions to trigger it. So head over to the reference article and follow the steps.
These are the five simple ways you can fix the black screen issue on your Chromebook. If none of the methods resolved the problem for you, it’s likely your Chromebook’s screen has malfunctioned. You should get it checked at a service center. Anyway, that is all from us. If you are looking to find a way to factory reset your Chromebook, you can follow our detailed tutorial. Finally, if you have any questions, let us know in the comments below.
Google announced a series of functional updates to the Google Maps App on Android and iOS platforms. These updates mainly improve the “rail transit route suggestions” and group functions. The Maps now accurately display the entrance and exit information of rail transit stations. It claims to be able to “ensure that users will not get off at the wrong exit or board the wrong train.”
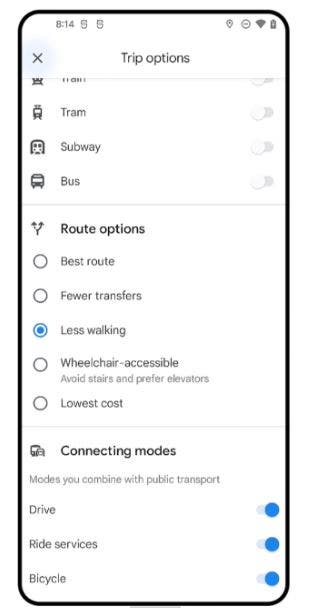
Google Maps is introducing improvements to its public transit routing system, including clearer station entrances and exits in 80 cities. The navigation interface on Google Maps will have more visible options to customize routes based on preferences and transportation modes. Also, Google Maps is adding emoji reactions to collaborative lists and user-generated content, allowing for easier voting and expression of preferences. The changes are rolling out over the next few weeks to Android and iOS.
Google Maps has improved its algorithm for public transportation travel, providing users with the best route based on estimated arrival time, travel time, and number of transfers. Users can also filter transportation types in the app and select designated public transportation. These improvements are part of Google’s effort to make navigating big cities and stations easier and more accurate.
New Rail Station Entrance and Exit Signs on Google Maps
Google Maps has recently introduced updates to its public transit routing system, including clearer station entrances and exits in 80 cities. This enhancement aims to provide detailed station entrance and exit information to help travellers avoid getting on the wrong train. The new feature will likely make travelling via public transport much easier. This is because it will recognize fewer transfers and will guide users to the correct station entrance.
This update is coming after Google improved the algorithm for “public transportation” travel. The map can now give the best route based on “estimated arrival time, travel time and number of transfers”. Users can also filter transportation types in the app and select designated public transportation.
Google Maps uses algorithms to determine the best route based on factors like distance, time, traffic, and mode of transportation. It can provide directions for driving, walking, biking, or using public transportation. To predict what traffic will look like in the near future, Google Maps analyzes historical traffic patterns for roads over time. Google Maps also uses machine learning and geospatial data analysis to extract useful information from the raw data collected by satellites and street view cameras.
Gizchina News of the week
Google Maps has been working on expanding full public transportation support to more locations. It now generates step-by-step guidance along with timing information to provide users with accurate estimates for their ETAs. The app also lets drivers return to the previous model that provides the fastest route to a destination. By default, Google Maps generates the most fuel-efficient alternative for everybody.
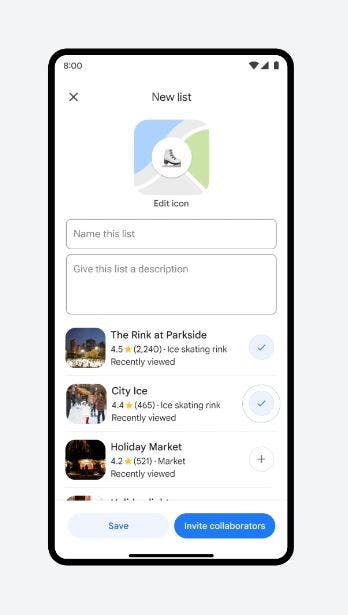
Group Voting Function Added
In addition to the new rail station entrance and exit signs, Google Maps has also added a group voting function to enhance collaborative trip planning. This feature allows users to create shareable lists when sending locations to friends. This allows all trip members to add and vote on places using emoji reactions. According to Amanda Leicht Moore, Director of Product at Google Maps, this update aims to “take planning out of the group chat and keep it in one helpful place.” The updated lists will be rolled out globally over the next few weeks, making group trip planning more convenient and interactive.
Users who create groups in Google Maps can now provide lists in the group so that each member can vote for the places they most want to visit. This makes it easier for the gathering to take place. Users can choose to react with default emojis or create their own hybrid emojis using AI and Emoji Workshop.
These updates are part of Google Maps’ efforts to improve transit navigation, trip planning, and community engagement. The new tools not only provide smarter recommendations for transit routes but also offer a seamless way for users to plan and decide on destinations collectively. With these updates, Google Maps continues to evolve as a comprehensive travel and navigation tool, catering to the diverse needs of its users.
Final Words
The new update from Google aims to improve the accuracy of information during travel. It also offers the best route and estimate of arrival time, travel time, and number of transfers. With the new update, users can check the available transport type and select the one they need. There is also a new feature for group travellers which helps to share locations and vote on it. The voting is done with emojis and the feature is rolling out globally in a few weeks. On the side, Google adds a new colour scheme to all versions of the Map app. The new colour scheme has been rolled out on both desktop and mobile versions of the Google Maps app.
Users can now add Google Maps widgets to their iOS devices to check arrival time and traffic updates for frequent trips like home and work. In the past, Google Maps did not show the actual locations of subway entrances, but the recent updates aim to address this issue by showing the exact location of exits and entrances, including which side of the street they’re on and clear routes to and from them. This improvement is part of Google’s effort to make navigating big cities and stations easier and more accurate.
In general, the addition of new entrances to metro stations can create new, easier, and sometimes even safer ways to get into a station, cutting down on walking time and improving accessibility.
MediaTek held a press conference in Beijing today and officially launched the new Dimensity 8300 mobile chip. This new mobile SoC is positioned as a “low-end” flagship processor. As a new member of the Dimensity 8000 series family, the Dimensity 8300 has advanced generative AI technology. It also comes with high energy efficiency features such as a decent gaming performance as well as a high-speed and stable network connection.
In its blogpost, MediaTek said
“With MediaTek’s optimized Dimensity 8000 series, consumers don’t have to pick and choose between accessibility and premier experiences like flagship-grade memory or accelerated AI capabilities—they can have it all,” said Dr. Yenchi Lee, Deputy General Manager of MediaTek’s Wireless Communications Business Unit. “The Dimensity 8300 unlocks new possibilities for the premium smartphone segment, offering users in-hand AI, hyper-realistic entertainment opportunities, and seamless connectivity without sacrificing efficiency.”
The Dimensity 8300 is also equipped with MediaTek’s new generation “Star Speed Engine”. Through a unique performance algorithm, it can perform real-time resource scheduling based on application performance requirements and device temperature information. This allows users to enjoy high frame stabilization, low power consumption and long battery life. In essence, the gaming and usage experience of the chip is pretty decent. According to MediaTek, the Star Speed Engine not only cooperates extensively with game apps but also expands ecological cooperation with more types of apps and upgrades users’ app experience.
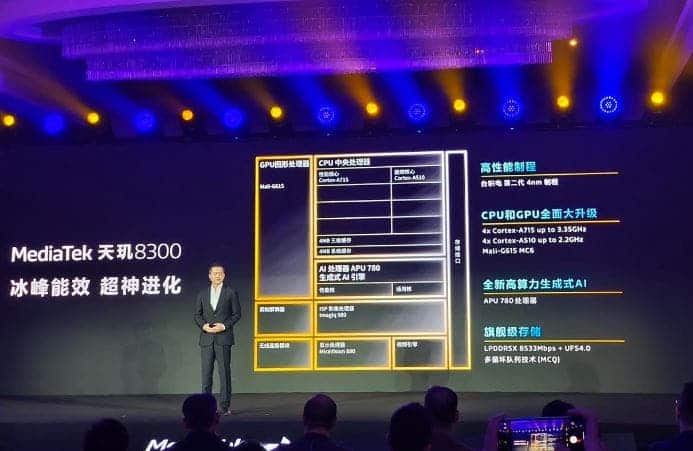
MediaTek Dimensity 8300 Details
CPU Performance
The Dimensity 8300 features an octa-core CPU with 4X Arm Cortex-A715 and 4X Cortex-A510, offering faster apps and superior experiences. According to MediaTek, the chipset boasts 20% faster CPU performance and 30% peak gains in power efficiency compared to its predecessor.
Dimensity 8300 uses TSMC’s second-generation 4nm process and is based on Armv9 CPU architecture. The eight-core CPU includes 4 Cortex-A715 performance cores with a maximum frequency of 3.35GHz and 4 Cortex-A510 energy efficiency cores with a maximum frequency of 2.2GHz.
In addition, Dimensity 8300 also supports flagship LPDDR5X 8533Mbps memory. This chip also comes with a UFS 4.0 flash memory and multi-circular queue technology (Multi-Circular Queue, MCQ). The memory transfer rate is increased by 33% compared with the previous generation. Also, the company said that the flash memory read and write rate is increased by 100%.
GPU Performance
While the CPU details of this new chip are pretty impressive, its GPU specs are not left out. This chip comes with a 6-core Mali-G615 GPU. The peak performance of the GPU is increased by 60% compared with the previous generation. Also, the company said that the power consumption is 55% better than the previous generation. Dimensity 8300 supports excellent memory and flash memory specifications. It offers users with a silky and smooth experience in games, daily applications, imaging and other scenarios.
Gizchina News of the week
Generative AI Capabilities
Dimensity 8300 is the first in its class to support generative AI. In fact, one of the standout features of the Dimensity 8300 is its full generative AI support. This is made possible by the APU 780 AI processor integrated into the chipset. It enables the Dimensity 8300 to provide support for innovative apps that leverage large language models (LLMs) up to 10 billion parameters.
With the integrated generative AI engine, this chip suits the current trend in the industry. The performance of integer operations and floating point operations is 2 times that of the previous generation. It supports transformer operator acceleration and mixed precision INT4 quantization technology. The overall AI performance is 3.3 times faster than that of the previous generation. It can also smoothly run innovative applications of terminal-side generative AI.
Image
Dimensity 8300 supports a 14-bit HDR-ISP Imagiq 980 image processor. This improves the terminal’s computational photography performance and upgrades the photo and video recording experience. Not only can users easily record clearer and sharper 4K60 HDR videos, they can also get longer battery life.
5G Modem
MediaTek Dimensity 8300 integrates the 3GPP R16 5G modem to provide a faster and more stable 5G network experience. Dimensity 8300 is optimized for specific scenarios to achieve smoother 5G connections in weak signal network environments. It also enhances the connection performance and range of Sub-6GHz networks, supports 3 carrier aggregation, and the theoretical peak downlink rate can reach 5.17 Gbps.
Power Efficiency
The chipset is designed to deliver exceptional power efficiency in premier 5G smartphones. MediaTek claims that it has a 30% improvement in power efficiency compared to the previous generation chipset. This chip also comes with MediaTek’s 5G UltraSave 3.0+ power-saving technology. This technology can reduce 5G communication power consumption by up to 20% and ensure long-lasting 5G battery life. Its Wi-Fi 6E has enhanced performance and supports 160MHz bandwidth. With its Wi-Fi Bluetooth hyper-connection technology, the smartphone can simultaneously connect to Bluetooth headsets, wireless handles and other peripherals with lower latency.
Xiaomi Speaks about the Dimensity 8300
Lu Weibing, president of Xiaomi Group and general manager of the Redmi brand, also attended the Dimensity 8300 launch conference. At the event, he announced that the Dimensity 8300-Ultra flagship AI platform is jointly developed by Redmi and MediaTek. He also revealed that the world’s first Dimensity 8300-Ultra phone will be the Redmi K70e. This device as well as the entire Redmi K70 series will be officially released this month.
Conclusion
The MediaTek Dimensity 8300 chipset represents a significant leap forward in mobile technology, offering improved CPU and GPU performance, enhanced generative AI capabilities, and exceptional power efficiency. With these advancements, the Dimensity 8300 is poised to deliver a premium and seamless user experience in the 5G smartphone market.
Author Bio
Efe Udin is a seasoned tech writer with over seven years of experience. He covers a wide range of topics in the tech industry from industry politics to mobile phone performance. From mobile phones to tablets, Efe has also kept a keen eye on the latest advancements and trends. He provides insightful analysis and reviews to inform and educate readers.
Street Fighter 6 fans finally got to see all 18 of the incoming Outfit 3 designs in the new trailer, but players aren’t the only ones excited about them.
Professionals Caytie Cosplay and Jahara Jayde were prepared for today to show off impressive cosplays already for the new Cammy and Kimberly costumes.
Jahara’s got Kimberly’s ninja streetwear ready to smack around her opponents in style.
Her details are pretty darn spot on with the all blue hair and long red scarf, but she’s even got the smaller pieces ready to rock with her shin / elbow guards, ninja pouch and chain all ready to go — plus the ear buds to rock out while doing so.
As to how she got this cosplay together already, it seems that Capcom was impressed enough with her earlier Kimberly costume to show her this design early so that she could have it ready for this day.
Unfortunately, she’s only shared the one photo so far, but there’s probably going to be much more coming in the near future.
NEW COSPLAY
Kimberly Outfit 3 Street Fighter 6
So excited to have been asked to be an OFFICIAL #streetfighterpartner to announce Kimberlys new outfit available Dec 1st!
Since Cammy’s Outfit 3 was already revealed through the concept art, Caytie had been publicly sharing her progress on the new costume for about a month now.
Taking a look at the cosplay next to the art, we can she she basically nailed it head to toe and pieced together herself.
The long coat and boots look absolutely fantastic along with Cammy’s battle gloves, and most importantly a cat to do cute poses with.
We’ll hopefully get to see more great SF6 cosplay from Jahara and Caytie in the coming weeks and months with the actual Outfit 3 releases coming to the game on December 1.